> ## Documentation Index
> Fetch the complete documentation index at: https://help.dingtalk.io/llms.txt
> Use this file to discover all available pages before exploring further.
# DingTalk Enterprise Activation and Initialization Guide
> A complete walkthrough for new customers: choosing a plan on the website, starting a free trial, registering the admin, creating an organization, signing in to the Admin Console, and bulk-importing enterprise accounts for a POC.
This guide is for project leads and organization admins of new customers. It covers the complete flow — from choosing a plan on the website, starting a free trial, registering the admin, and creating an organization, to signing in to the Admin Console and bulk-importing enterprise accounts.
**Who this is for**: Project leads and the first organization admin responsible for driving a DingTalk enterprise POC (Proof of Concept).
## Overview
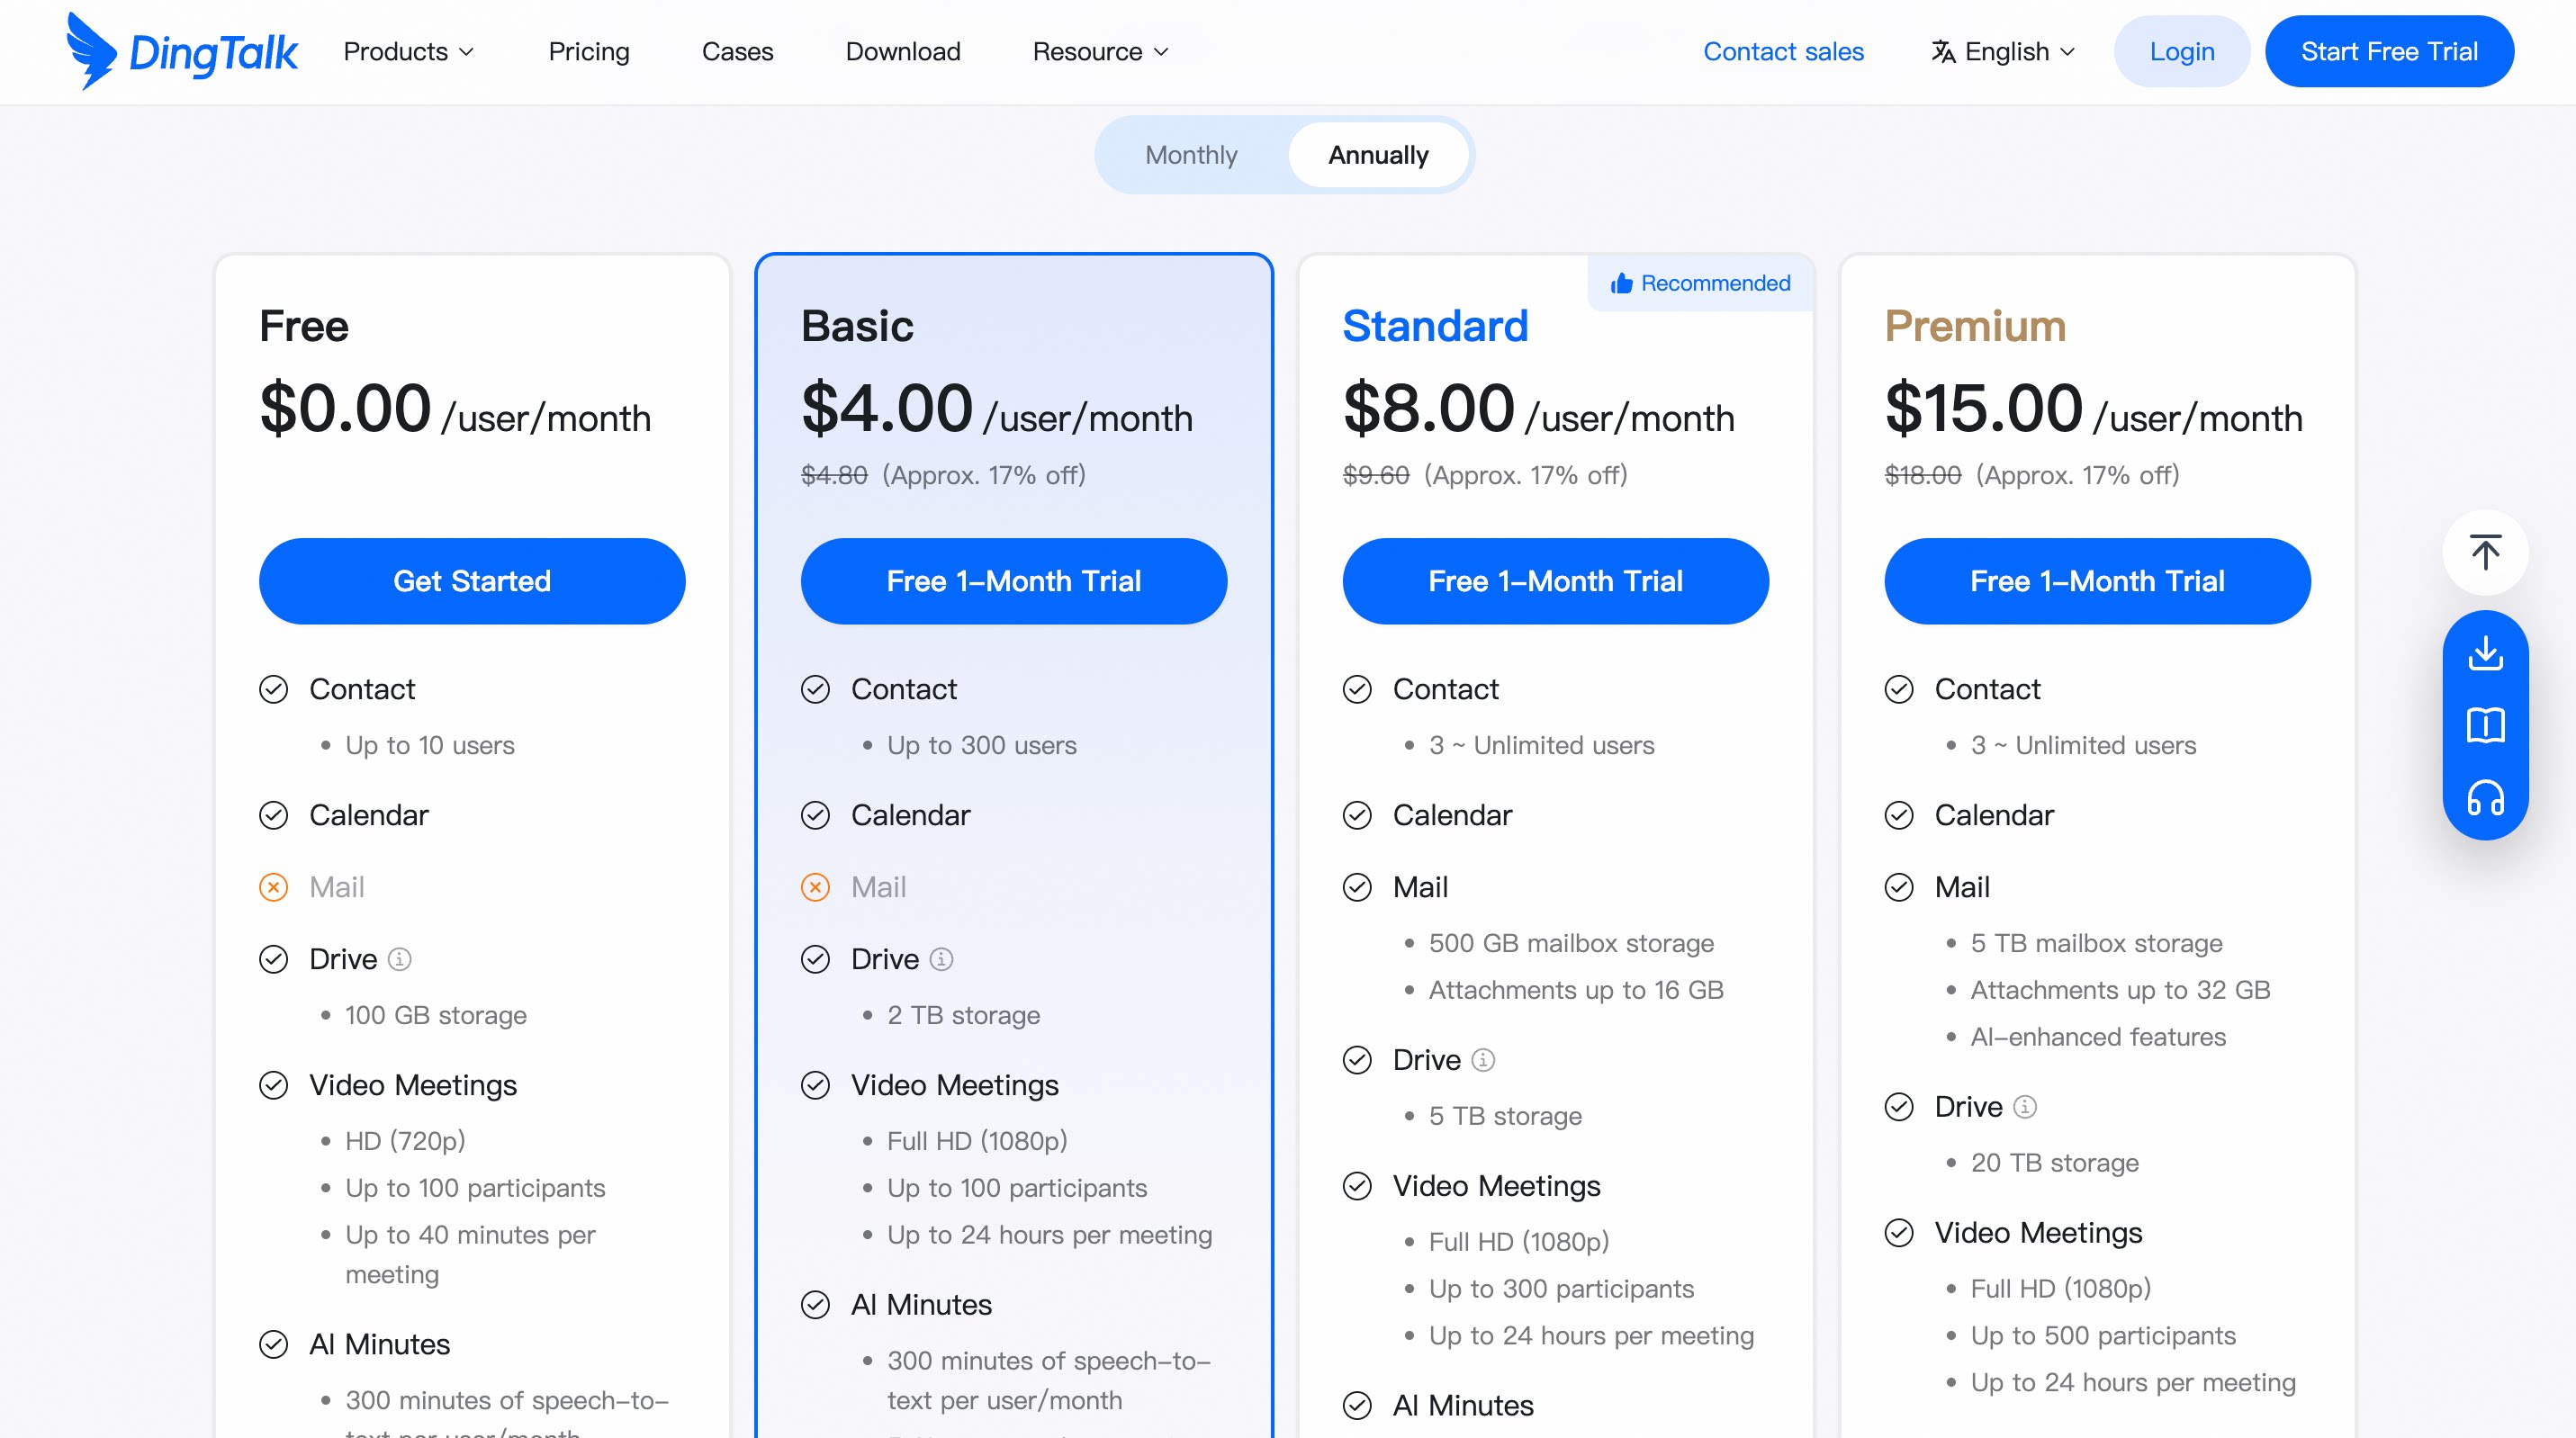
Open the DingTalk global website and compare the Free / Basic / Standard / Premium plans.
Choose a plan that fits and apply for a 30-day full-featured free trial.
Sign up, complete identity verification, and set a password.
Fill in the organization details and record the Org ID and Organization Code.
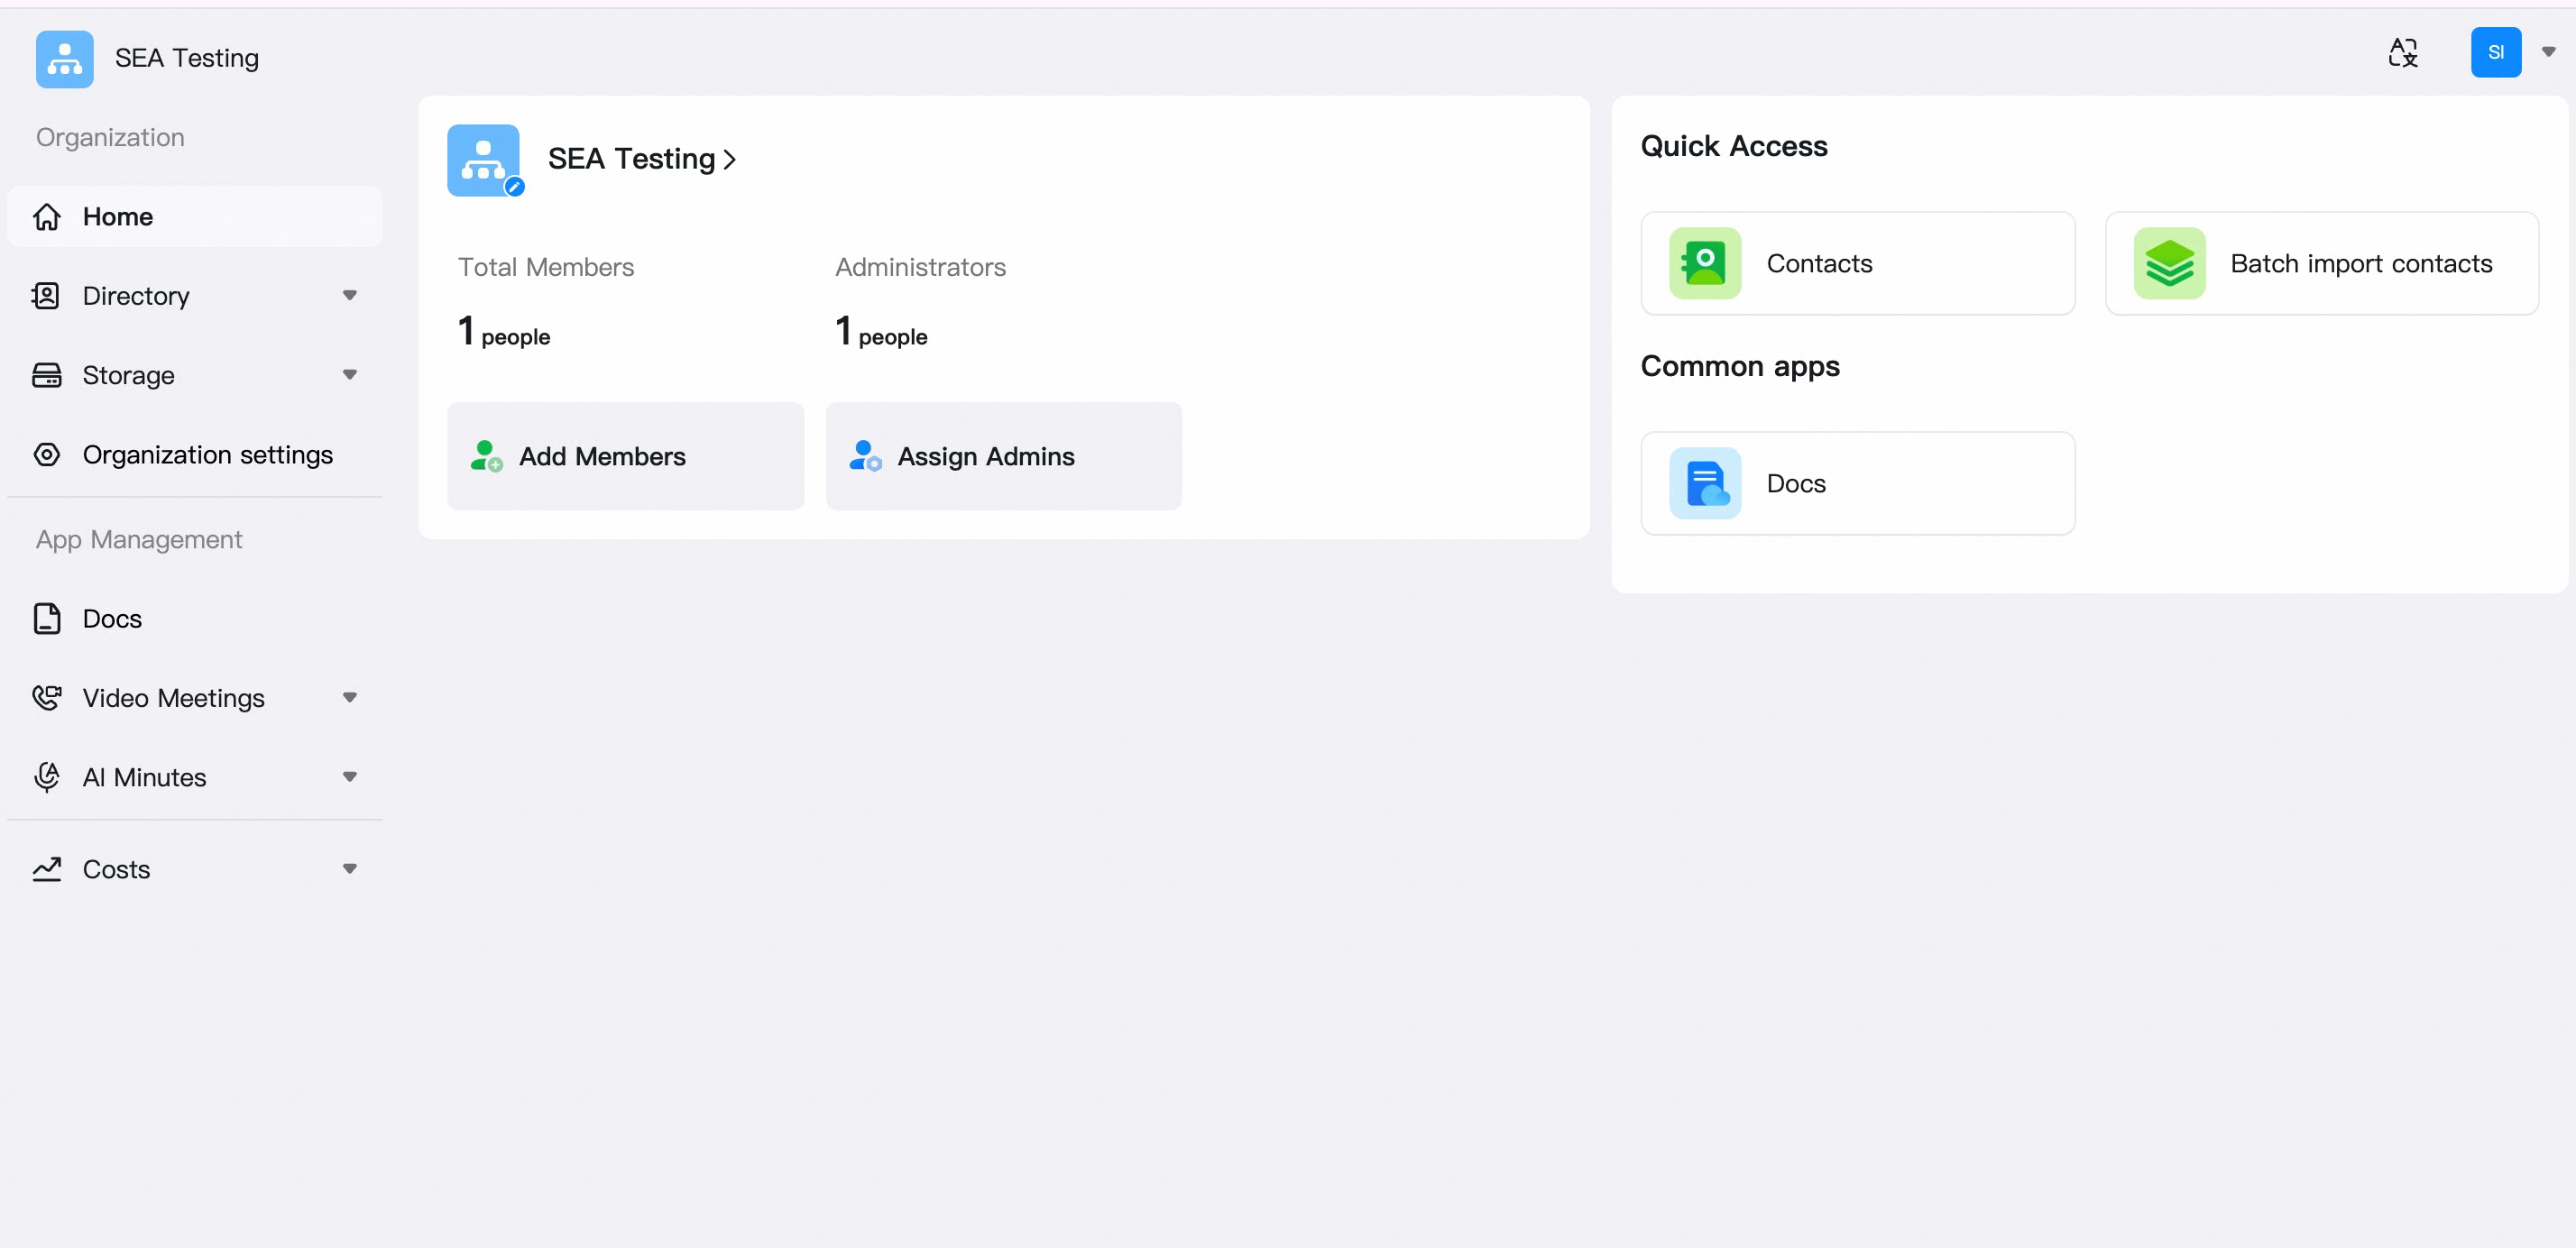
Enter the Admin Console to configure your organization.
Create departments based on your test scope.
Download the Excel template, bulk-import, and spot-check the results.
***
## Step 1: Open the website and choose a plan
Visit the DingTalk global website: [https://www.dingtalk.io/](https://www.dingtalk.io/) (Chinese page: [https://www.dingtalk.io/zh/](https://www.dingtalk.io/zh/)).
The website offers four plans. Choose one based on your POC user count, business scenarios, security requirements, storage needs, and system integration scope:
| Plan | Best for |
| ------------ | ------------------------------------------------------------------------------------------------------------- |
| **Free** | An out-of-the-box product experience |
| **Basic** | Startups and small teams — validate core capabilities such as messaging, calendar, and document collaboration |
| **Standard** | Growing organizations — stronger security policies, more cloud storage, and support services |
| **Premium** | Mid-to-large organizations — more advanced capabilities and large-scale cross-team collaboration |
 ## Step 2: Start a free trial
On the website, click **Start Free Trial**. Every plan is eligible for a 30-day full-featured free trial — no credit card required.
If your POC involves Enterprise, data compliance, SSO, data region, or custom requirements, you can also click **Contact Sales**: [https://www.dingtalk.io/contact-sales/](https://www.dingtalk.io/zh/contact-sales/?from=%2F)
**Prepare before applying:**
* Organization name and country/region
* Estimated number of POC users
* Planned start time and test period
* Key business scenarios to validate
* Super Admin's name, email, and phone number
**Suggested application note**: Applying for a DingTalk enterprise POC, \~XX users, XX-day test period, focused on validating organization management, admin workflows, meeting collaboration, and bulk employee onboarding.
## Step 3: Register the admin account
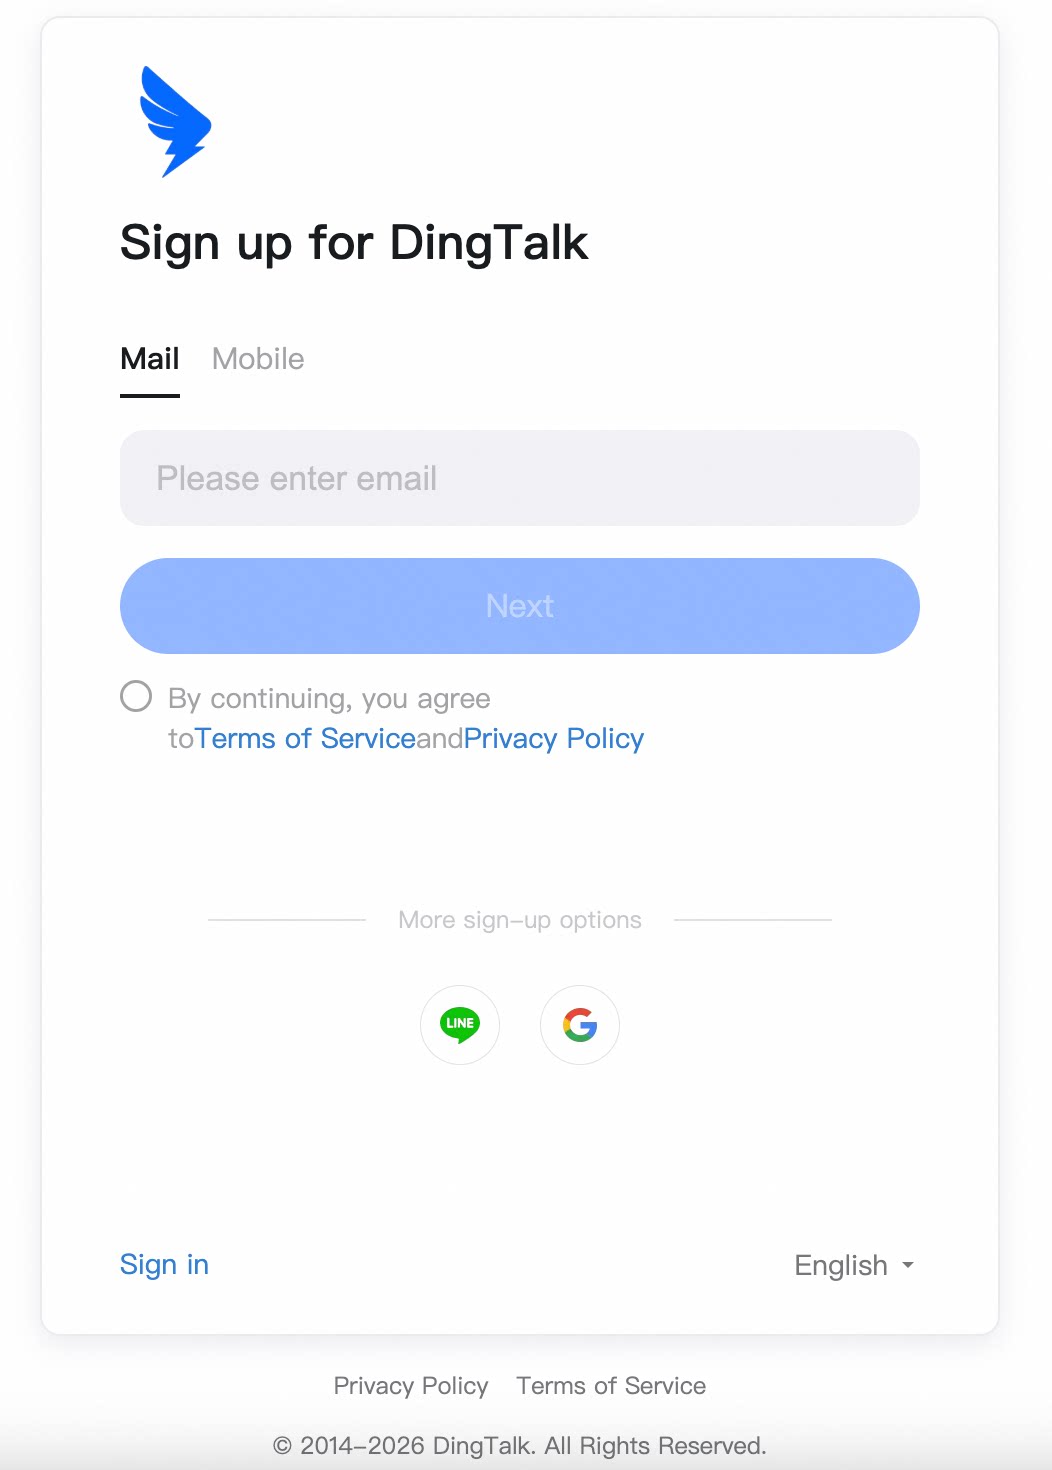
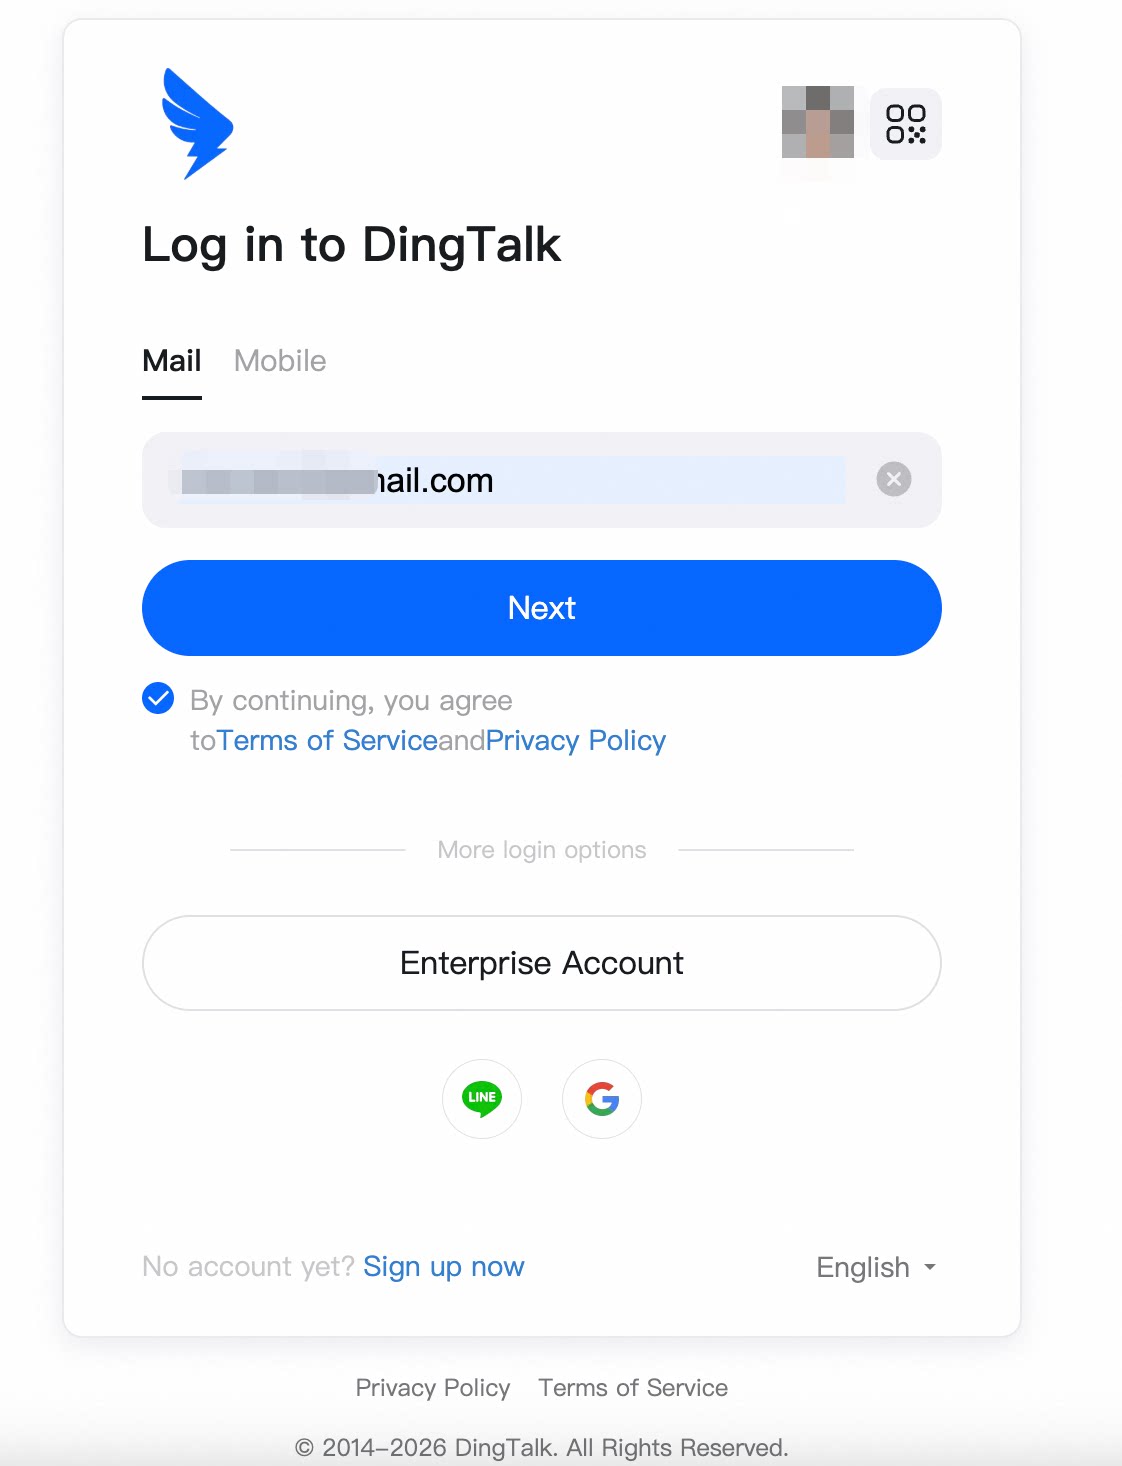
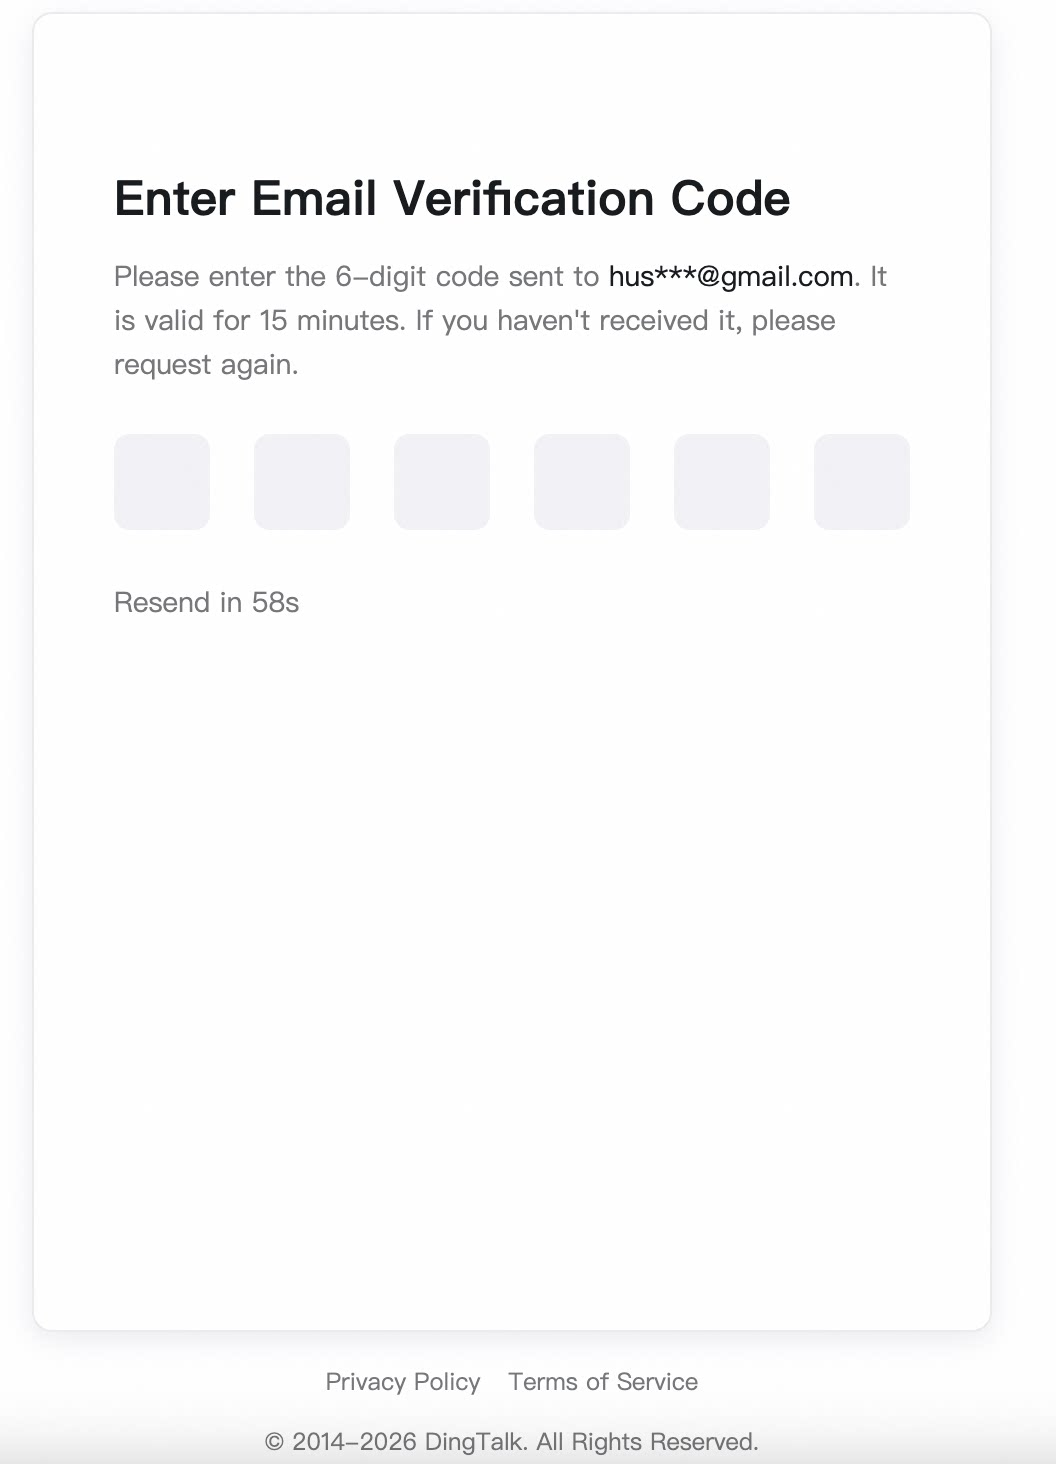
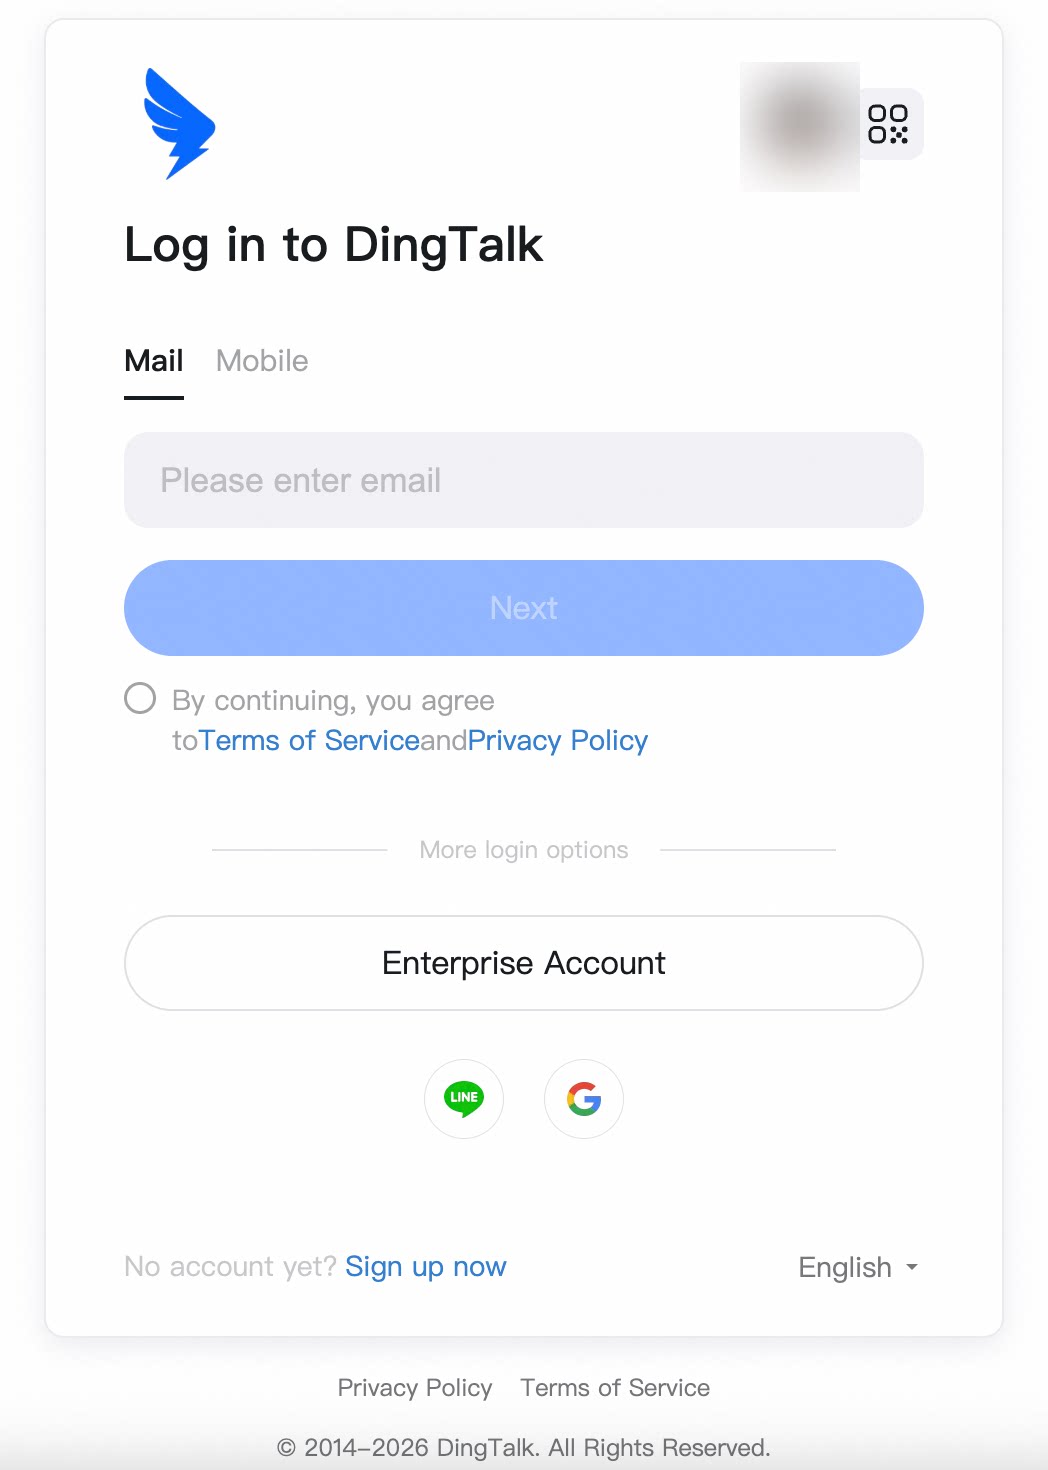
Choose one of the following methods to sign up as prompted: **a valid email** / **a Google account** / **a valid phone number with verification code**. Complete identity verification, set a password, and accept the Terms of Service and Privacy Policy.
For an enterprise POC, use the customer's long-term work email as the Super Admin account, and configure a backup admin.
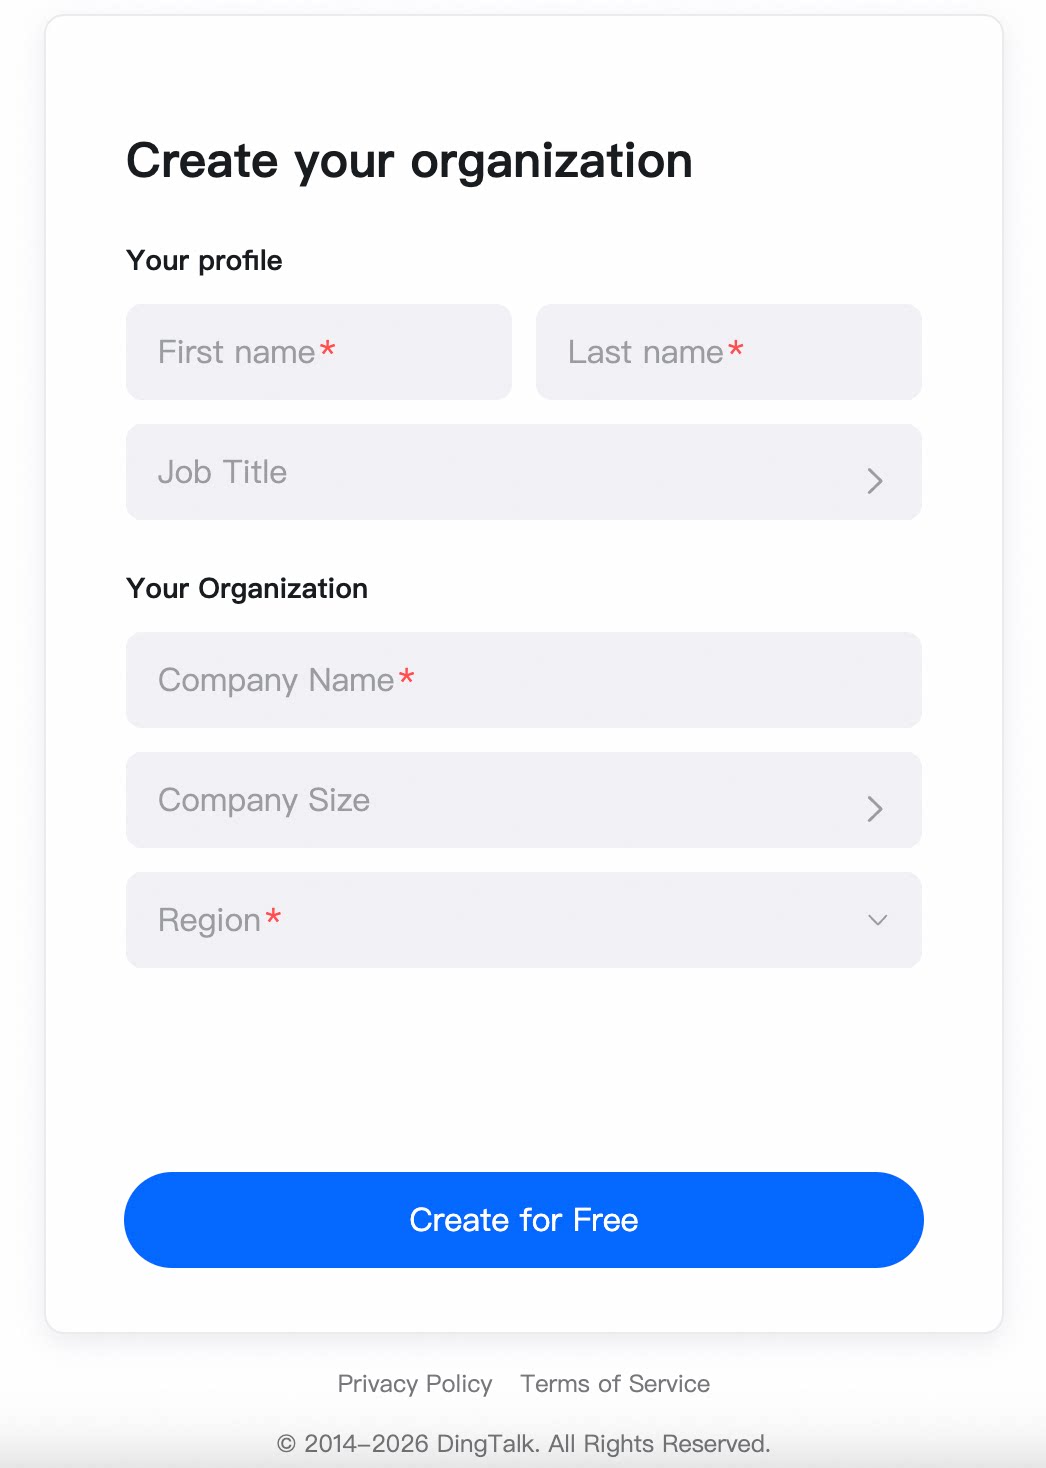
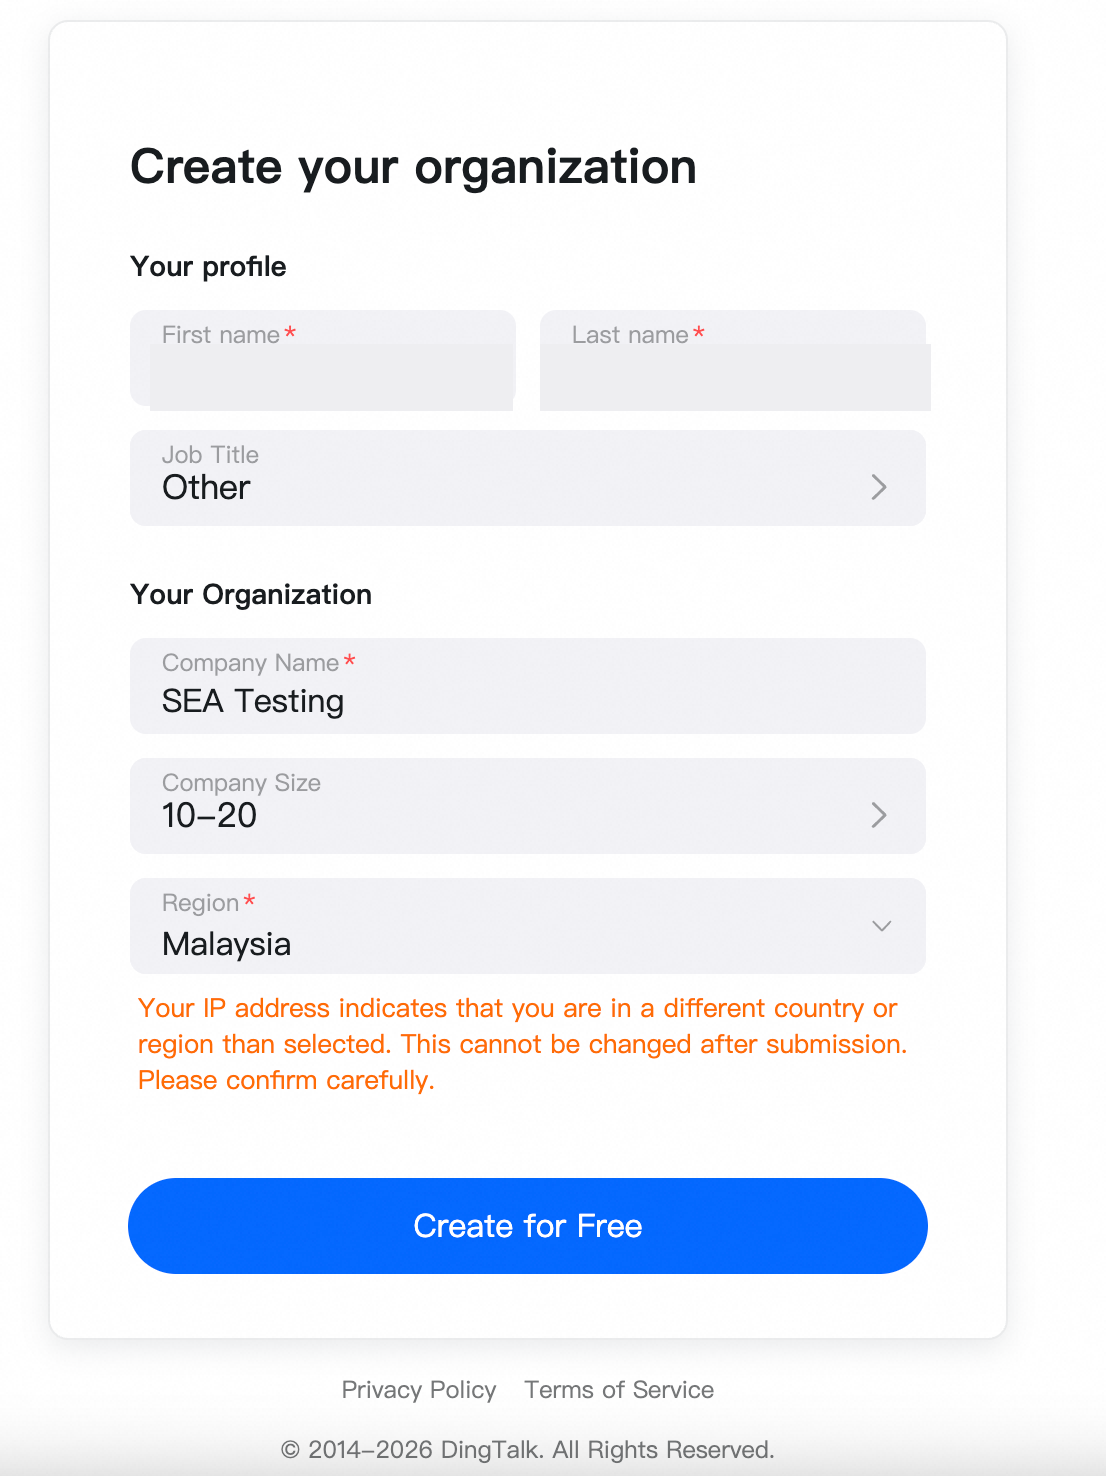
## Step 4: Create the organization
Select your target plan and complete the free trial or subscription flow as prompted. When creating the organization, prepare the following:
| Field | Recommendation |
| ---------------------------- | ---------------------------------------------------------------------------------------------------------------- |
| Organization Name | Use the company's official English name; avoid personal or temporary project names |
| Country / Region | Select the organization's primary operating or POC region |
| Industry / Organization Size | Fill in the actual industry and expected headcount |
| Super Admin | Use a verified admin email or phone number |
| Org ID | Save the unique organization identifier assigned after creation |
| Organization Code | Used to locate the organization when signing in with an enterprise account; record it separately from the Org ID |
After the organization is created, be sure to save the **Org ID**. The **Organization Code** required for enterprise-account sign-in can be viewed by the admin under **Security and Permission → Organization code login**.
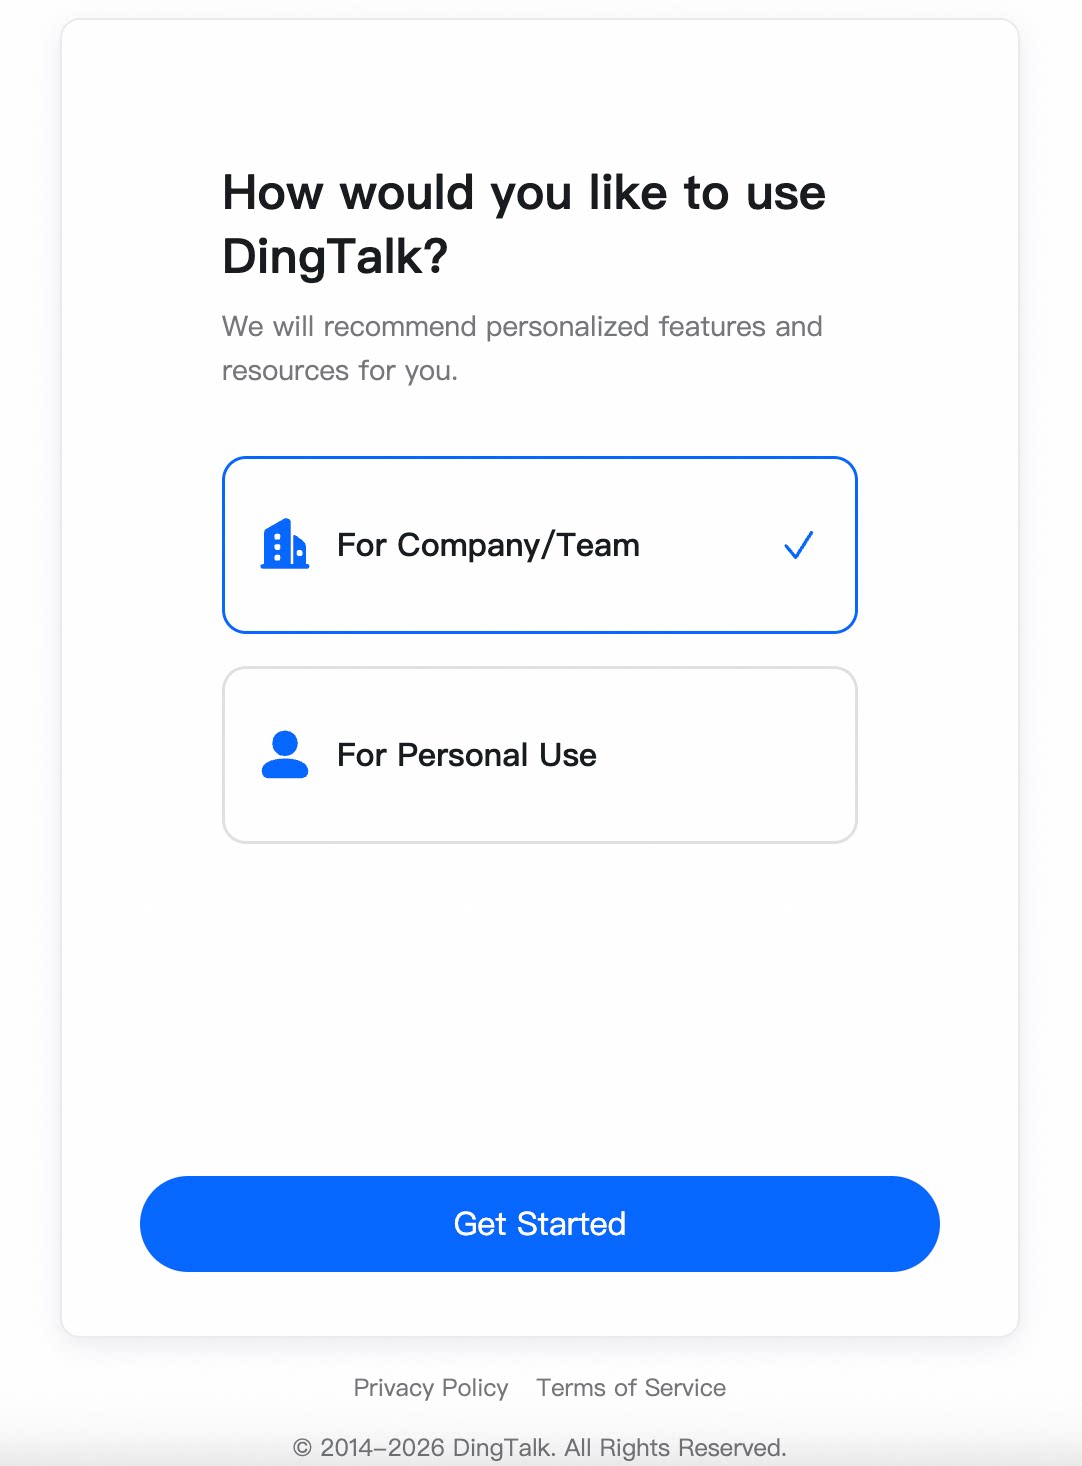
Select the company team and click **Get Started**:
## Step 2: Start a free trial
On the website, click **Start Free Trial**. Every plan is eligible for a 30-day full-featured free trial — no credit card required.
If your POC involves Enterprise, data compliance, SSO, data region, or custom requirements, you can also click **Contact Sales**: [https://www.dingtalk.io/contact-sales/](https://www.dingtalk.io/zh/contact-sales/?from=%2F)
**Prepare before applying:**
* Organization name and country/region
* Estimated number of POC users
* Planned start time and test period
* Key business scenarios to validate
* Super Admin's name, email, and phone number
**Suggested application note**: Applying for a DingTalk enterprise POC, \~XX users, XX-day test period, focused on validating organization management, admin workflows, meeting collaboration, and bulk employee onboarding.
## Step 3: Register the admin account
Choose one of the following methods to sign up as prompted: **a valid email** / **a Google account** / **a valid phone number with verification code**. Complete identity verification, set a password, and accept the Terms of Service and Privacy Policy.
For an enterprise POC, use the customer's long-term work email as the Super Admin account, and configure a backup admin.
## Step 4: Create the organization
Select your target plan and complete the free trial or subscription flow as prompted. When creating the organization, prepare the following:
| Field | Recommendation |
| ---------------------------- | ---------------------------------------------------------------------------------------------------------------- |
| Organization Name | Use the company's official English name; avoid personal or temporary project names |
| Country / Region | Select the organization's primary operating or POC region |
| Industry / Organization Size | Fill in the actual industry and expected headcount |
| Super Admin | Use a verified admin email or phone number |
| Org ID | Save the unique organization identifier assigned after creation |
| Organization Code | Used to locate the organization when signing in with an enterprise account; record it separately from the Org ID |
After the organization is created, be sure to save the **Org ID**. The **Organization Code** required for enterprise-account sign-in can be viewed by the admin under **Security and Permission → Organization code login**.
Select the company team and click **Get Started**:
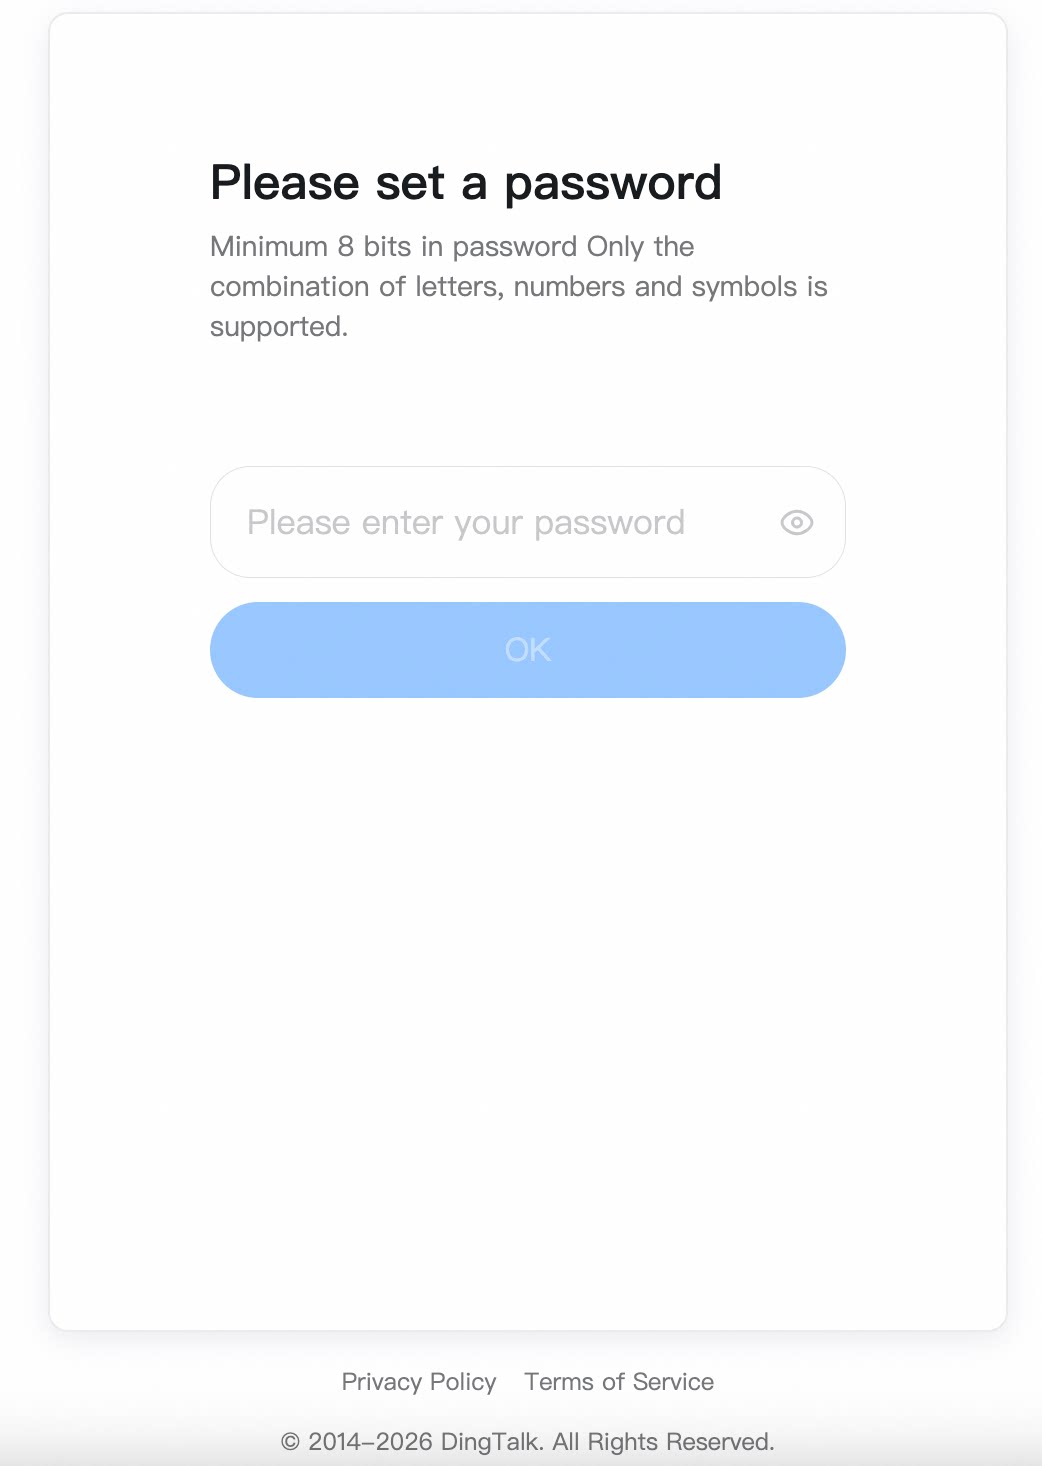 Once the password is set, you are automatically signed in to the Admin Console as the admin.
 ## Step 5: Sign in to the Admin Console
The admin visits: [https://oa.dingtalk.io/](https://oa.dingtalk.io/)
Enter your organization details as prompted and choose a sign-in method:
* Registered email or phone number + password
* Phone number + verification code
* Scan the QR code with mobile DingTalk
* Enterprise account + Organization Code + password
* A linked third-party account
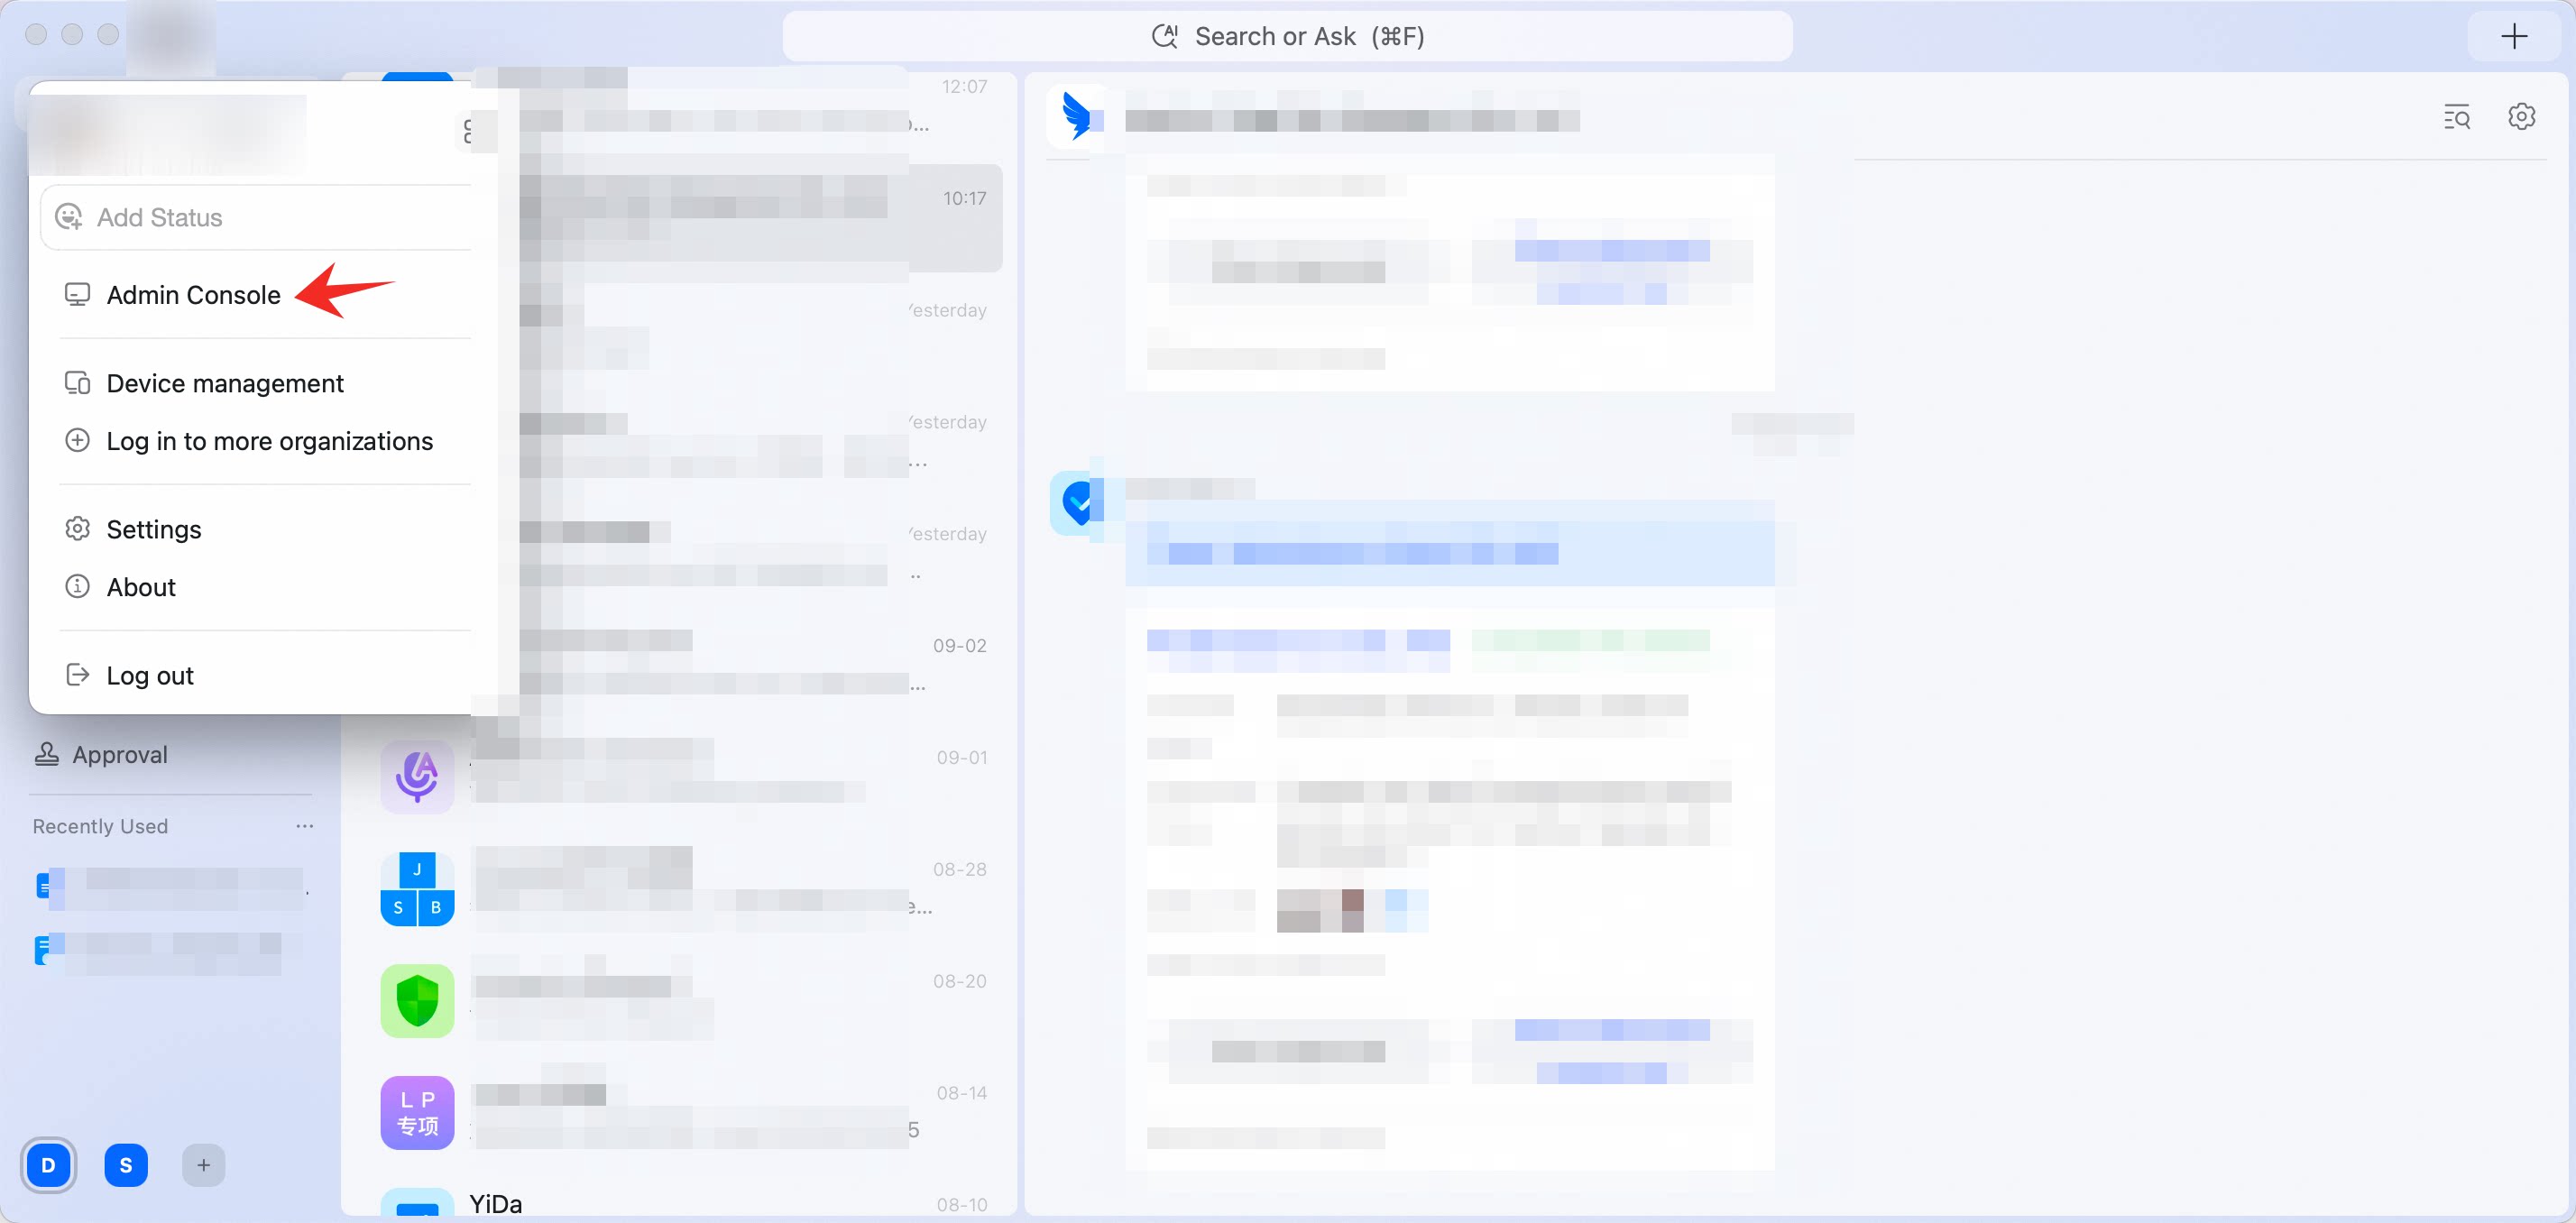
You can also enter from the DingTalk client: **Profile Photo → Admin Console**, or **Contacts → organization name → Manage**.
If your account belongs to multiple organizations, make sure you enter the one for this POC.
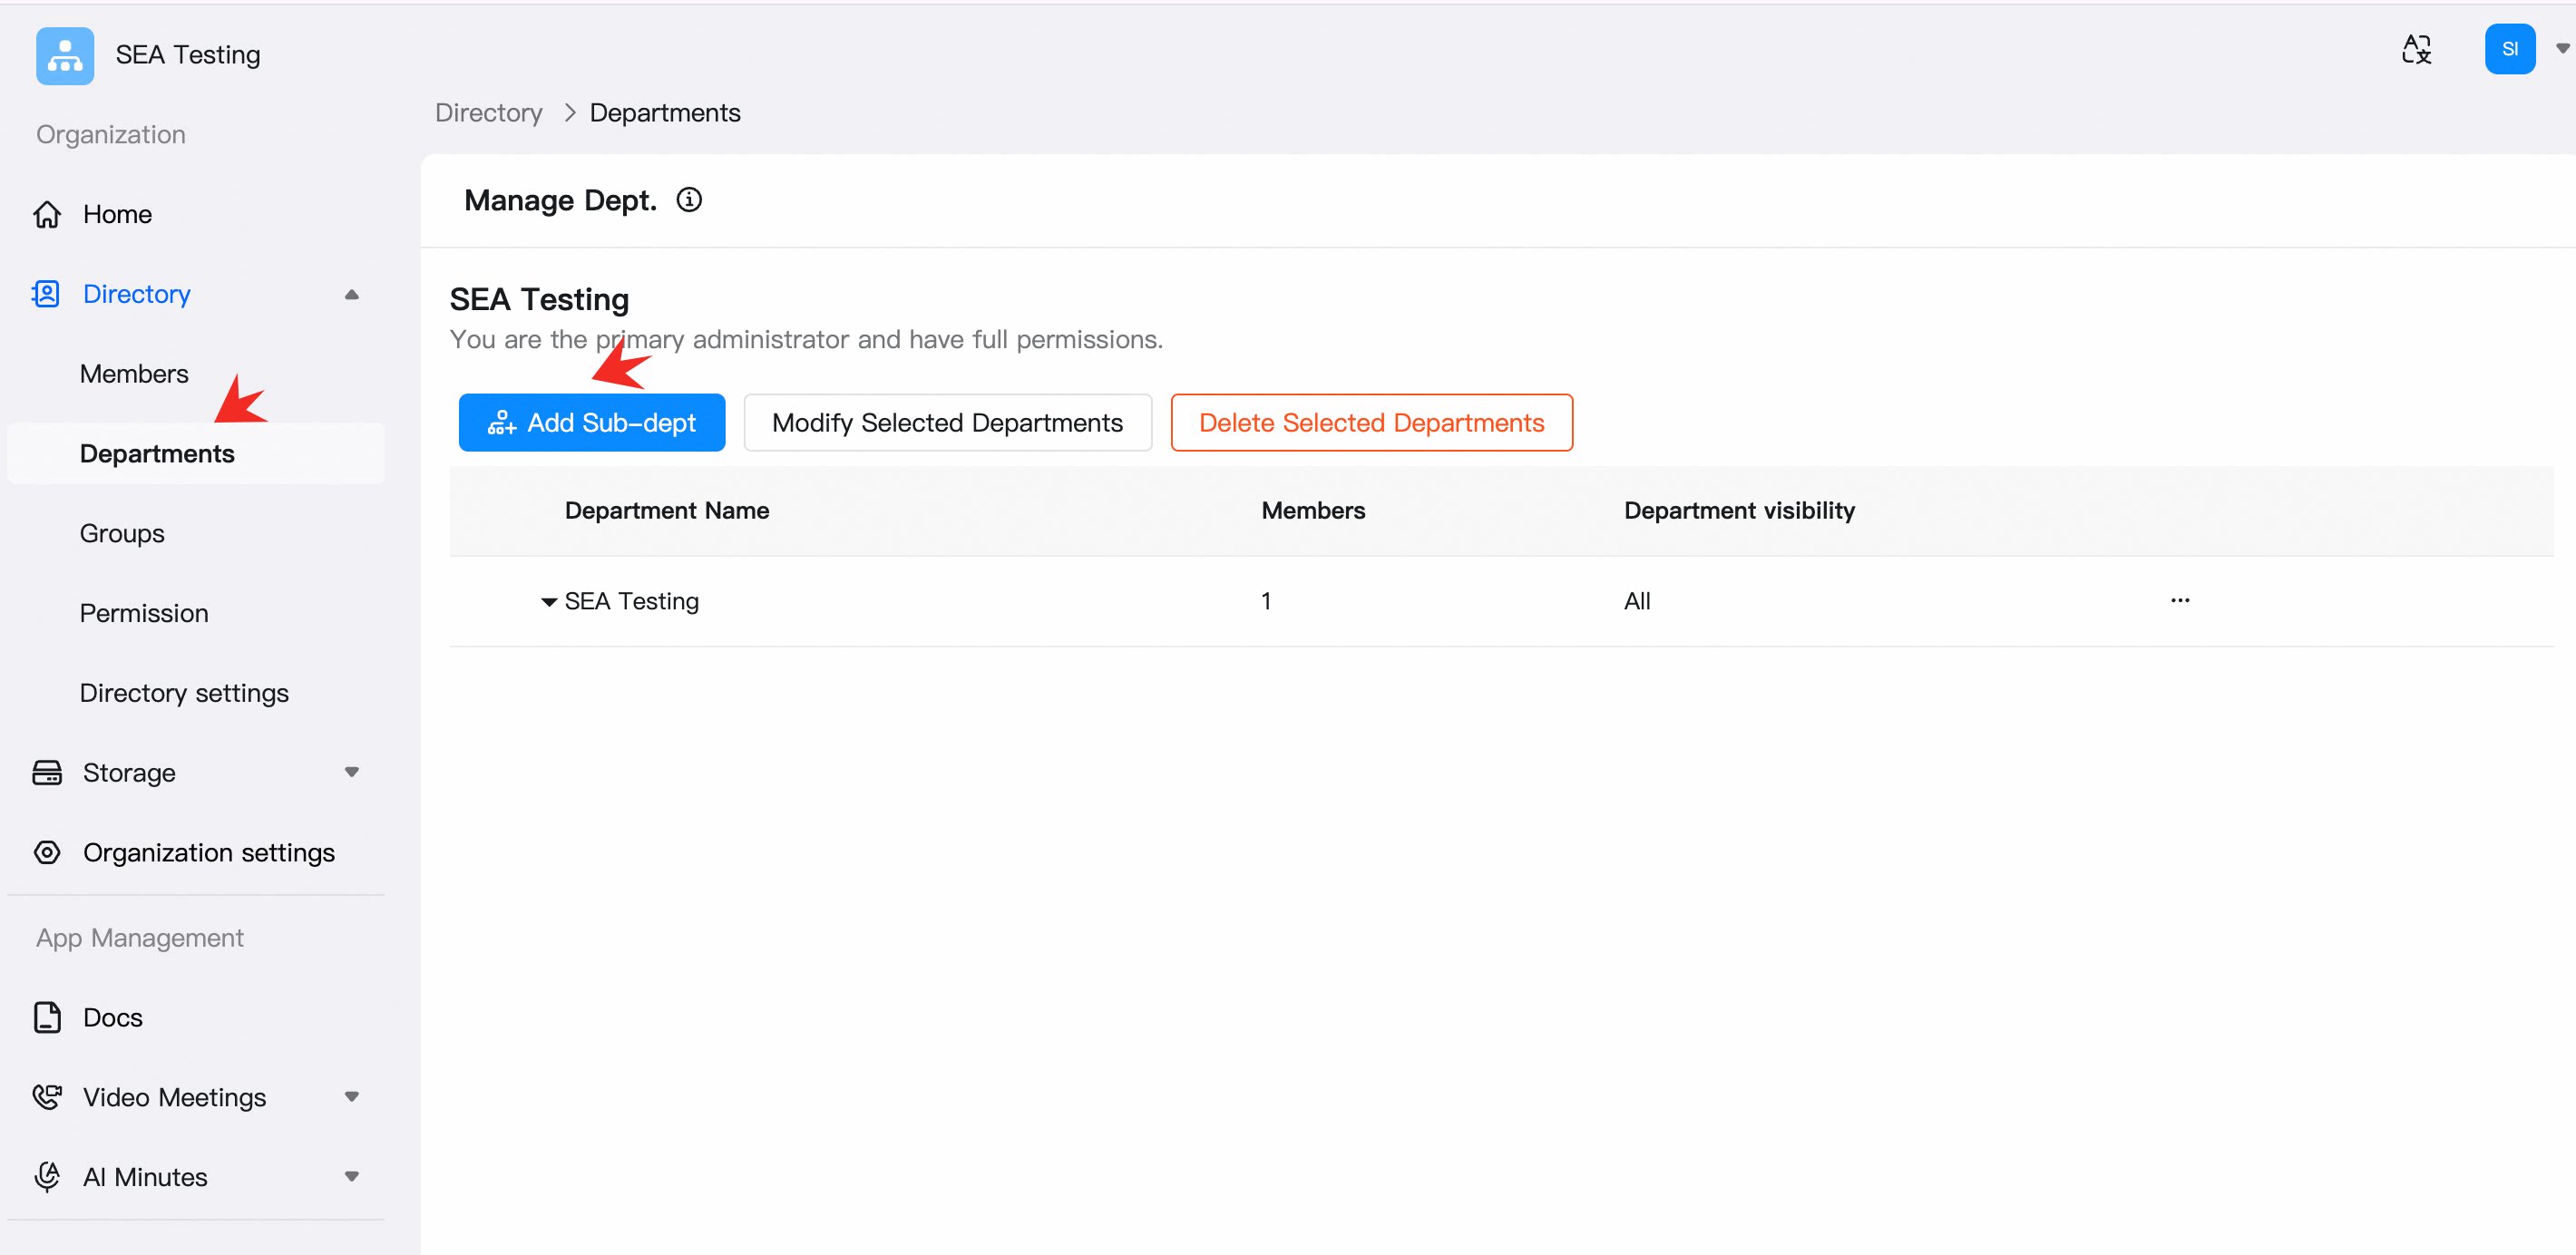
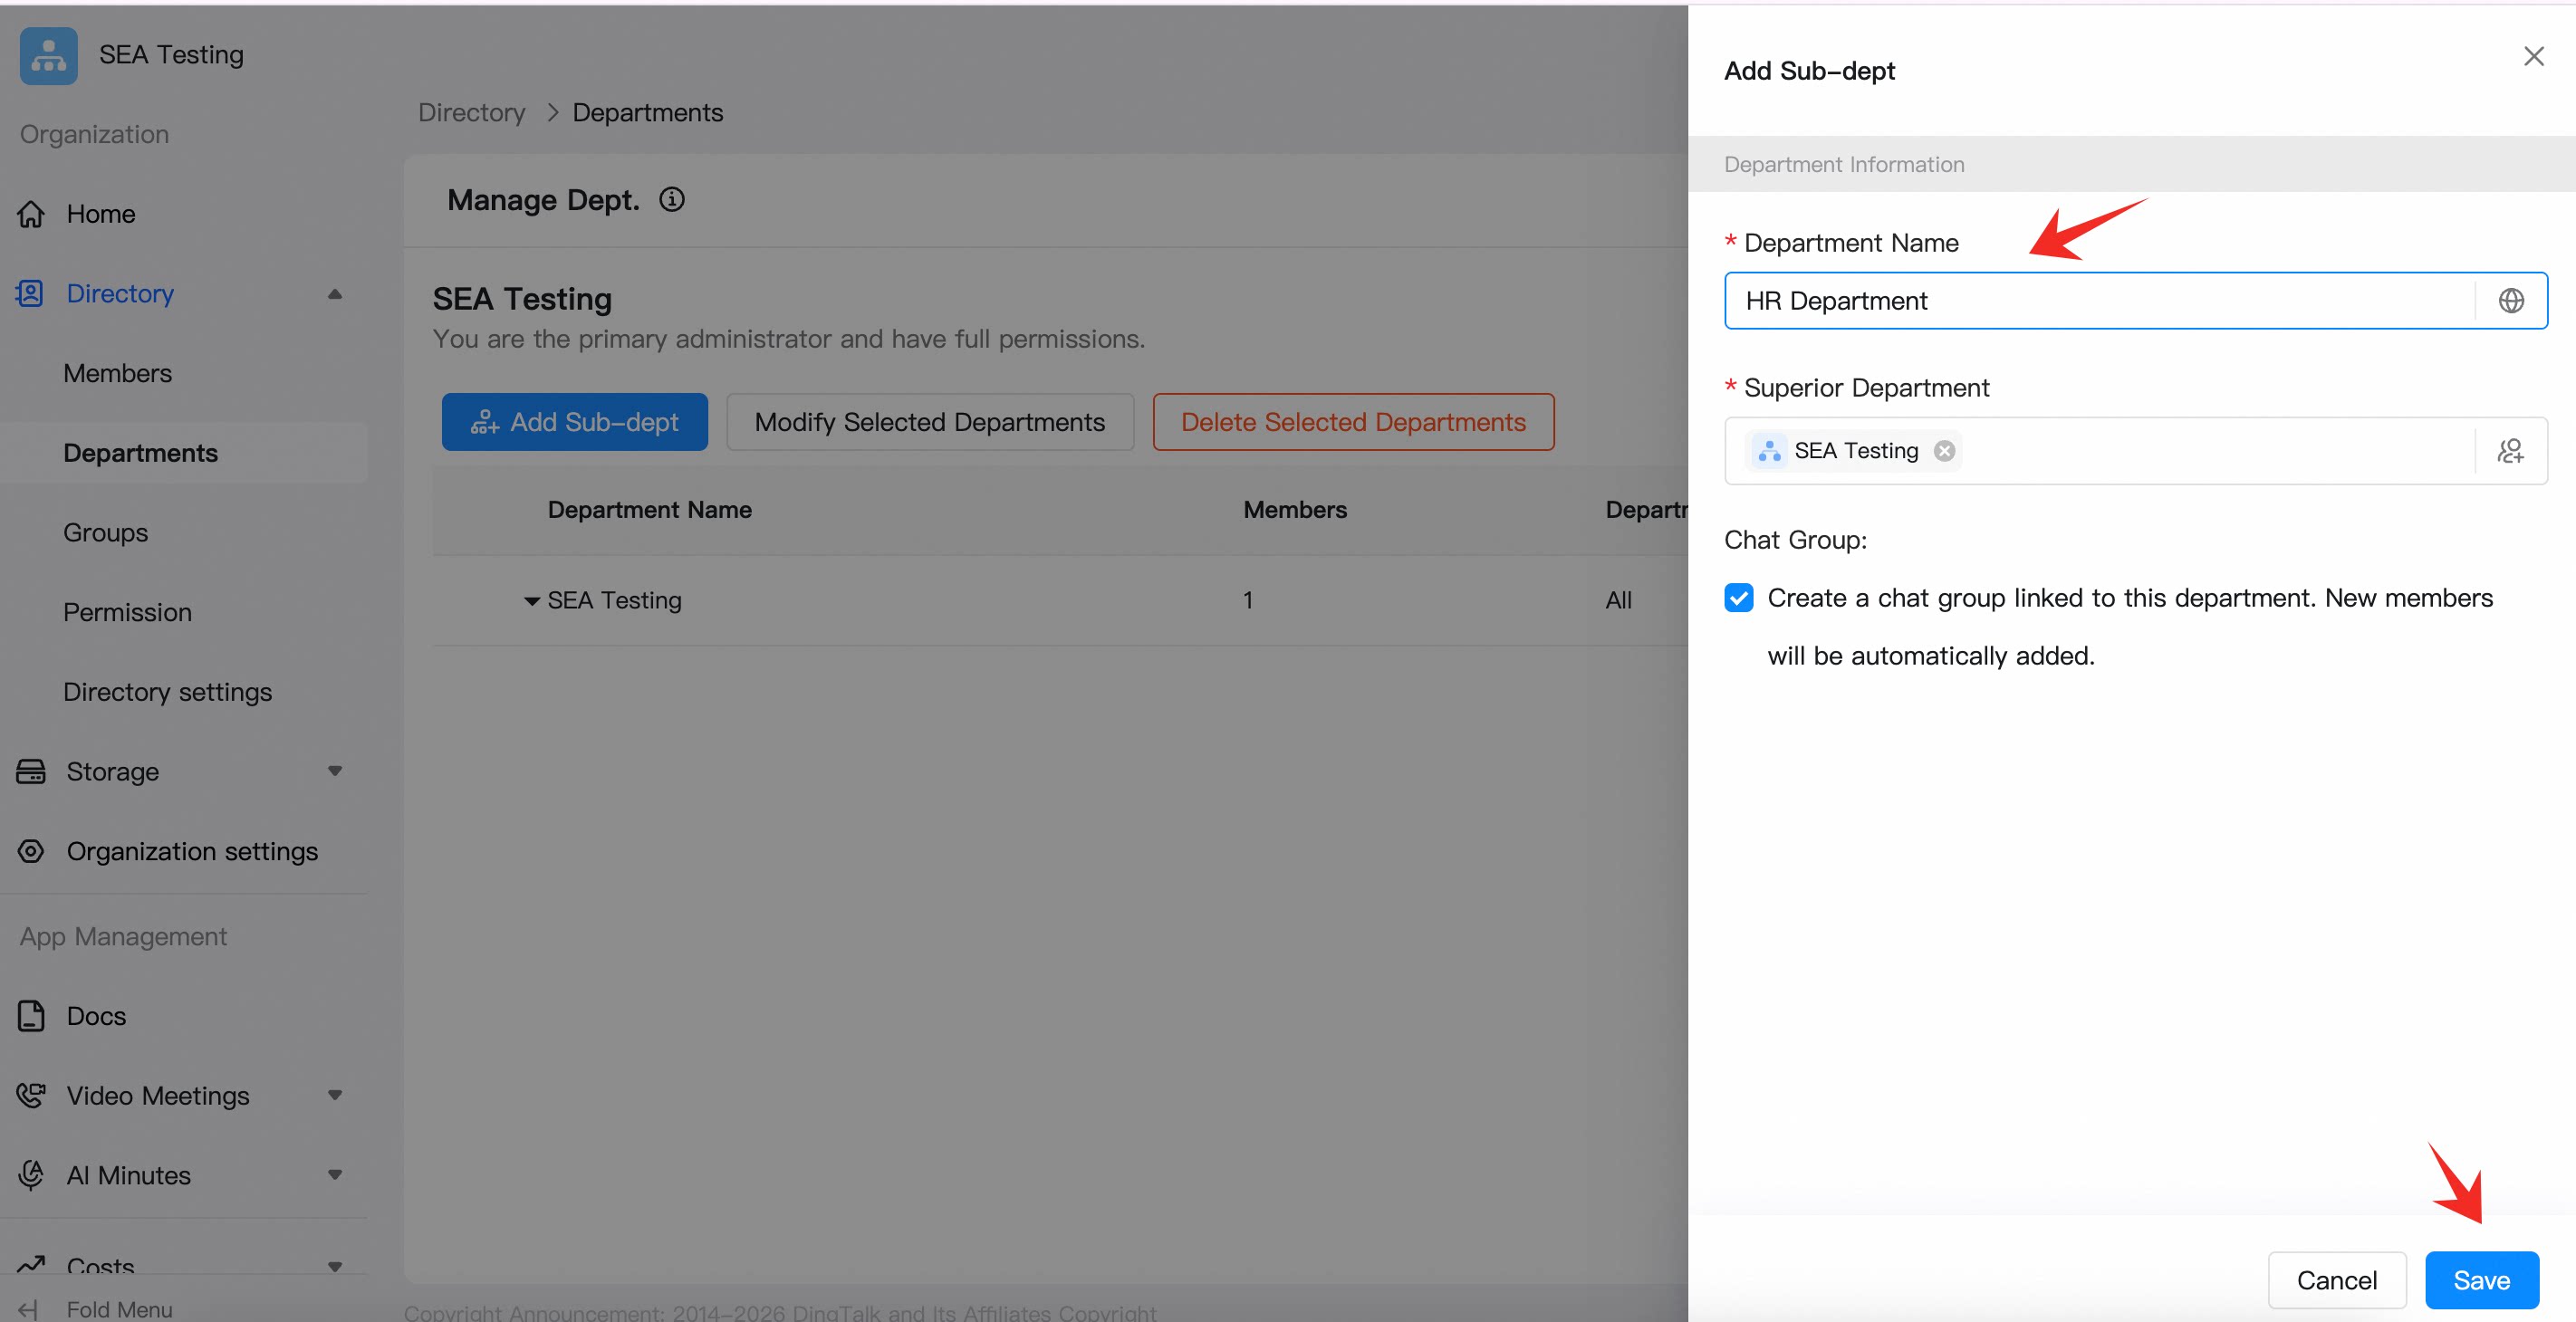
## Step 6: Build the department structure
In the Admin Console, open Contacts and create the department structure your POC needs:
**Admin Console → Contacts → Department Management → Add Department**
Create top-level departments first, then add the second-level departments needed for your test scope. Department names should match the customer's current organization structure.
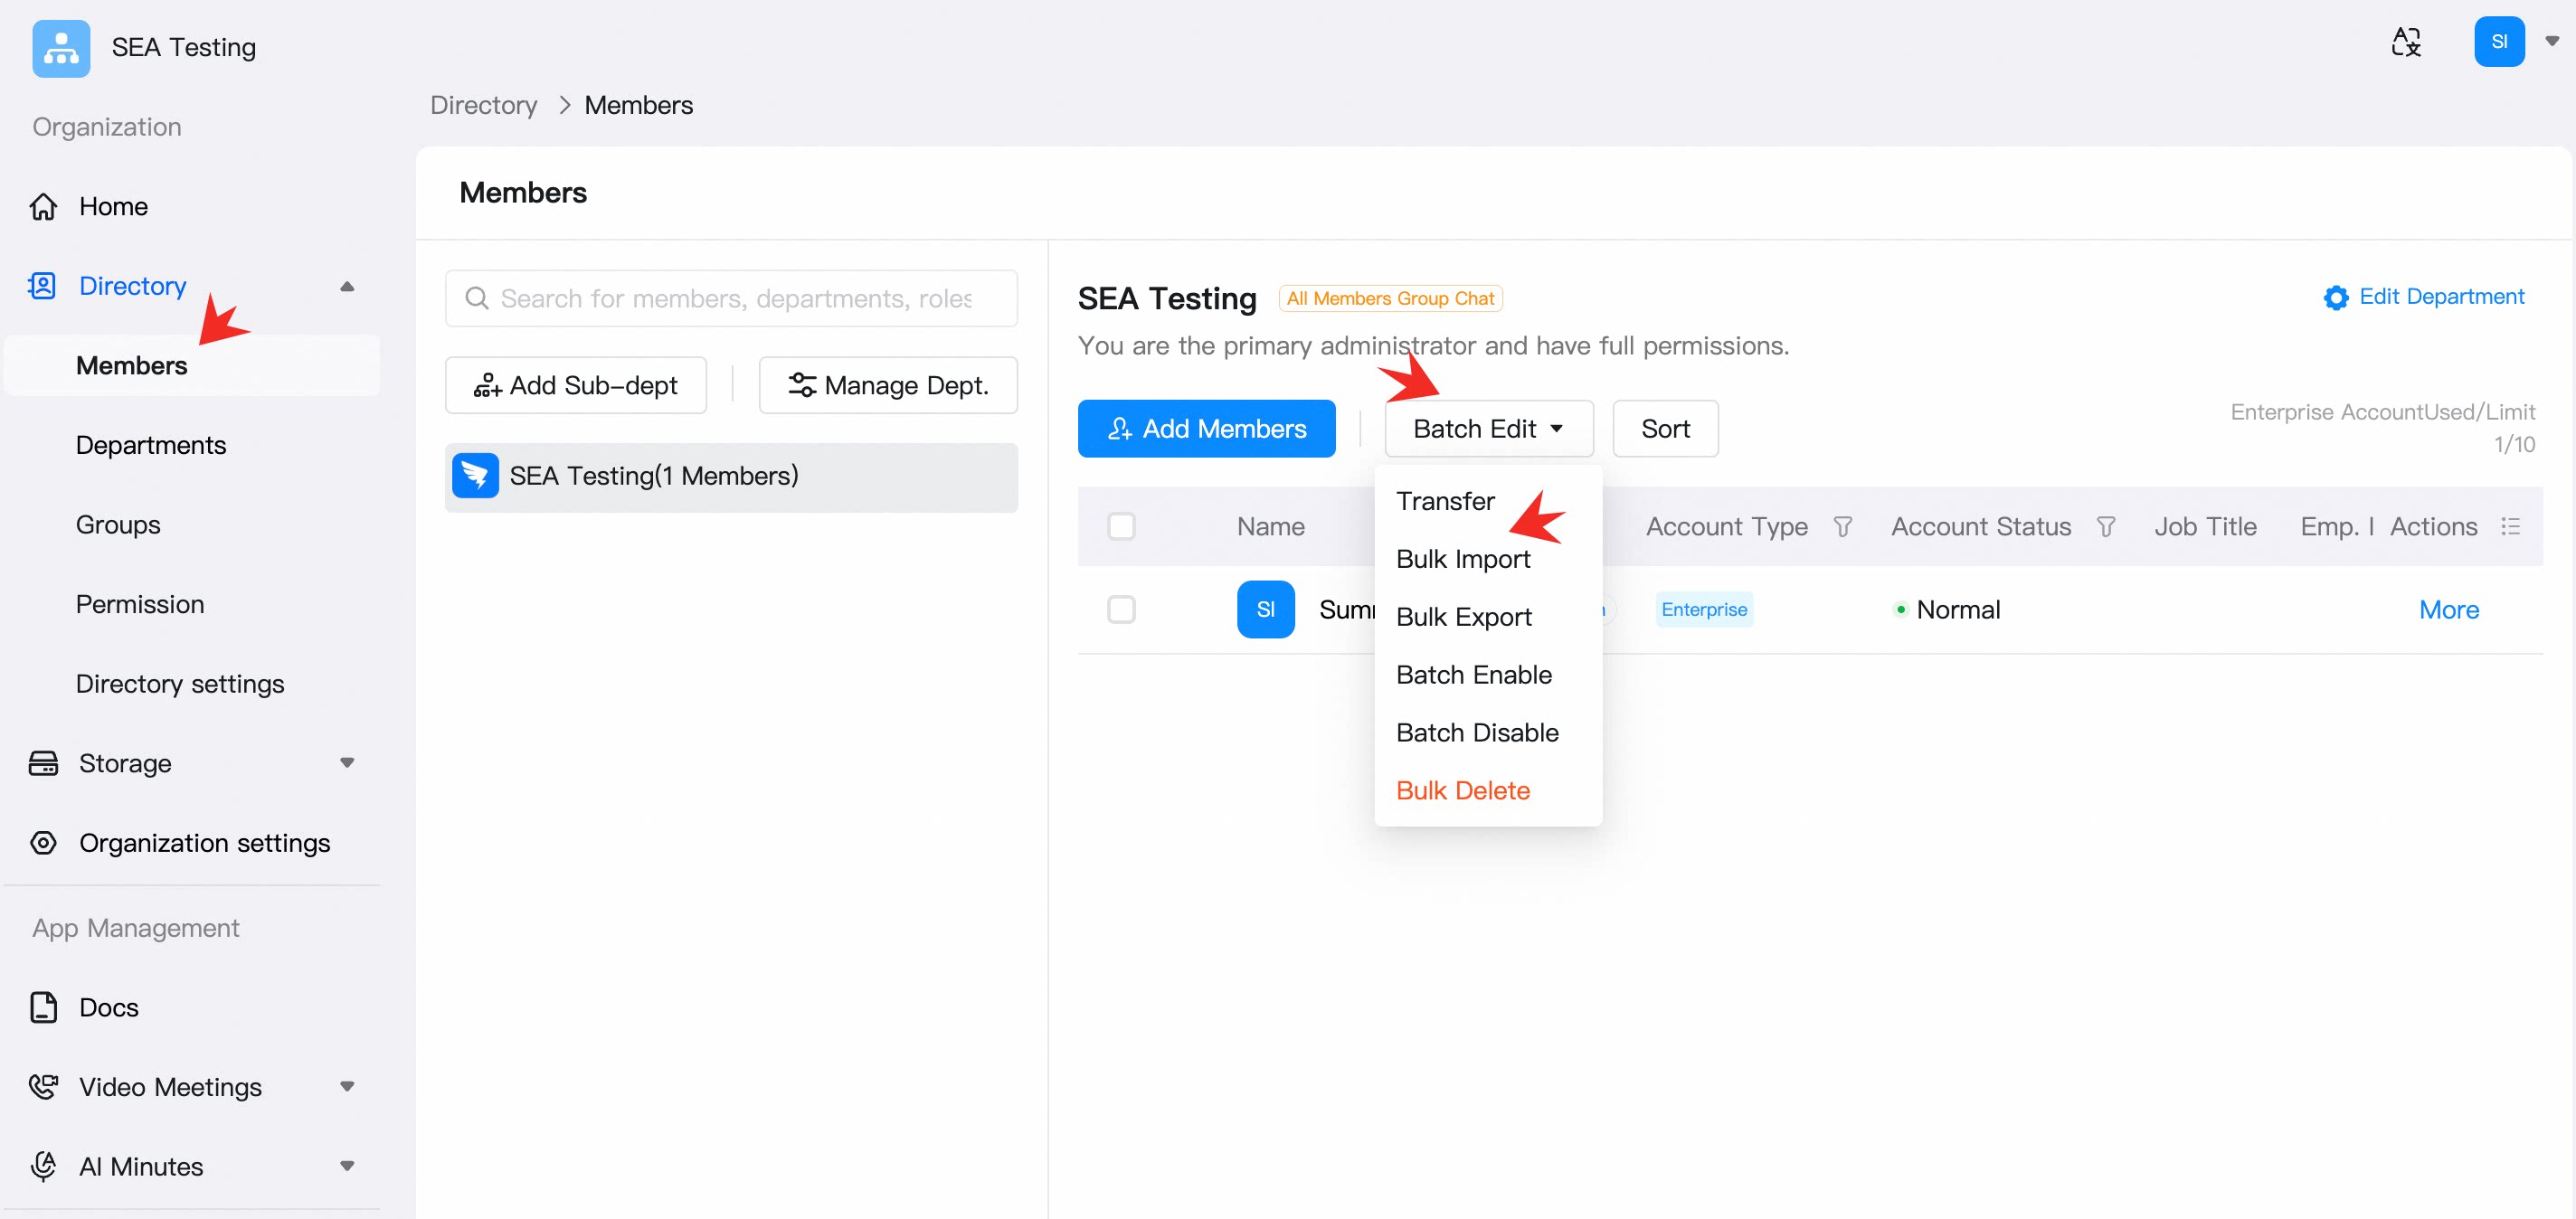
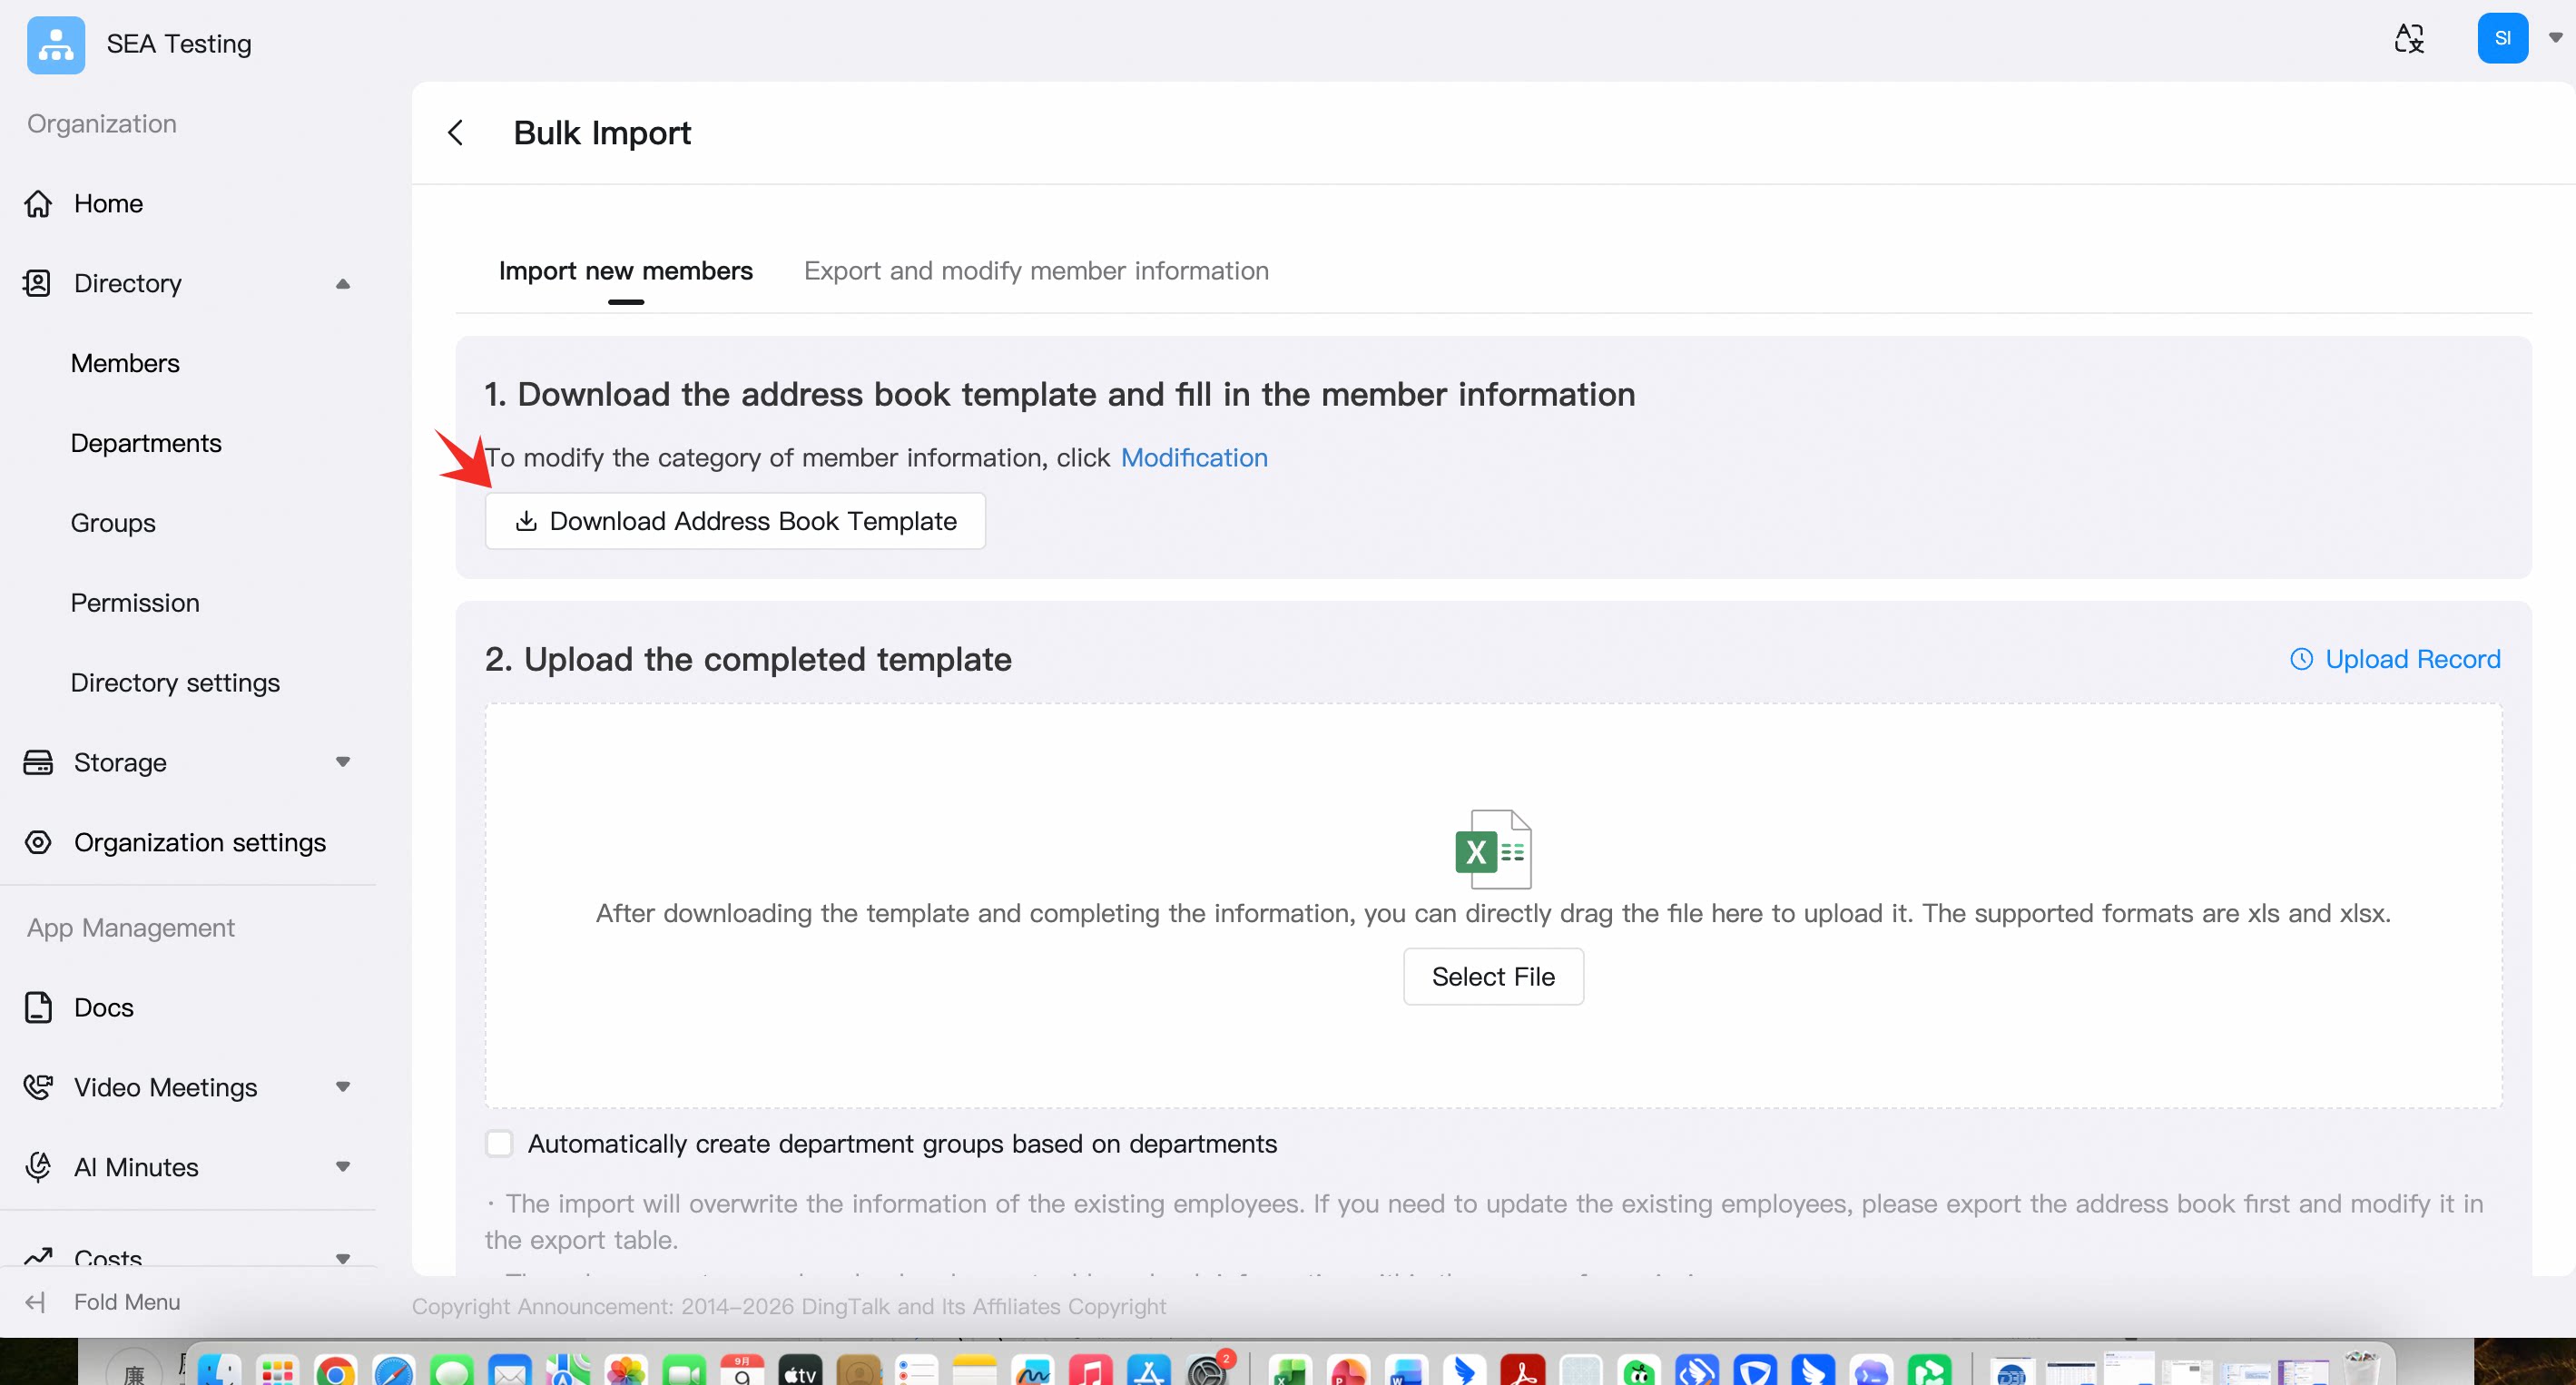
## Step 7: Bulk-import enterprise accounts via Excel
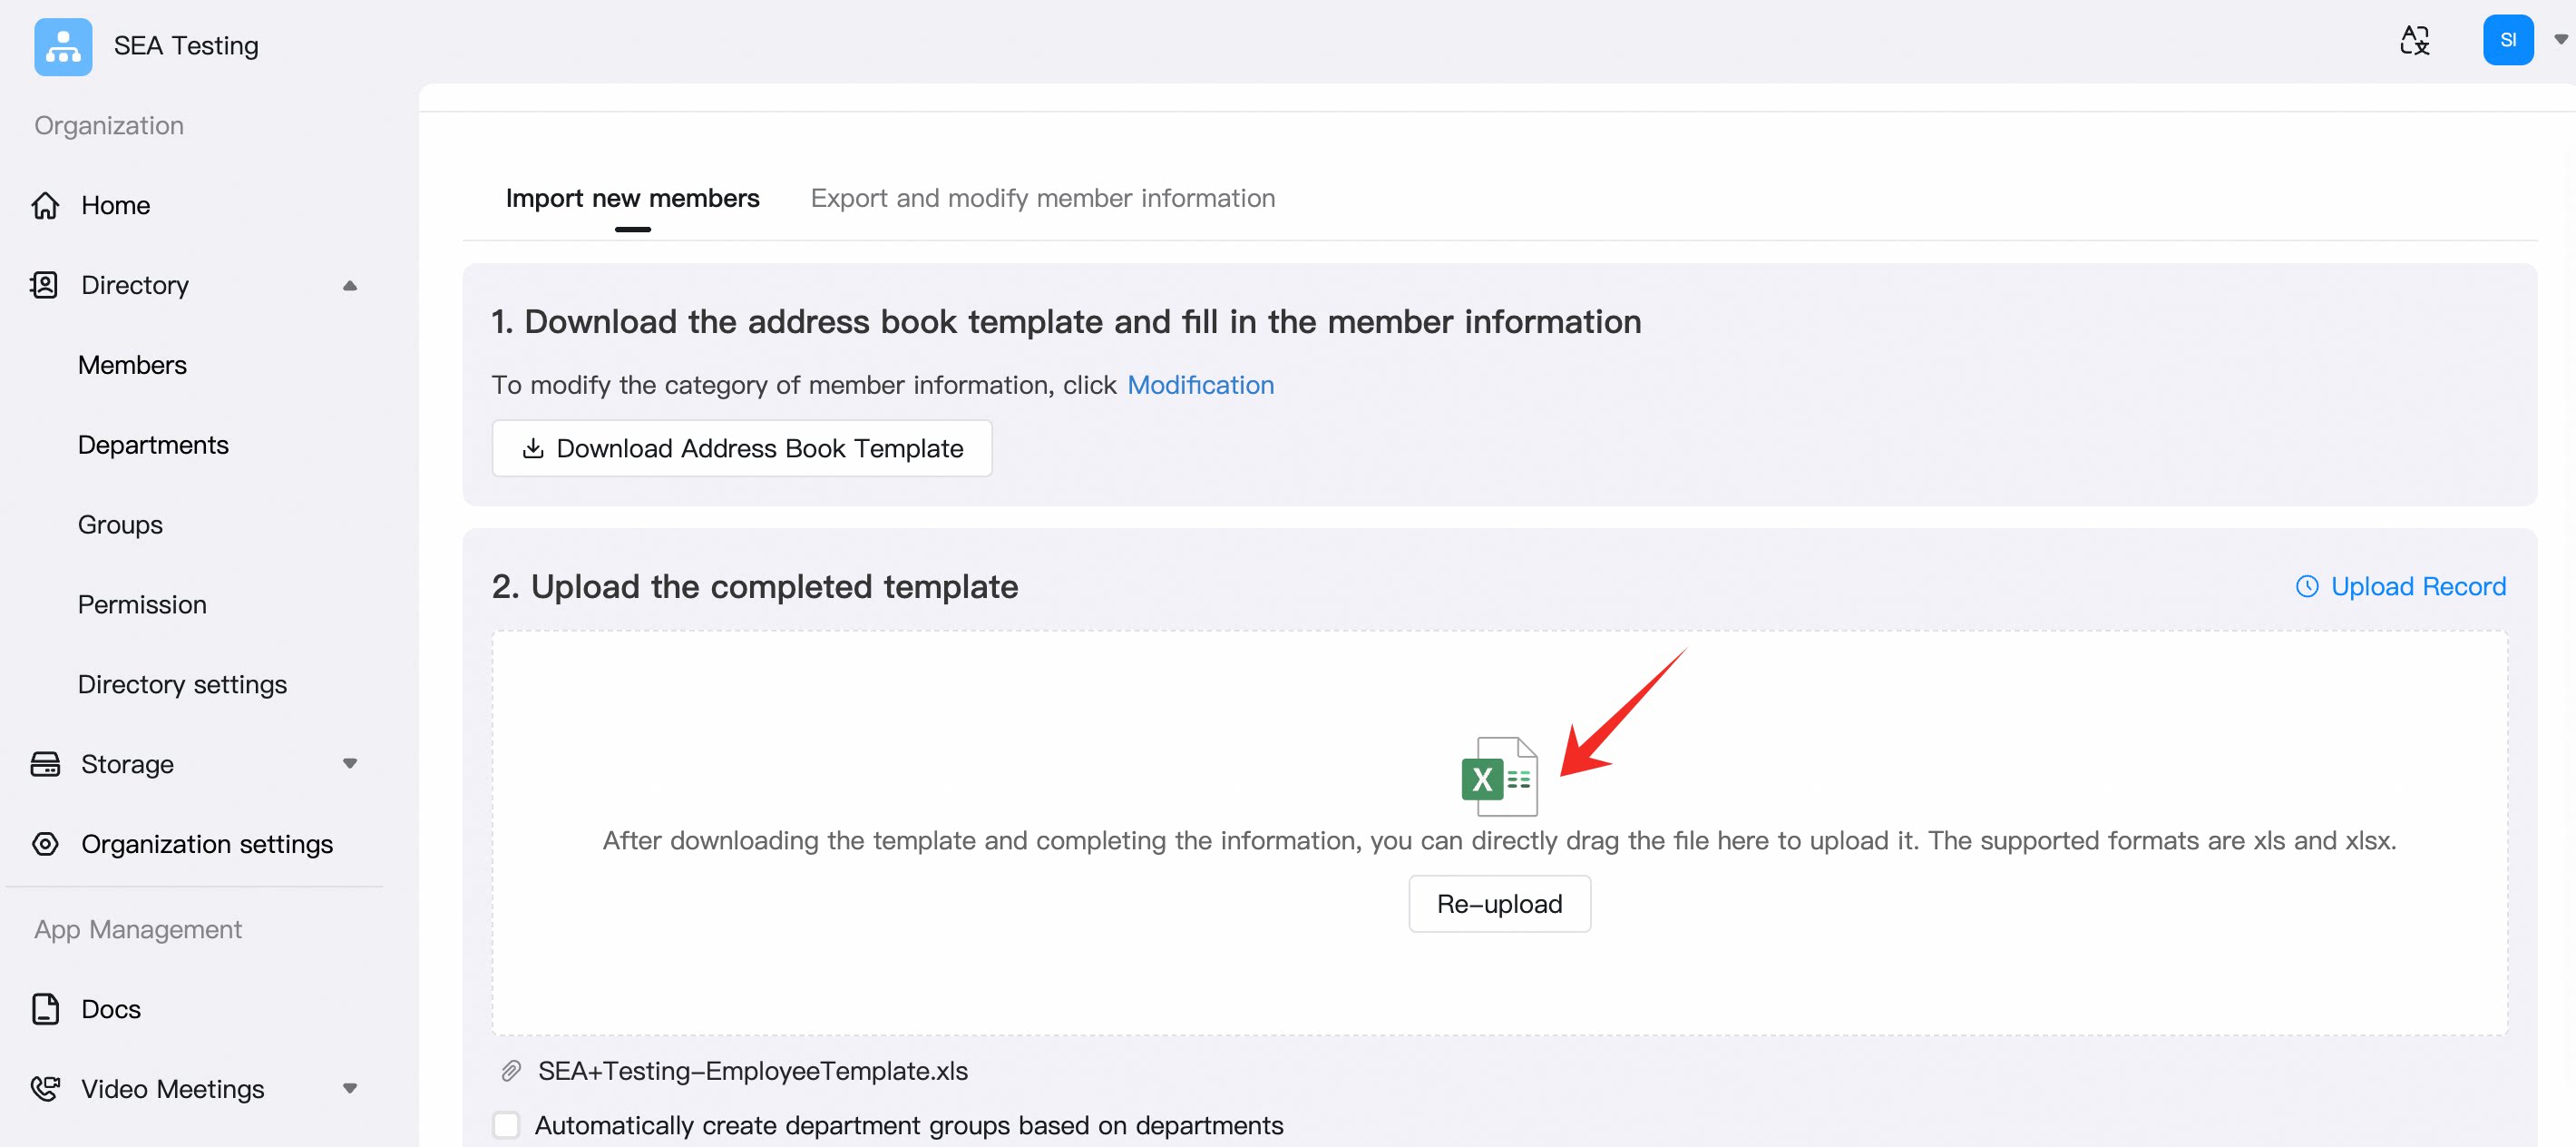
**Path**: Admin Console → Contacts → Members → Batch Edit → Bulk Import
Click **Download Template** and use the standard Excel template downloaded from your current organization.
Follow the example row and instructions in the template to enter employee details. Delete the example row before uploading.
Do not change the column names, column order, worksheet structure, or file type.
Return to the import page, click **Upload File**, select your completed Excel file, then click **Import**.
After the import completes, spot-check the member list by department, name, email, or phone number.
Import 3–5 admins and test users first. Once accounts, department assignments, and sign-in all work correctly, import the remaining POC users.
## Step 5: Sign in to the Admin Console
The admin visits: [https://oa.dingtalk.io/](https://oa.dingtalk.io/)
Enter your organization details as prompted and choose a sign-in method:
* Registered email or phone number + password
* Phone number + verification code
* Scan the QR code with mobile DingTalk
* Enterprise account + Organization Code + password
* A linked third-party account
You can also enter from the DingTalk client: **Profile Photo → Admin Console**, or **Contacts → organization name → Manage**.
If your account belongs to multiple organizations, make sure you enter the one for this POC.
## Step 6: Build the department structure
In the Admin Console, open Contacts and create the department structure your POC needs:
**Admin Console → Contacts → Department Management → Add Department**
Create top-level departments first, then add the second-level departments needed for your test scope. Department names should match the customer's current organization structure.
## Step 7: Bulk-import enterprise accounts via Excel
**Path**: Admin Console → Contacts → Members → Batch Edit → Bulk Import
Click **Download Template** and use the standard Excel template downloaded from your current organization.
Follow the example row and instructions in the template to enter employee details. Delete the example row before uploading.
Do not change the column names, column order, worksheet structure, or file type.
Return to the import page, click **Upload File**, select your completed Excel file, then click **Import**.
After the import completes, spot-check the member list by department, name, email, or phone number.
Import 3–5 admins and test users first. Once accounts, department assignments, and sign-in all work correctly, import the remaining POC users.
 ## Troubleshooting imports
If the upload or import fails:
Review the relevant employee record based on the on-screen error message.
Confirm that required fields and formats match the template instructions.
Confirm you have not changed the template's column names, column order, or worksheet structure.
Fix the incorrect records and upload again.
If the page behaves unexpectedly, refresh it, sign in again, or retry with the latest version of Google Chrome.
## POC acceptance checklist
Once the steps below are complete, you can start configuring and testing business scenarios for the DingTalk enterprise POC.
* [ ] Target plan, region, user count, and trial period are confirmed
* [ ] The Super Admin can sign in to both the DingTalk client and the Admin Console
* [ ] Organization name, region, time zone, and admin details are accurate
* [ ] The department structure required for the POC is built
* [ ] Test accounts are successfully imported via Excel and assigned to the correct departments
* [ ] At least 3 test users with different roles have completed their first sign-in
* [ ] Import errors have been fixed or closed out
## Troubleshooting imports
If the upload or import fails:
Review the relevant employee record based on the on-screen error message.
Confirm that required fields and formats match the template instructions.
Confirm you have not changed the template's column names, column order, or worksheet structure.
Fix the incorrect records and upload again.
If the page behaves unexpectedly, refresh it, sign in again, or retry with the latest version of Google Chrome.
## POC acceptance checklist
Once the steps below are complete, you can start configuring and testing business scenarios for the DingTalk enterprise POC.
* [ ] Target plan, region, user count, and trial period are confirmed
* [ ] The Super Admin can sign in to both the DingTalk client and the Admin Console
* [ ] Organization name, region, time zone, and admin details are accurate
* [ ] The department structure required for the POC is built
* [ ] Test accounts are successfully imported via Excel and assigned to the correct departments
* [ ] At least 3 test users with different roles have completed their first sign-in
* [ ] Import errors have been fixed or closed out