> ## Documentation Index
> Fetch the complete documentation index at: https://help.dingtalk.io/llms.txt
> Use this file to discover all available pages before exploring further.
# 获取登录用户的访问凭证
> 通过创建应用、OAuth 登录授权、获取访问凭证、调用 API 四个步骤,为应用代表登录用户调用钉钉 OpenAPI 获取访问凭证。
当应用需要代表登录用户调用DingTalk OpenAPI对资源进行操作时,可参考本文的流程获取调用API操作资源的访问凭证。
企业内部应用与三方企业应用实现流程类似,本文档以企业内部应用实现流程为例。
## 步骤一:创建应用
1. 登录[钉钉开发者后台](https://open-dev.dingtalk.io/#/loginMan)。
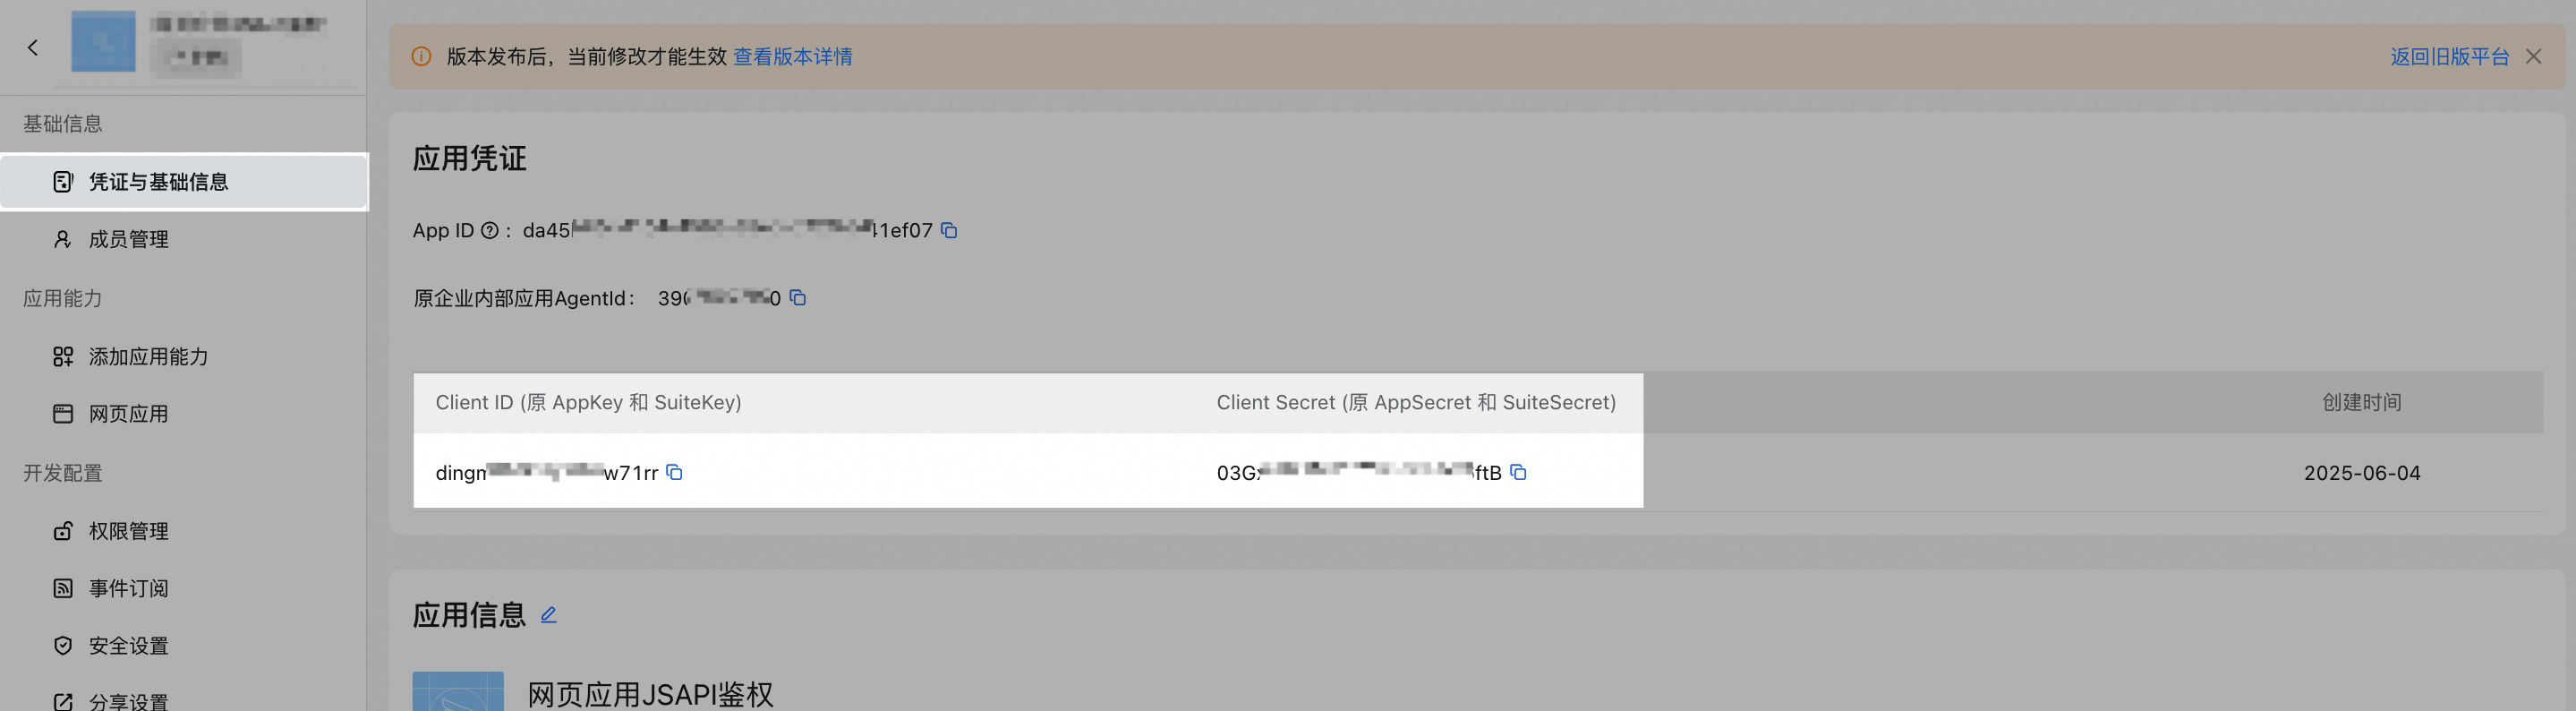
2. 进入已创建的应用详情页,在**基础信息**页面可以查看到应用的**SuiteKey/SuiteSecret(第三方企业应用)或AppKey/AppSecret(企业内部应用)**。
3. 在应用详情页,单击**开发配置** > **安全设置**,填写重定向URL(回调域名)。
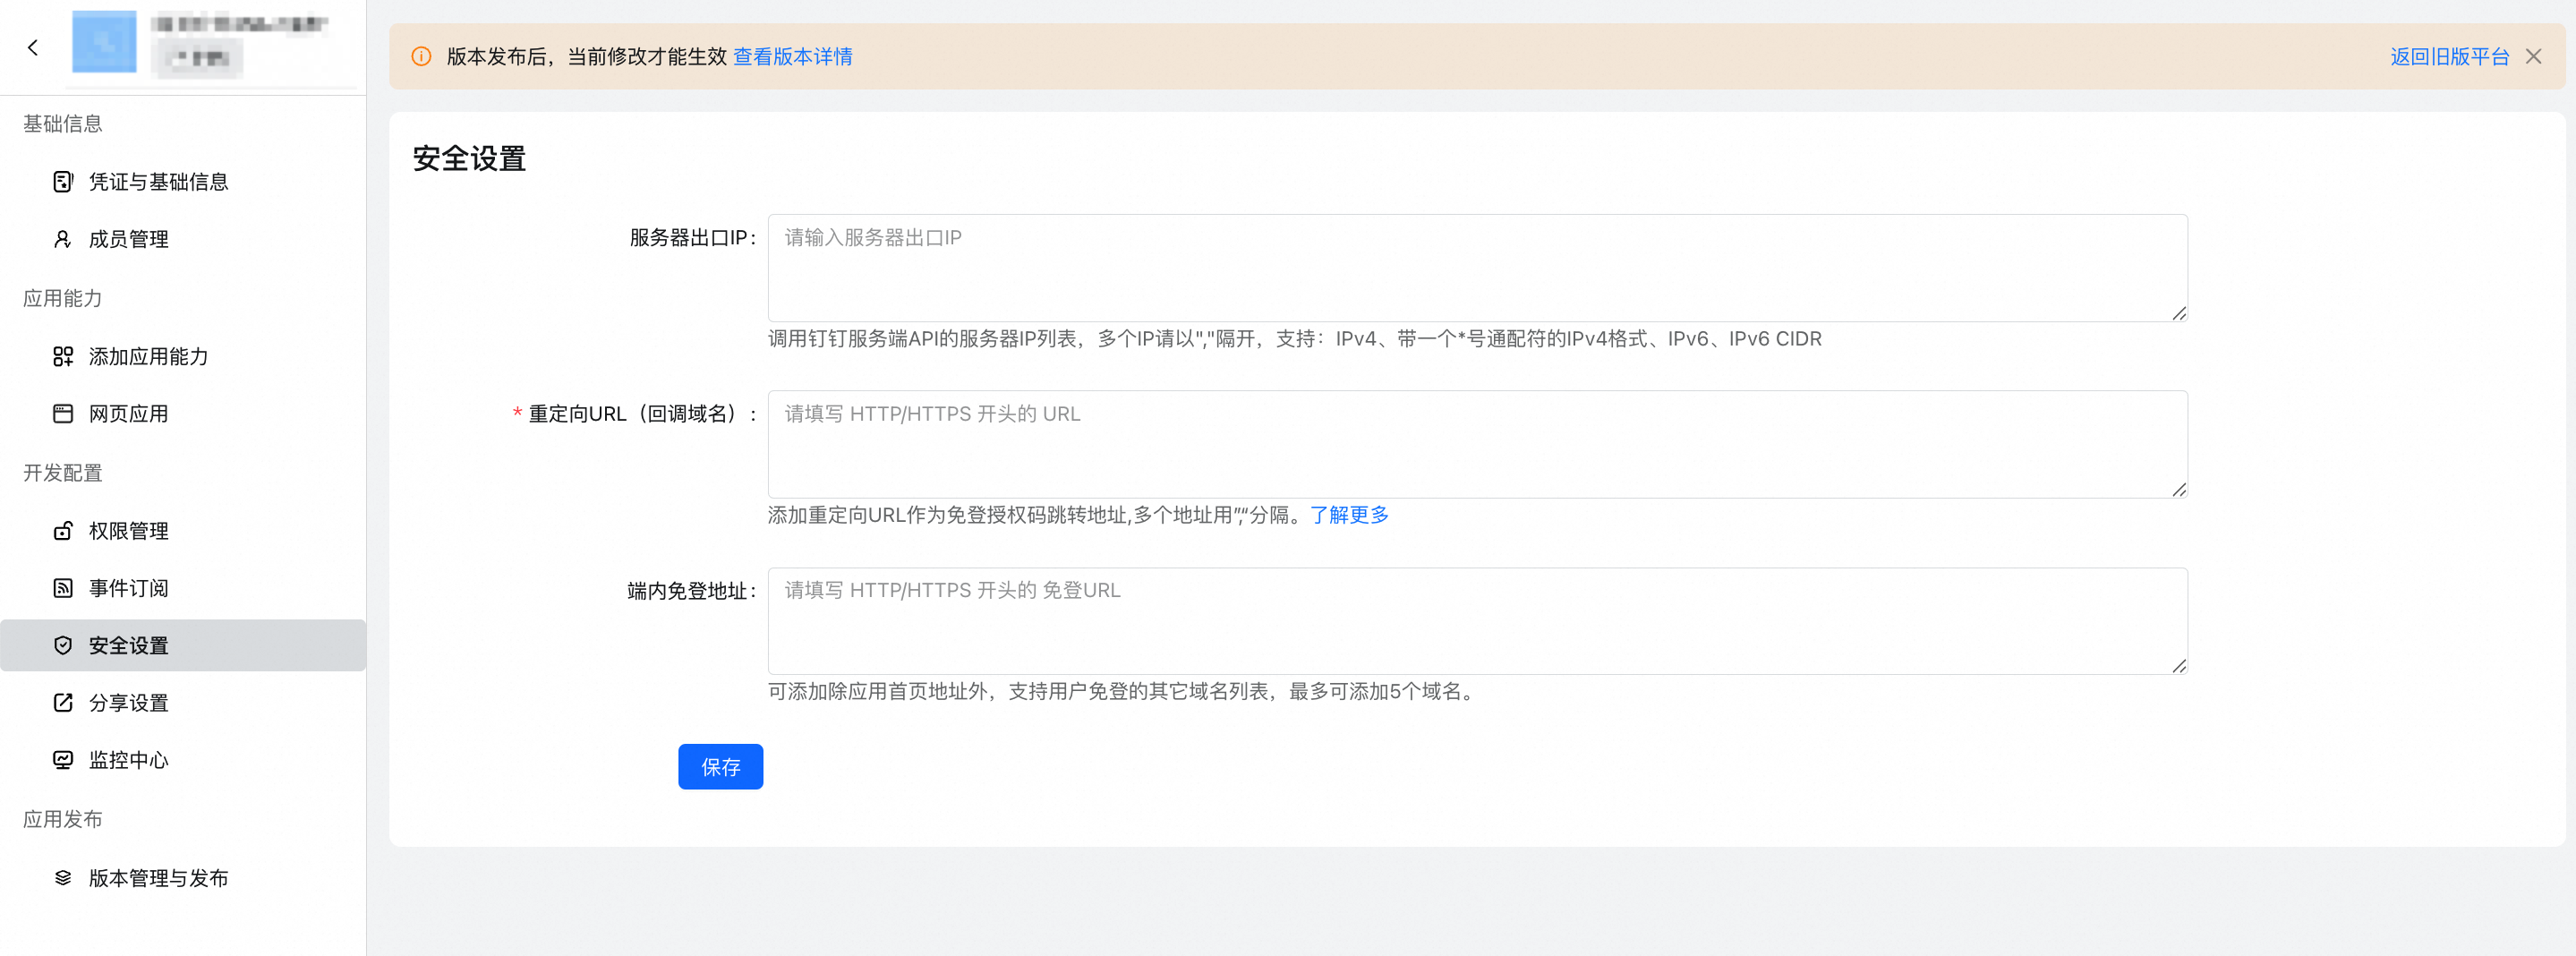
> 重定向 URL 为你后续登录授权后,预期跳转的地址。
## 步骤二:OAuth登录授权
当要代表用户使用DingTalk OpenAPI读取和写入资源,需要通过OAuth 2.0授权流程完成授权。OAuth 2.0授权的流程如下图所示。

### 使用钉钉提供的页面登录授权
构造登录授权页面。页面参数如下:
### 重要
* 为了方便阅读,以下参数示例做了换行处理。正常情况下无需进行参数换行。
* 参数value必须要做urlencode,以下示例已经进行urlencode。
```text theme={"theme":{"light":"github-light","dark":"github-dark"}}
https://login.dingtalk.io/oauth2/auth?
redirect_uri=https%3A%2F%2Fwww.aaaaa.com%2Fa%2Fb
&response_type=code
&client_id=dingbbbbbbb
&scope=openid corpid
&state=dddd
&prompt=consent
```
| 参数 | 是否必填 | 说明 |
| --------------- | ---- | ---------------------------------------------------------------------------------------------------------------------------------- |
| redirect\_uri | 是 | 授权通过/拒绝后回调地址。 **重要** 需要与注册应用时登记的域名保持一致。 |
| response\_type | 是 | 固定值为code。 授权通过后返回authCode。 |
| client\_id | 是 | 步骤一中创建的应用详情中获取。 - 企业内部应用:client\_id为应用的AppKey。 - 第三方企业应用:client\_id为应用的SuiteKey。 |
| scope | 是 | 授权范围,授权页面显示的授权信息以应用注册时配置的为准。 当前只支持两种输入: - **openid**:授权后可获得用户userid - **openid** corpid:授权后可获得用户id和登录过程中用户选择的组织id,空格分隔。注意url编码。 |
| prompt | 是 | 值为consent时,会进入授权确认页。 |
| state | 否 | 跟随authCode原样返回。 |
| org\_type | 否 | 控制输出特定类型的组织列表,org\_type=management 表示只输出有管理权限的组织。 **重要** scope包含corpid时该参数存在意义。 |
| corpId | 否 | 用于指定用户需要选择的组织。 **重要** - scope包含corpid时该参数存在意义。 - 传入的corpId需要是当前用户所在的组织。 |
| exclusiveLogin | 否 | true表示专属账号登录,展示组织代码输入页。 |
| exclusiveCorpId | 否 | 开启了专属账号功能的组织corpId。 **重要** exclusiveLogin为true时该参数存在意义, 表示直接进入该组织的登录页 |
成功时跳转到:[https://www.aaaaa.com/a/b?authCode=xxxx\&state=dddd](https://www.aaaaa.com/a/b?authCode=xxxx\&state=dddd)
失败时跳转到:[https://www.aaaaa.com/a/b?error=yyyyyy\&state=dddd](https://www.aaaaa.com/a/b?error=yyyyyy\&state=dddd)
### 内嵌二维码方式登录授权
嵌入二维码的页面必须和redirect\_uri参数所指定的页面“同源”,否则扫码后会没有反应,“同源”指:协议相同、二级或三级域名相同、端口号相同等。详情请参考文档[浏览器的同源策略](https://developer.mozilla.org/zh-CN/docs/Web/Security/Same-origin_policy)。
1. 在页面中引入钉钉扫码登录JSSDK。
```xml theme={"theme":{"light":"github-light","dark":"github-dark"}}
```
2. 在需要引入扫码登录的地方,调用如下方法。
```html theme={"theme":{"light":"github-light","dark":"github-dark"}}
```
参数说明((TypeScript语言描述)):
```typescript theme={"theme":{"light":"github-light","dark":"github-dark"}}
// ********************************************************************************
// window.DTFrameLogin方法定义
// ********************************************************************************
window.DTFrameLogin: (
frameParams: IDTLoginFrameParams, // DOM包裹容器相关参数
loginParams: IDTLoginLoginParams, // 统一登录参数
successCbk: (result: IDTLoginSuccess) => void, // 登录成功后的回调函数
errorCbk?: (errorMsg: string) => void, // 登录失败后的回调函数
) => void;
// ********************************************************************************
// DOM包裹容器相关参数
// ********************************************************************************
// 注意!width与height参数只用于设置二维码iframe元素的尺寸,并不会影响包裹容器尺寸。
// 包裹容器的尺寸与样式需要接入方自己使用css设置
interface IDTLoginFrameParams {
id: string; // 必传,包裹容器元素ID,不带'#'
width?: number; // 选传,二维码iframe元素宽度,最小280,默认300
height?: number; // 选传,二维码iframe元素高度,最小280,默认300
}
// ********************************************************************************
// 统一登录参数
// ********************************************************************************
// 参数意义与“拼接链接发起登录授权”的接入方式完全相同(缺少部分参数)
// 增加了isPre参数来设定运行环境
interface IDTLoginLoginParams {
redirect_uri: string; // 必传,注意url需要encode
response_type: string; // 必传,值固定为code
client_id: string; // 必传
scope: string; // 必传,如果值为openid+corpid,则下面的org_type和corpId参数必传,否则无法成功登录
prompt: string; // 必传,值为consent。
state?: string; // 选传
org_type?: string; // 选传,当scope值为openid+corpid时必传
corpId?: string; // 选传,当scope值为openid+corpid时必传
exclusiveLogin?: string; // 选传,如需生成专属组织专用二维码时,可指定为true,可以限制非组织帐号的扫码
exclusiveCorpId?: string; // 选传,当exclusiveLogin为true时必传,指定专属组织的corpId
}
// ********************************************************************************
// 登录成功后返回的登录结果
// ********************************************************************************
interface IDTLoginSuccess {
redirectUrl: string; // 登录成功后的重定向地址,接入方可以直接使用该地址进行重定向
authCode: string; // 登录成功后获取到的authCode,接入方可直接进行认证,无需跳转页面
state?: string; // 登录成功后获取到的state
}
```
## 步骤三:获取访问凭证
使用返回的auth\_code和应用的信息,调用[获取用户token](/zh/open/development/obtain-user-token)接口得到access\_token。
示例代码:
```http theme={"theme":{"light":"github-light","dark":"github-dark"}}
POST /v1.0/oauth2/userAccessToken HTTP/1.1
Host:api.dingtalk.io
x-acs-dingtalk-access-token:BE3xxxx
Content-Type:application/json
{
"clientId" : "dingxxx",
"clientSecret" : "1234",
"code" : "abcd",
"refreshToken" : "abcd",
"grantType" : "authorization_code"
}
```
## 步骤四:使用访问凭证调用API
获取access\_token后,就可以使用这个凭证调用[获取用户通讯录个人信息](/zh/open/development/dingtalk-retrieve-user-information)接口。