

 Chats
Chats Calendar
 Meetings
 Contacts
 Mail
Mail Docs
Docs Drive
Drive AI Table
 AI Minutes
 Attendance
 Approval
 YiDA
YiDA Admin Console
Overview
The approver handles approval tasks at the step and makes decisions such as Accept, Decline, transfer, sign request, or return. Every workflow must contain at least one approver step, and you can add or remove approver steps as needed. For example, when an employee purchases office computers, they must follow the company workflow for reimbursement. The employee submits a reimbursement request, and the finance staff decide whether to approve it — accept, decline, or take another action. In this scenario, the finance staff are the approver in the workflow.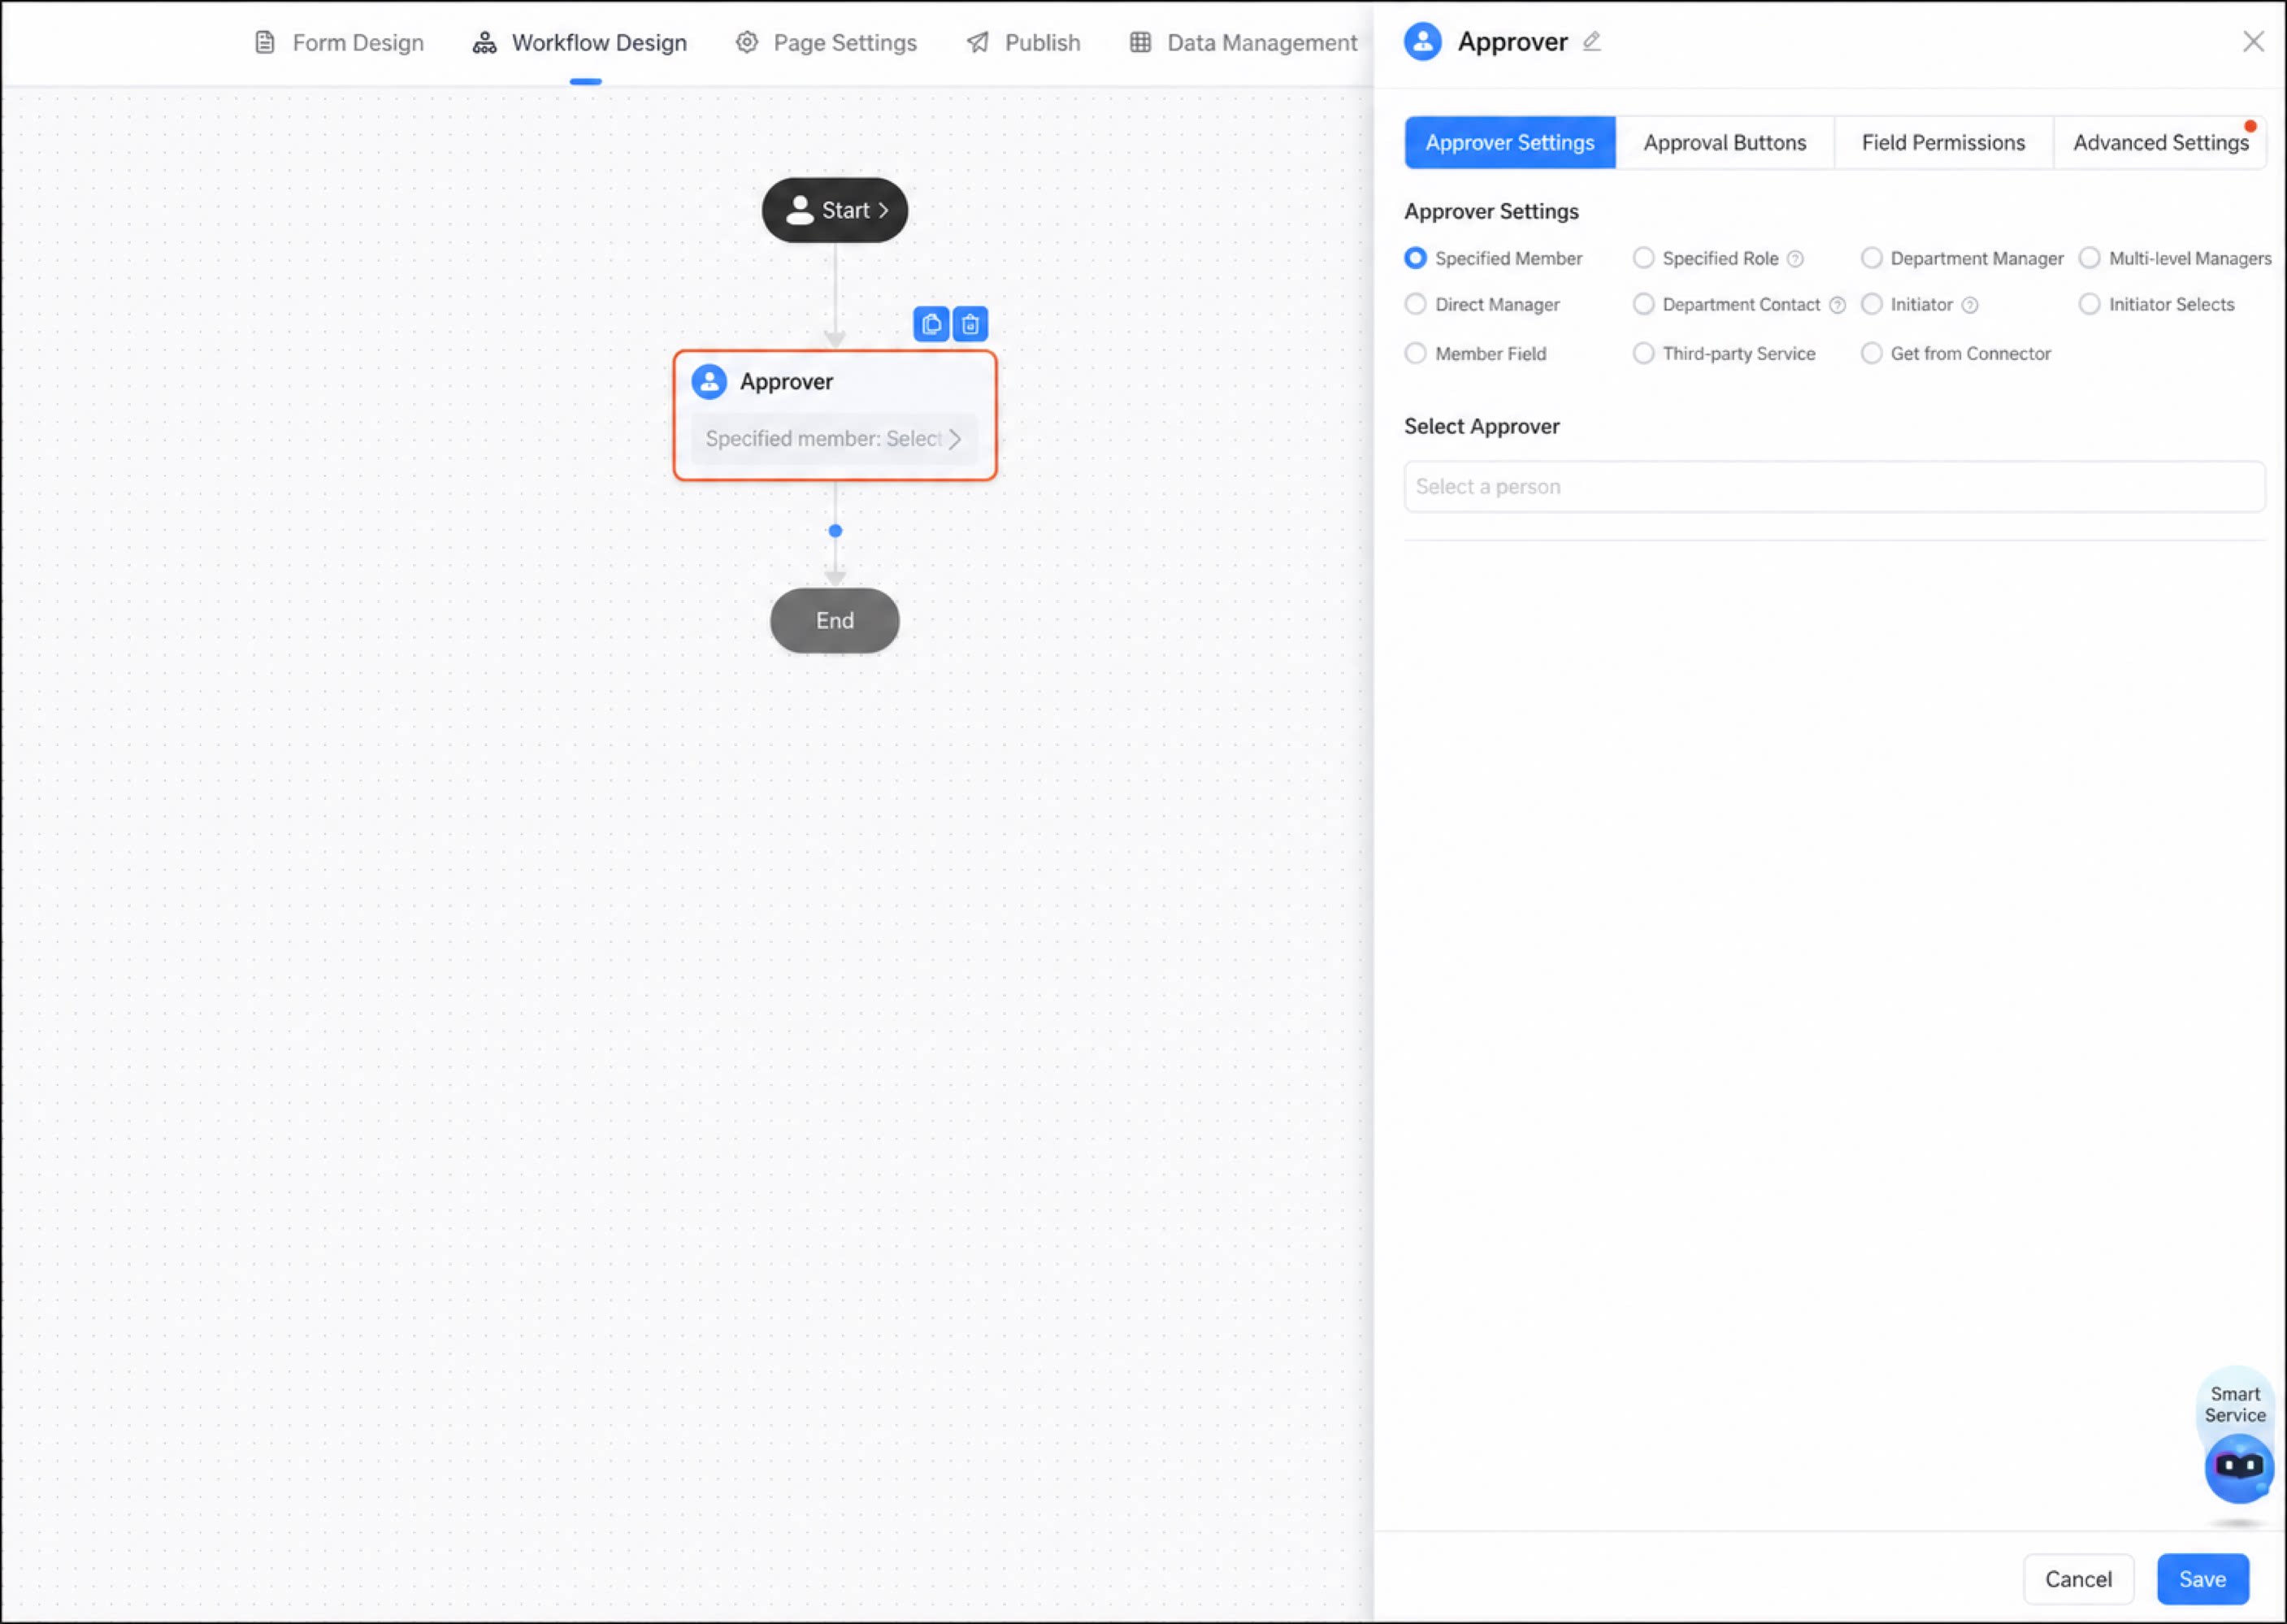
Add an Approver Step
Follow these steps to add an approver step.1
Step 1
Sign in to the YiDA workbench. Select the target app and go to the Page management page.
2
Step 2
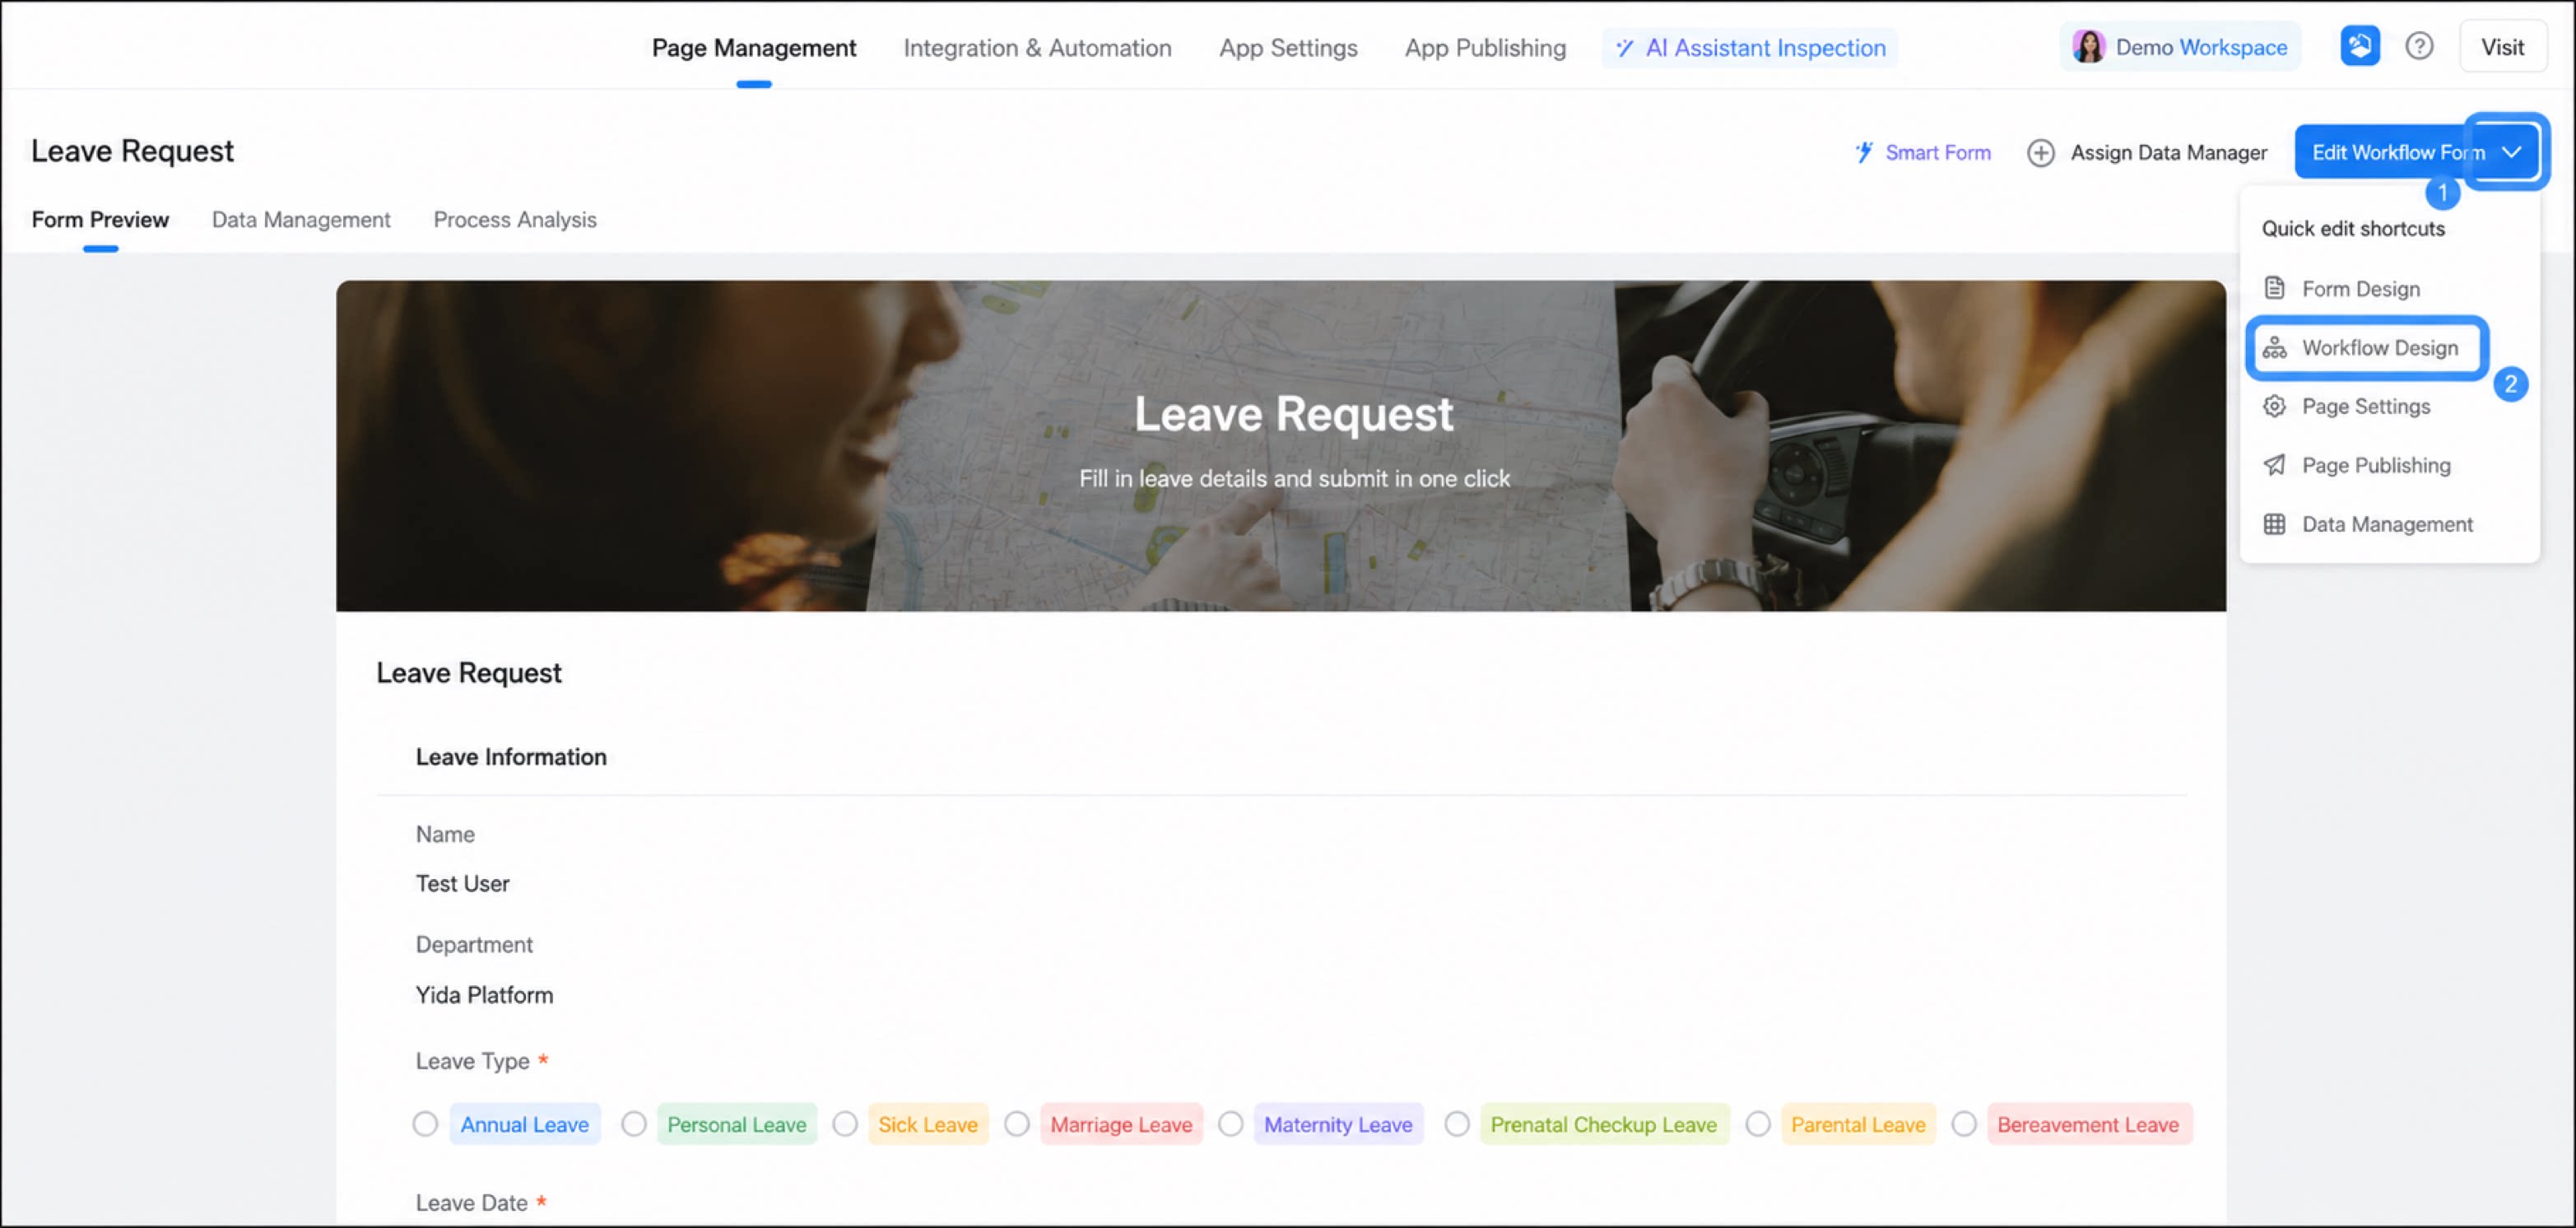
Select a workflow form, click the down arrow next to the workflow form, and then select Workflow design. 
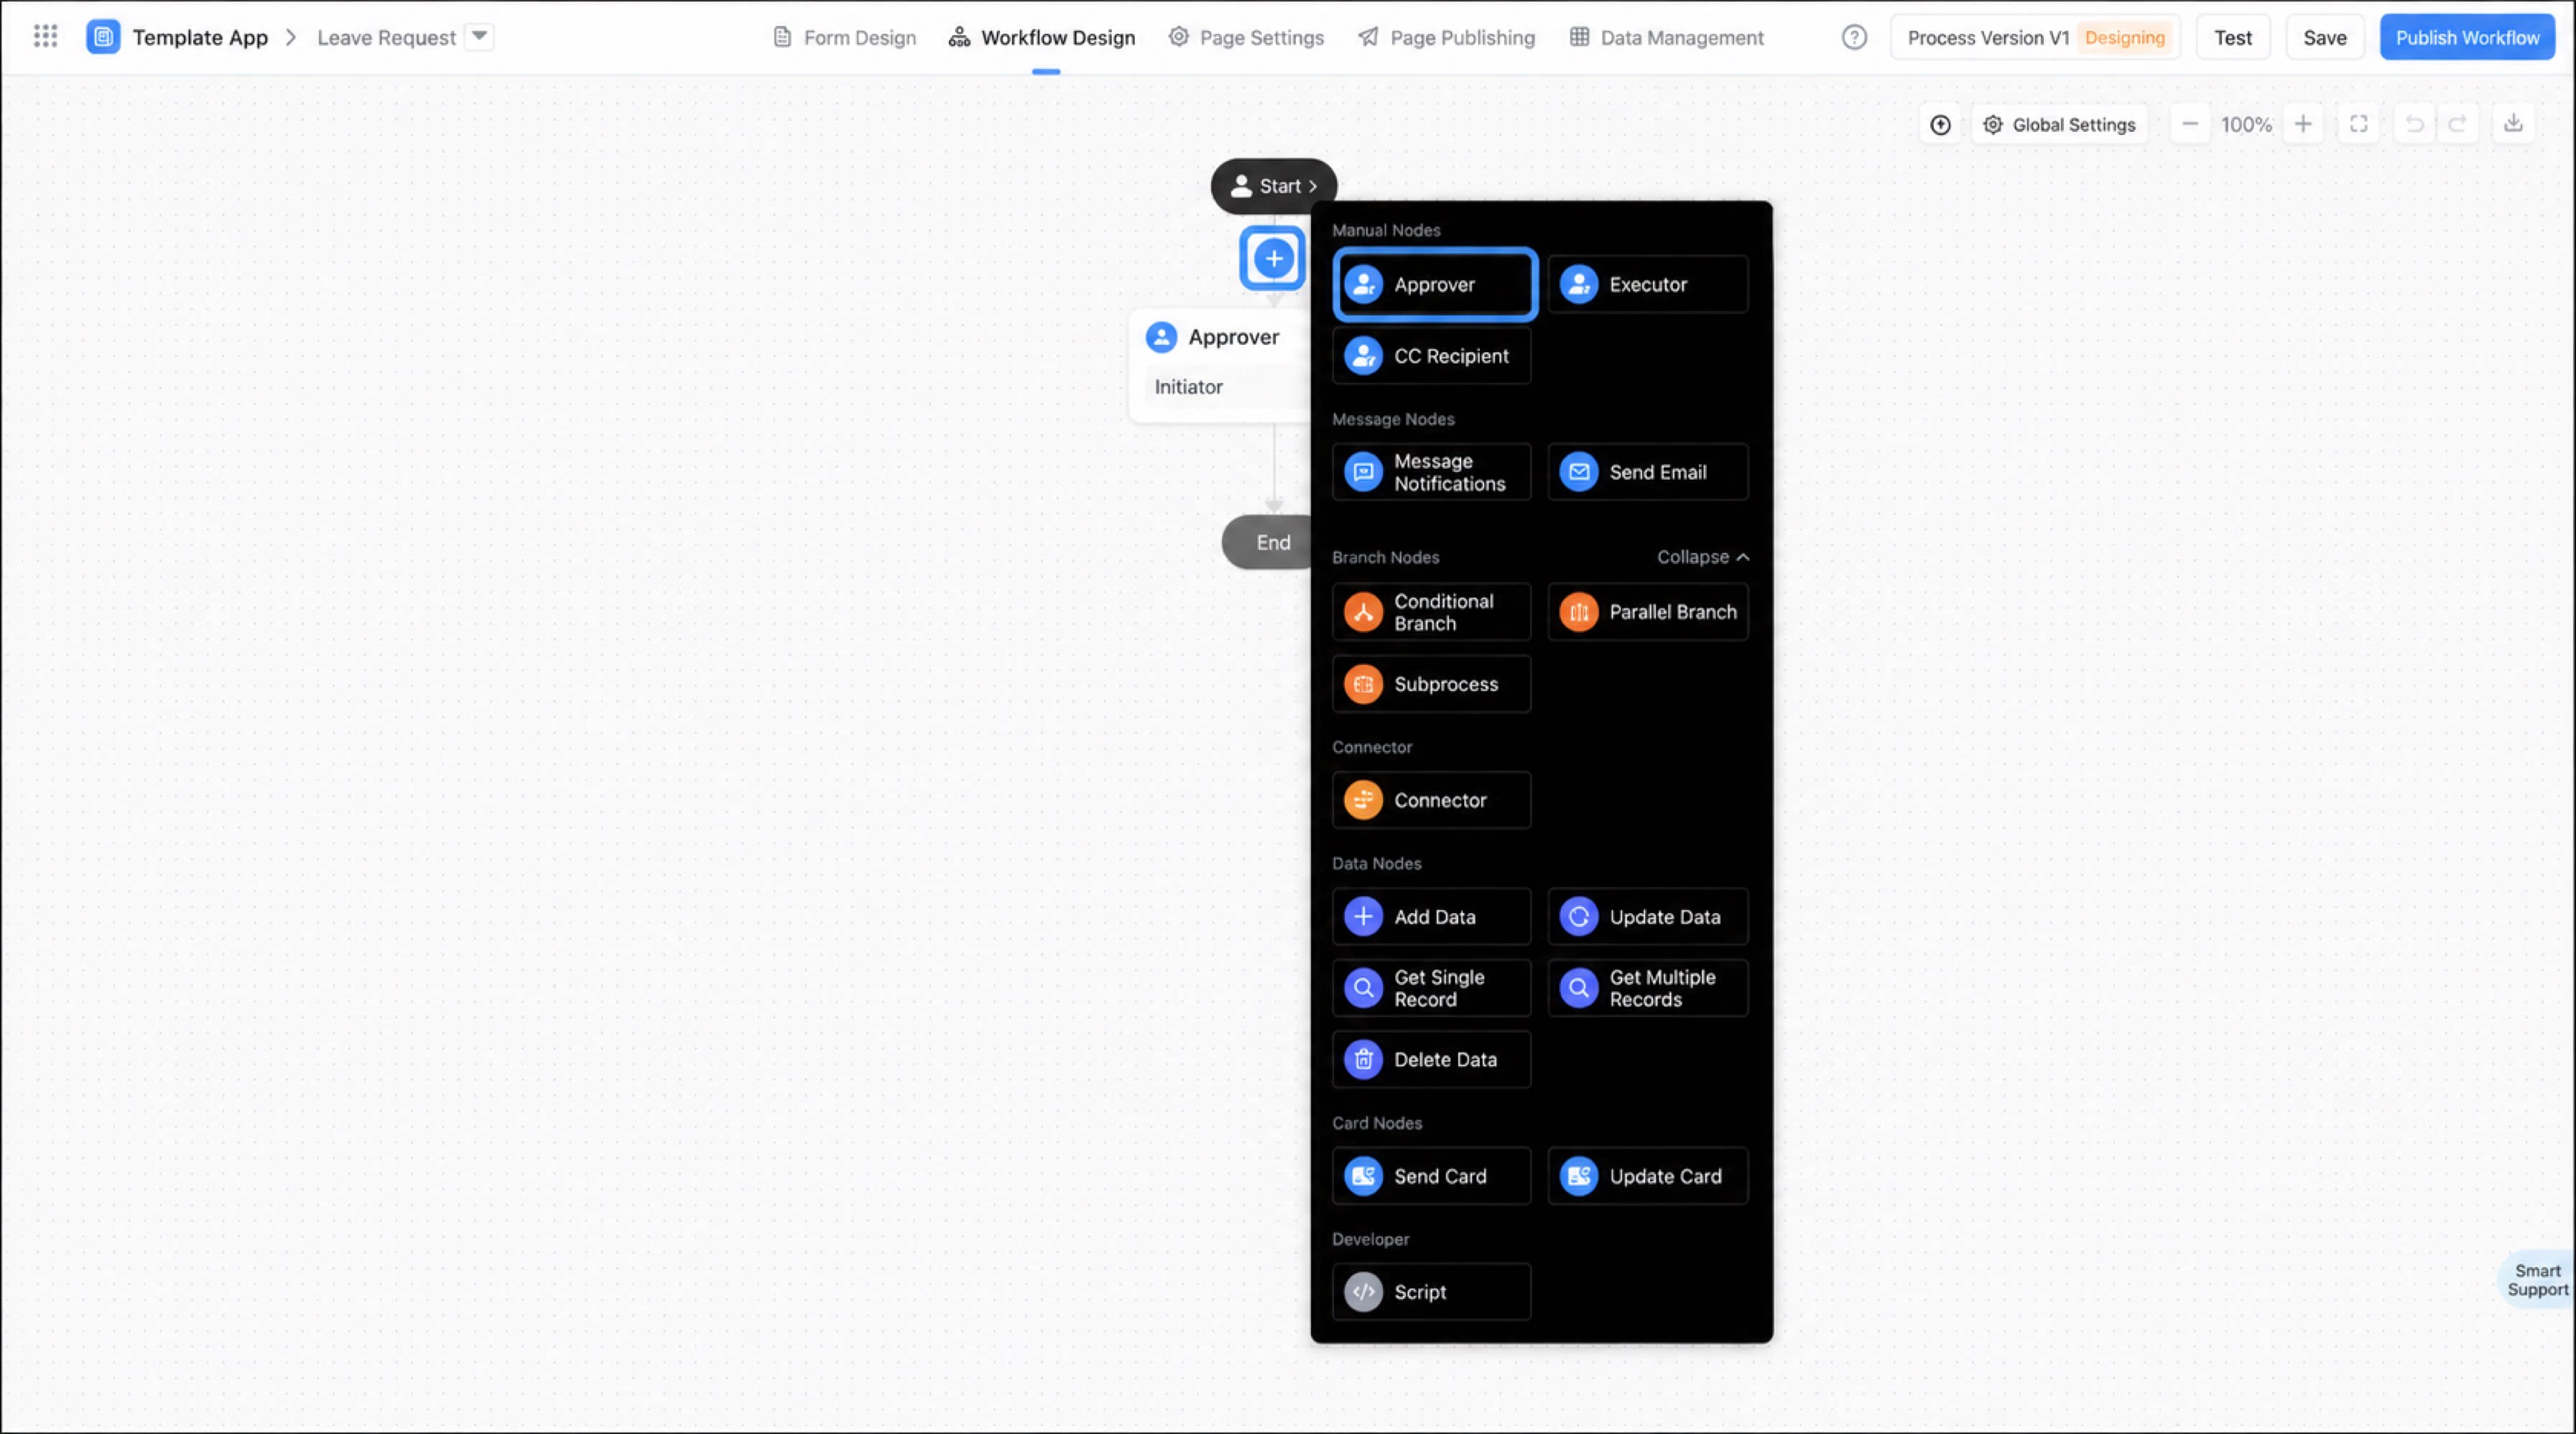
- Hover over a connection line between workflow steps to reveal the + button. Click + and select the Approver step.
Approver Settings
Approvers correspond to different roles depending on the business scenario. The YiDA approver step currently supports the following approver types.Specified User
In simple mode, Specified user means the step’s approver is a fixed approver. Multiple selections are supported. When there are multiple approvers, the following multi-approver modes are available:- Parallel (any): All configured users receive a notification. Once any approver accepts, the workflow moves to the next step. The final result is determined by the first person to act.
- Parallel (all): The workflow moves to the next step only after all approvers accept.
- Sequential: Approvers act one after another in the configured order.
Specified Role
Specified role approval groups multiple people together. You can use DingTalk roles or YiDA roles.- Manage YiDA roles in YiDA workbench > Platform management page.
- Manage DingTalk roles in the DingTalk admin console.
To configure roles, see Role management.
- Parallel (any): All configured users receive a notification. Once any approver accepts, the workflow moves to the next step. The final result is determined by the first person to act.
- Parallel (all): The workflow moves to the next step only after all approvers accept.
- Sequential: Approvers act one after another in the configured order.
Department Manager
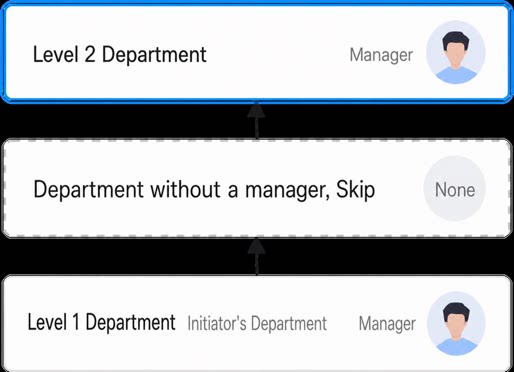
Specify the department manager of the initiator or of a member component on the page.- Up to 20 manager levels are supported.
- When the manager source is a member component from the form and the member belongs to multiple departments, the system randomly selects one department to obtain the “department manager”.
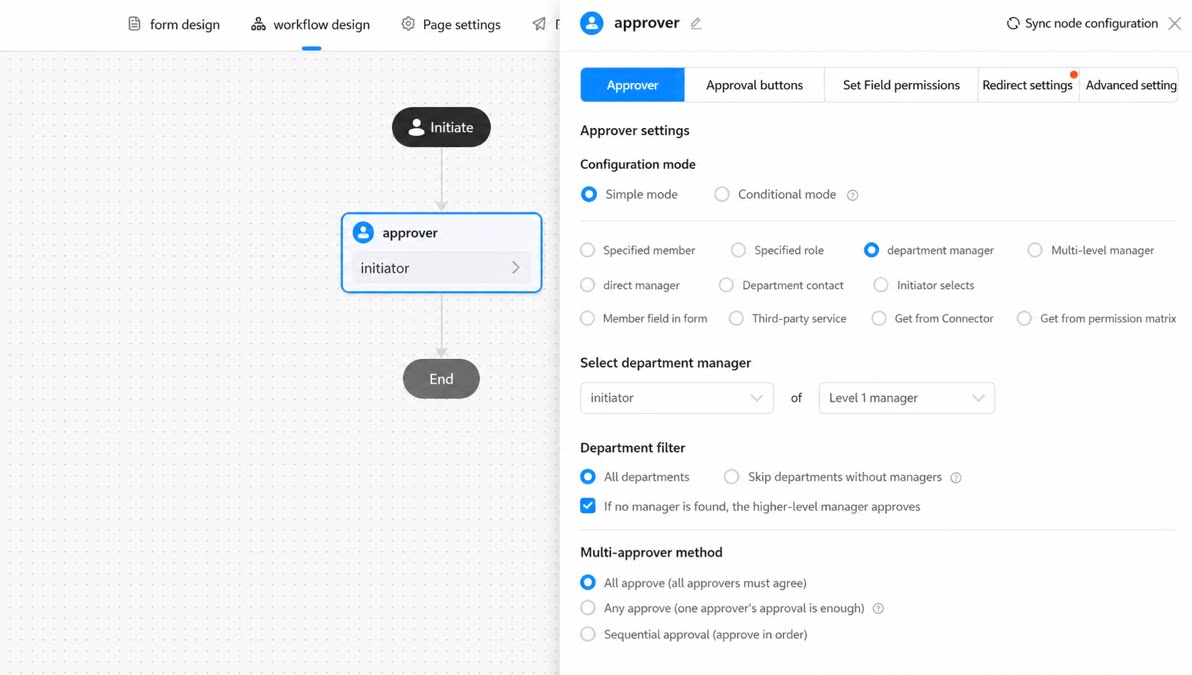
- Department filter:
- Multi-approver mode:
Multi-Level Manager
After the initiator submits, each manager level above the initiator approves in sequence until the approval endpoint is reached. The approval endpoint can be a specified role or a specific manager level.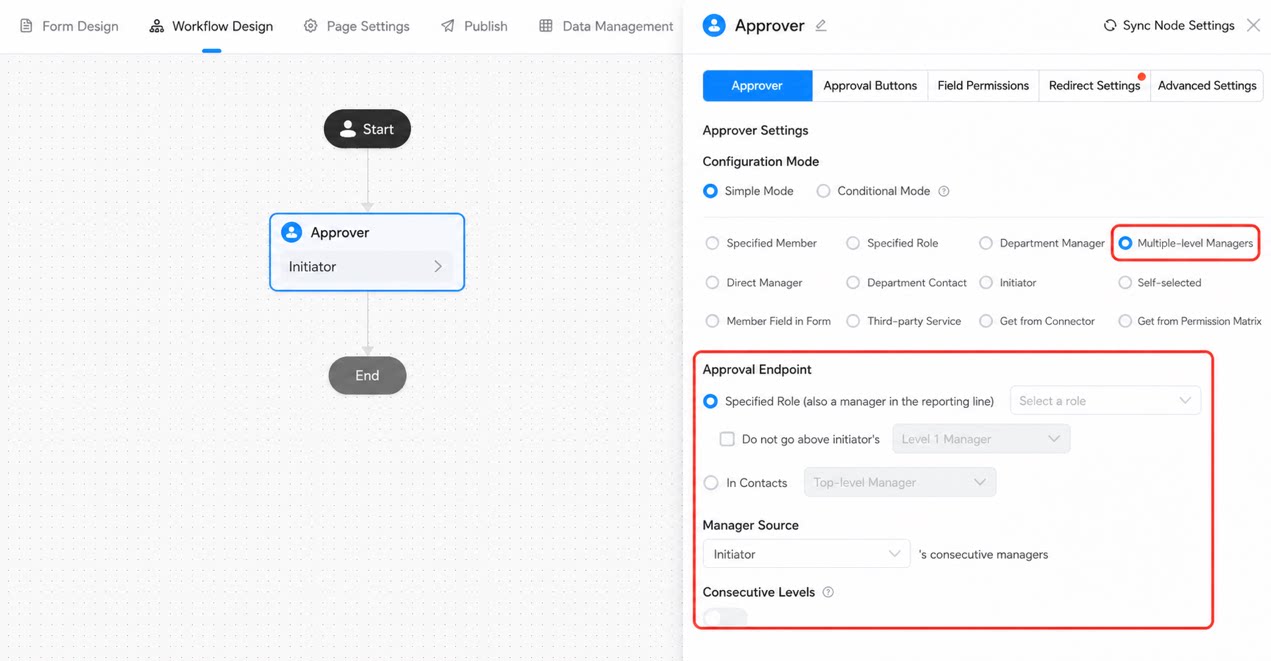
- Specified role (also on the manager chain):
Use this option when you don’t know which manager level is required but you know the manager’s role.Example: You know the manager’s role is Finance but not the exact level. Select this option and set the role to Finance to find the manager with the Finance role along the manager chain as the approver.
- Nth-level manager from Contacts: Select which manager level in Contacts serves as the approver.
- “Manager” in “Multi-level manager” refers to “department manager” (not “direct manager”).
- When the manager source is a member field from the form and members in the field belong to multiple departments, the system randomly selects one department to obtain the “department manager”.
- When Consecutive multi-level is off, only the manager at the approval endpoint approves.
- When Consecutive multi-level is on, all managers from the first level to the approval endpoint approve in sequence.
How the approval endpoint combines with Consecutive multi-levelConsecutive multi-level on
- Specified role as endpoint
- Consecutive multi-level managers are A-B-C-D.
- The endpoint role includes C.
- The final approval chain is A-B-C.
- Specified Nth-level manager as endpoint: take all managers from level 1 to N.
- Consecutive multi-level managers are A-B-C-D.
- If the endpoint is the third-level manager (C), the final approval chain is A-B-C.
- If the endpoint is the top-level manager, the final approval chain is A-B-C-D.
- Specified role as endpoint: take the intersection of the role and levels 1 to N.
- Consecutive managers are A-B-C-D.
- Members in the role are (A, D, E).
- The final approvers are A and D.
- Specified Nth-level manager as endpoint: take only the Nth-level manager.
- Consecutive managers are A-B-C-D.
- If the endpoint is the third-level manager, the final approver is C.
- If the endpoint is the top-level manager, the final approver is D.
Direct Manager
Specify the direct manager of the initiator or of a member component variable on the page. You can customize the Nth-level manager.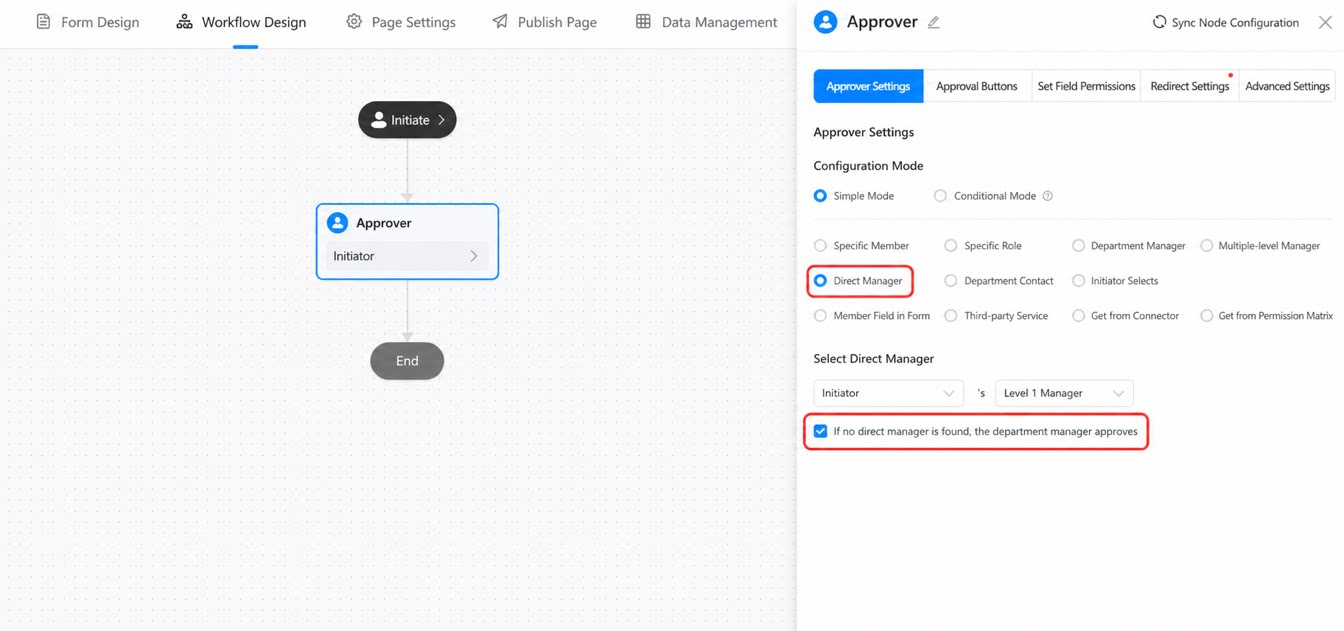
- Up to 20 manager levels are supported.
- When the manager source is a member component from the form and the member belongs to multiple departments, the system randomly selects one department to obtain the “direct manager”.
- If you choose the initiator’s direct manager as the approver and the initiator leaves the company, obtaining the approver fails because the manager information cannot be retrieved.
Department Contact Point
Manage department contact points on the Platform management page. Click the Contact point management button on the right to open the Platform management page and set up department contact points. For details, see Contact point settings.A department contact point is the designated contact for a department. Even when a department has multiple layers of hierarchy, there is usually one designated contact point.
- Parallel (any): All configured users receive a notification. Once any approver accepts, the workflow moves to the next step. The final result is determined by the first person to act.
- Parallel (all): The workflow moves to the next step only after all approvers accept.
- Sequential: Approvers act one after another in the configured order.
Initiator
The approver of the current step is the workflow initiator. This is useful when the initiator needs to review the information again.When the approver is the initiator, the step is not affected by automatic approval rules.
Selected by Initiator
The initiator selects the approvers when starting the workflow.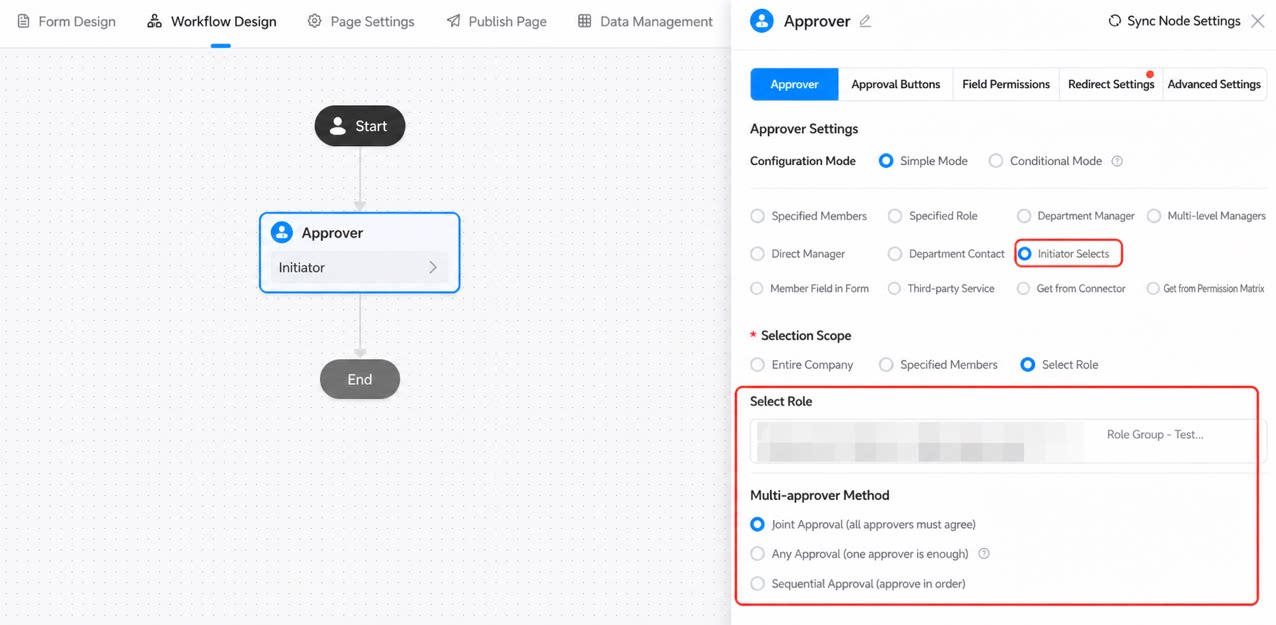
- Company-wide: The initiator can select approvers from anyone in the company.
- Specified user: The initiator selects approvers from a specified user list.
- Specified role: The initiator selects approvers from a specified role list.
- Parallel (any): All configured users receive a notification. Once any approver accepts, the workflow moves to the next step. The final result is determined by the first person to act.
- Parallel (all): The workflow moves to the next step only after all approvers accept.
- Sequential: Approvers act one after another in the configured order.
Member Field on the Form
Use a member variable or the initiator variable on the form as the approver. Multiple approvers are supported. The multi-approver modes are:- Parallel (any): All configured users receive a notification. Once any approver accepts, the workflow moves to the next step. The final result is determined by the first person to act.
- Parallel (all): The workflow moves to the next step only after all approvers accept.
- Sequential: Approvers act one after another in the configured order.
Third-Party Service
Set the approver through a third-party service. Register third-party services in Platform management > Service registration, and then select them directly in the workflow.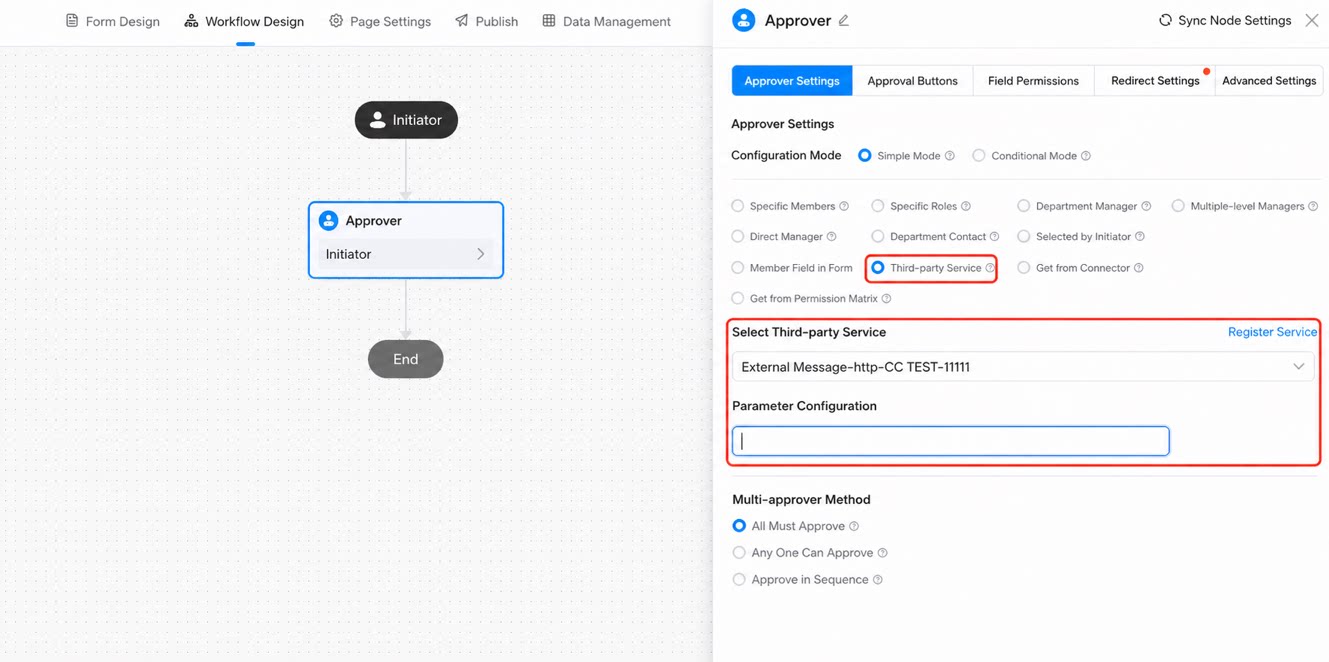
Response Format Requirements
From Connector
You can obtain approvers from a custom connector (YiDA Connector Factory or DingTalk connection platform). The configuration flow is the same as for a connector step.For Connector configuration, see:
- YiDA Connector Factory
- DingTalk connection platform
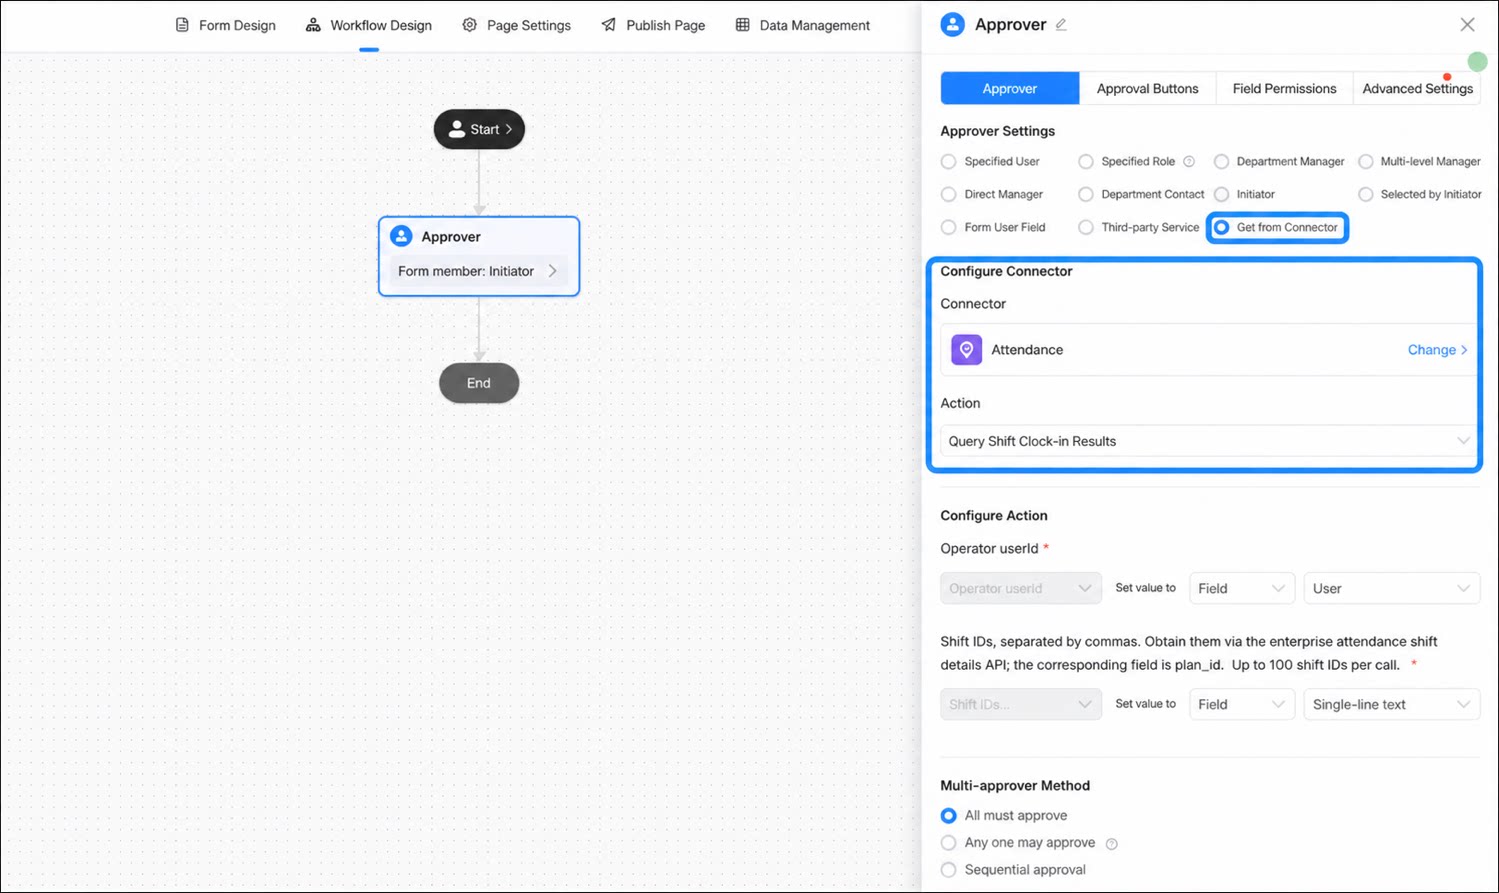
From Permission Matrix
Set approvers from the permission matrix. Configure it in Platform management > Permission matrix, and then select it directly in the workflow. For permission matrix configuration, see Permission matrix.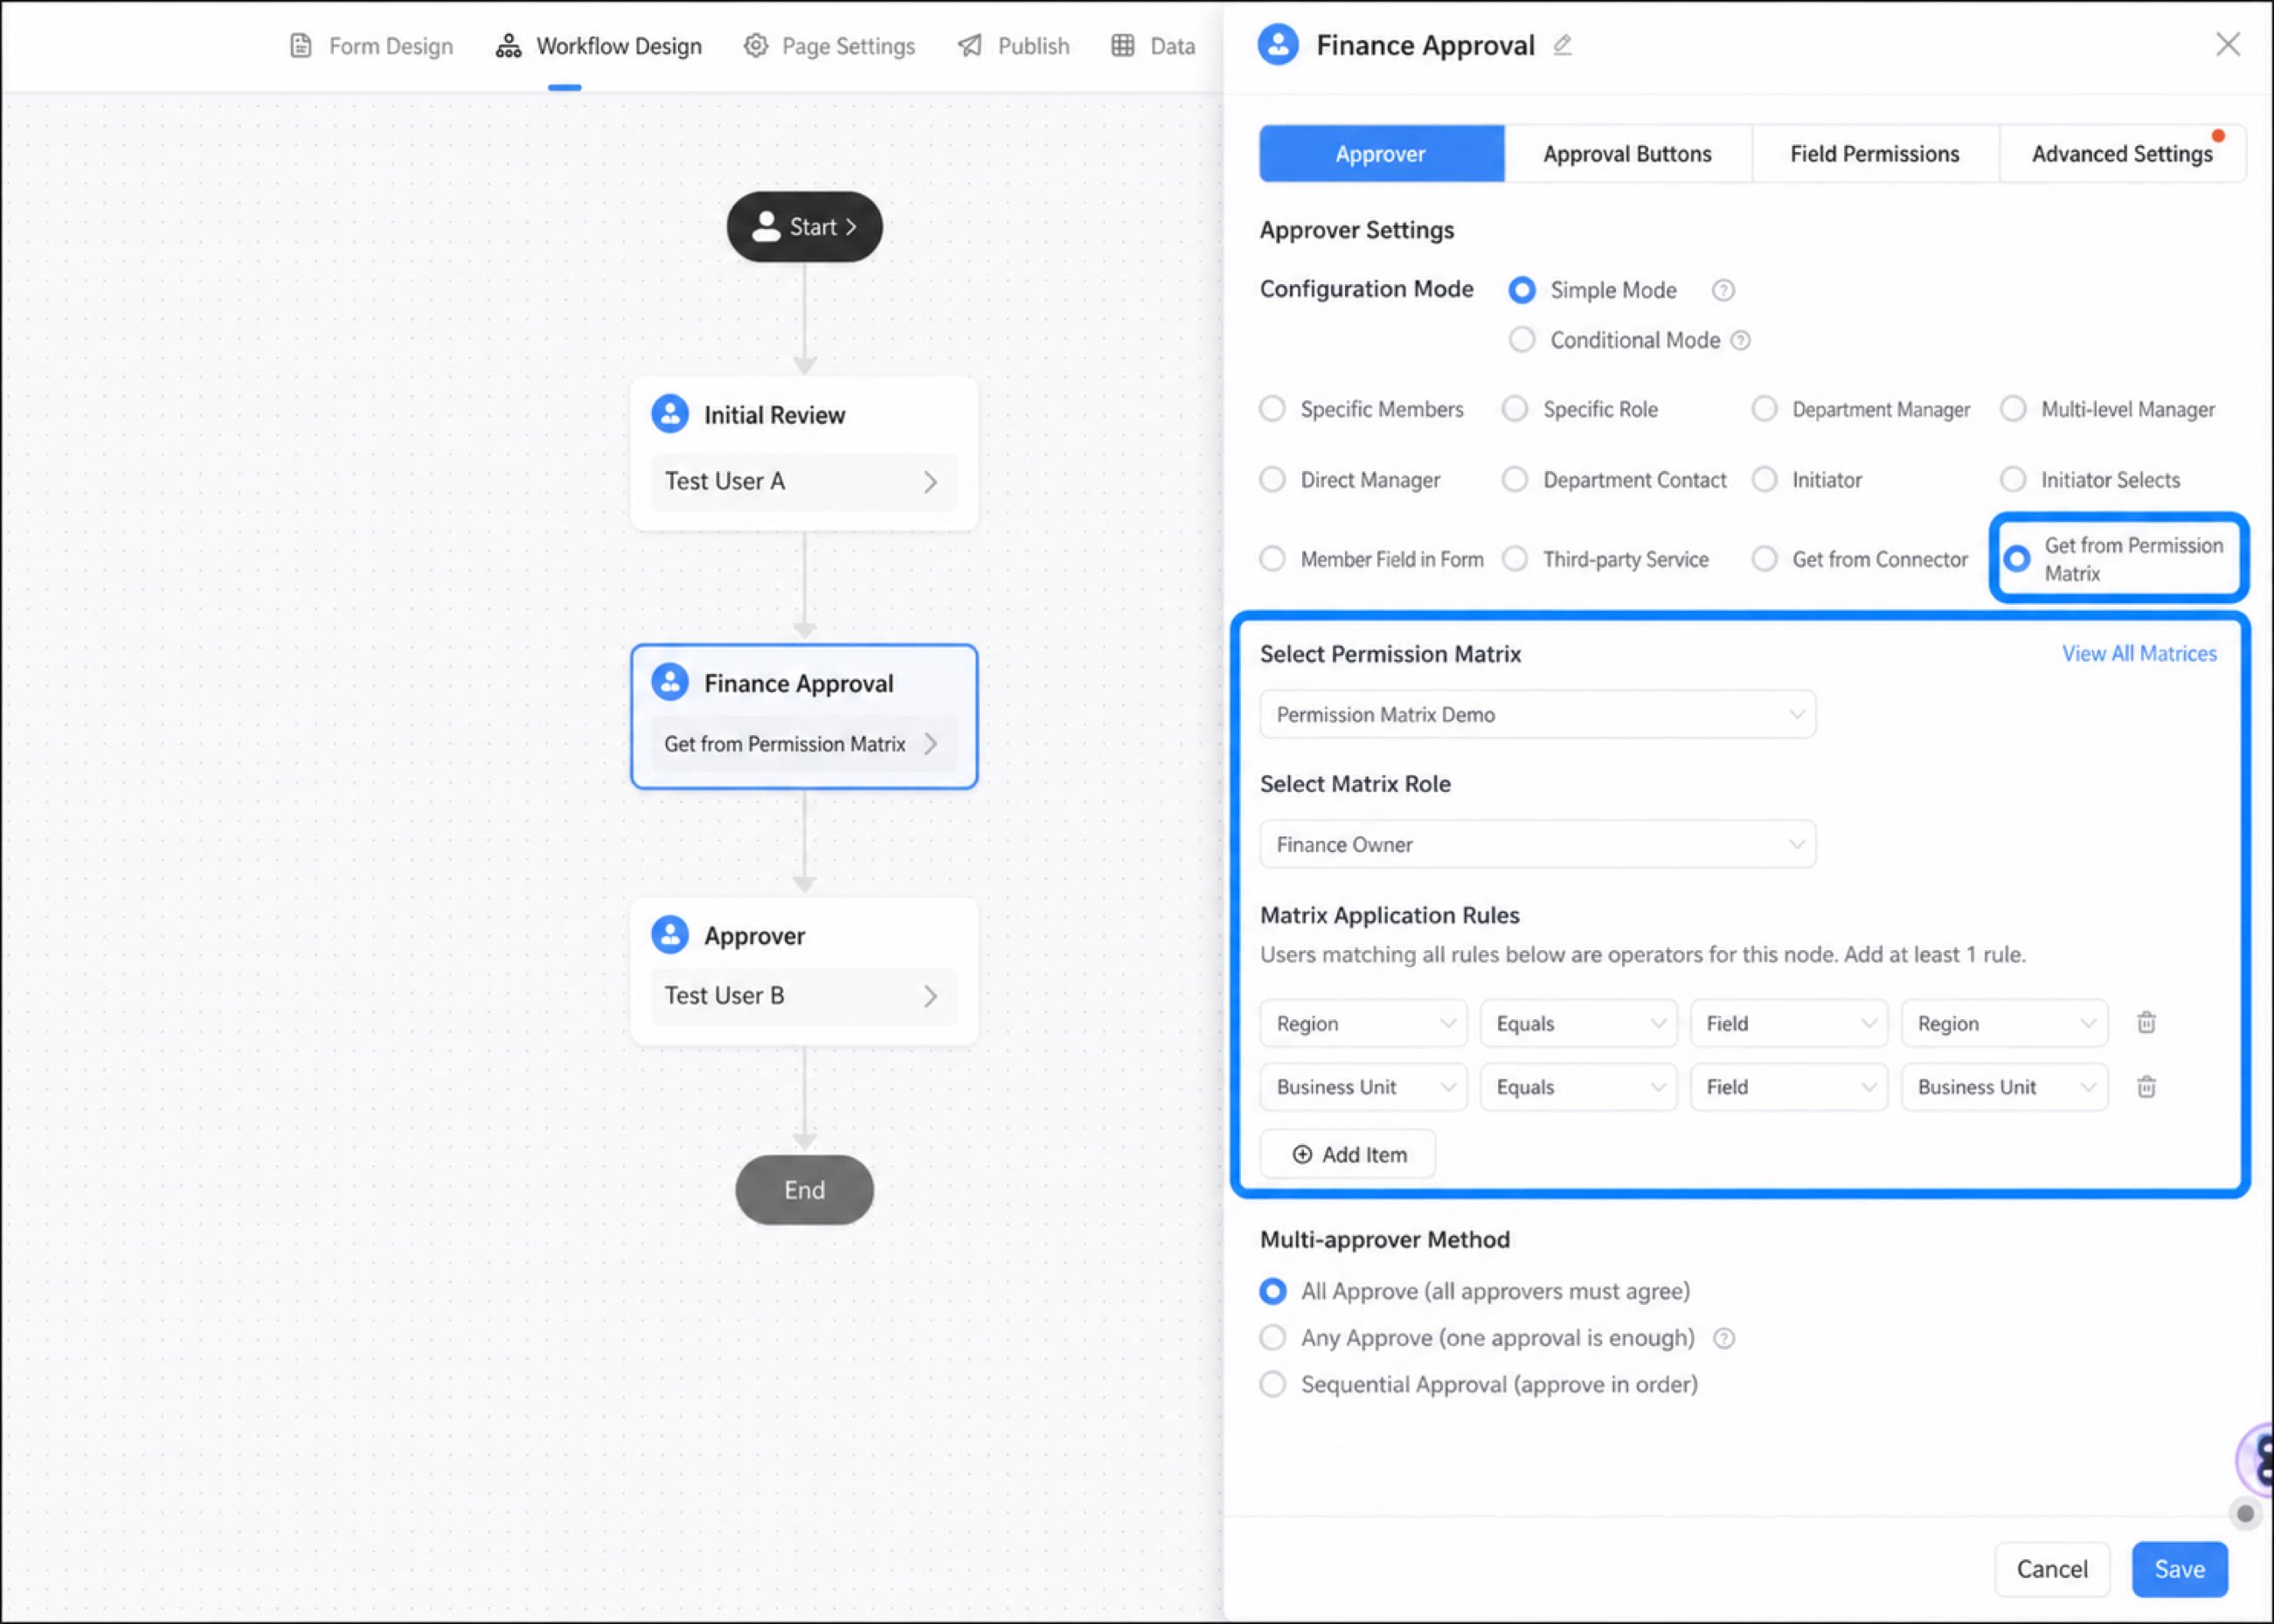
Conditional Mode
In betaBy configuring conditions, the system can automatically match approvers based on preset rules and select different approvers under different conditions. Conditional mode enables dynamic, precise task assignment through flexible rule configuration, using combinations of conditions to determine approvers, CC recipients, and executors.
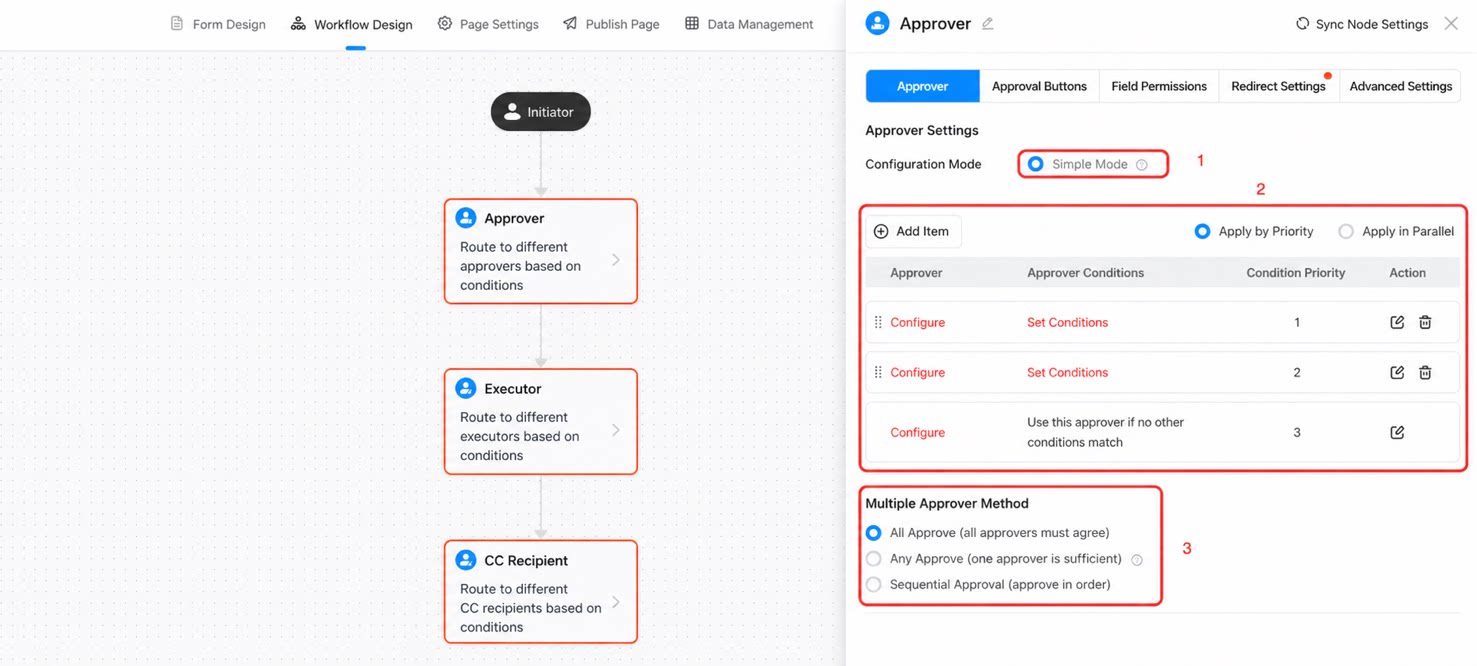
- Open the approval settings page: On the YiDA platform, open the approval workflow settings page.
- Select conditional mode: In the operator settings for approver, CC recipient, or executor, select “Conditional mode”. Conditional mode supports multiple approver groups and lets you define different conditions to route to different approvers.
- Configure condition rules: Click [Add item] to add a row in the approval effective conditions below. Click [Set condition] to open the condition configuration dialog and configure the rules as needed.
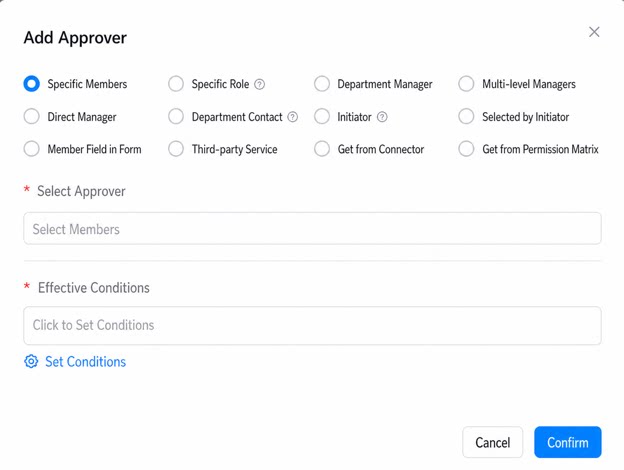
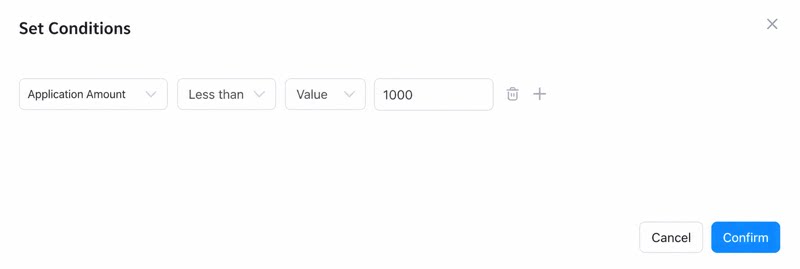
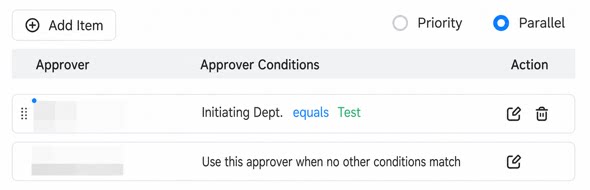
- How multiple rules take effect:
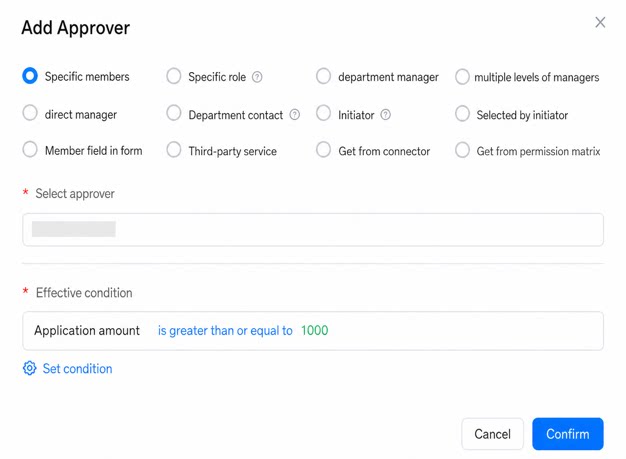
- Priority-based:
- Parallel:
- Multi-approver modes:
- Parallel (all) (all approvers must accept)
- Parallel (any) (any one approver accepting is enough)
- Sequential (approve one after another in order)
- Save and publish: After all conditions are configured, save the settings and publish.
Approval Buttons
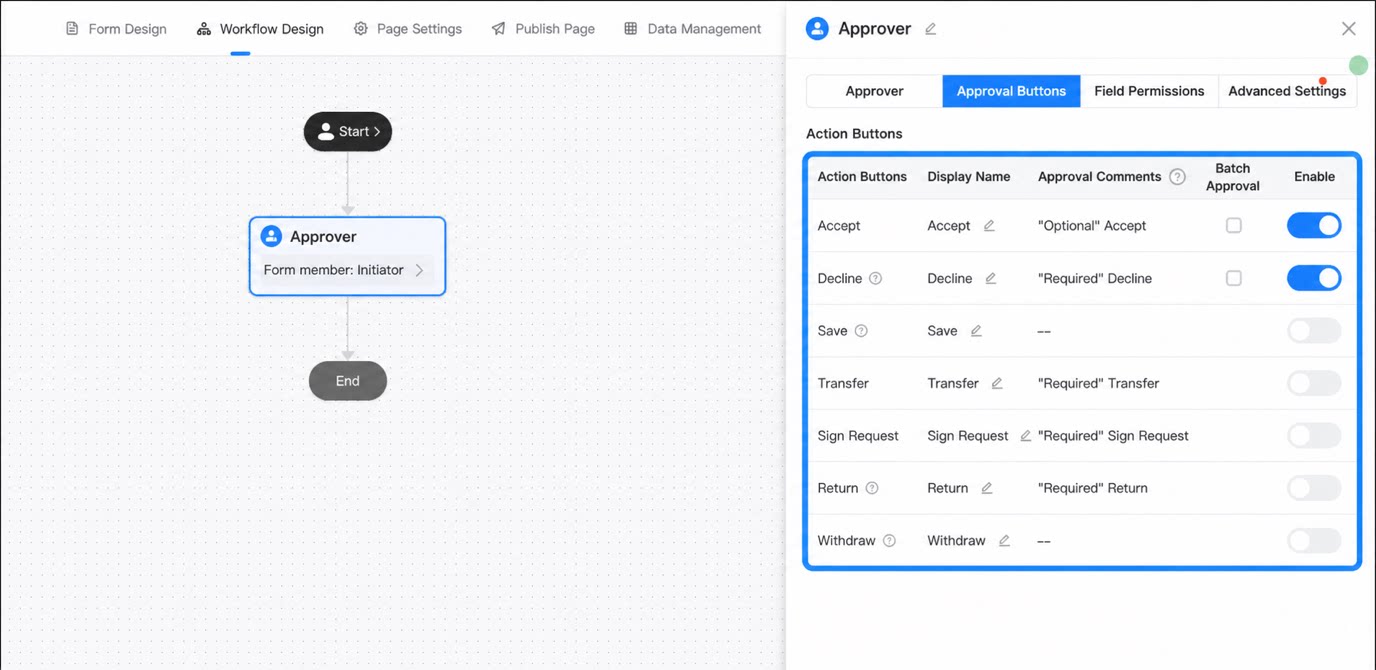
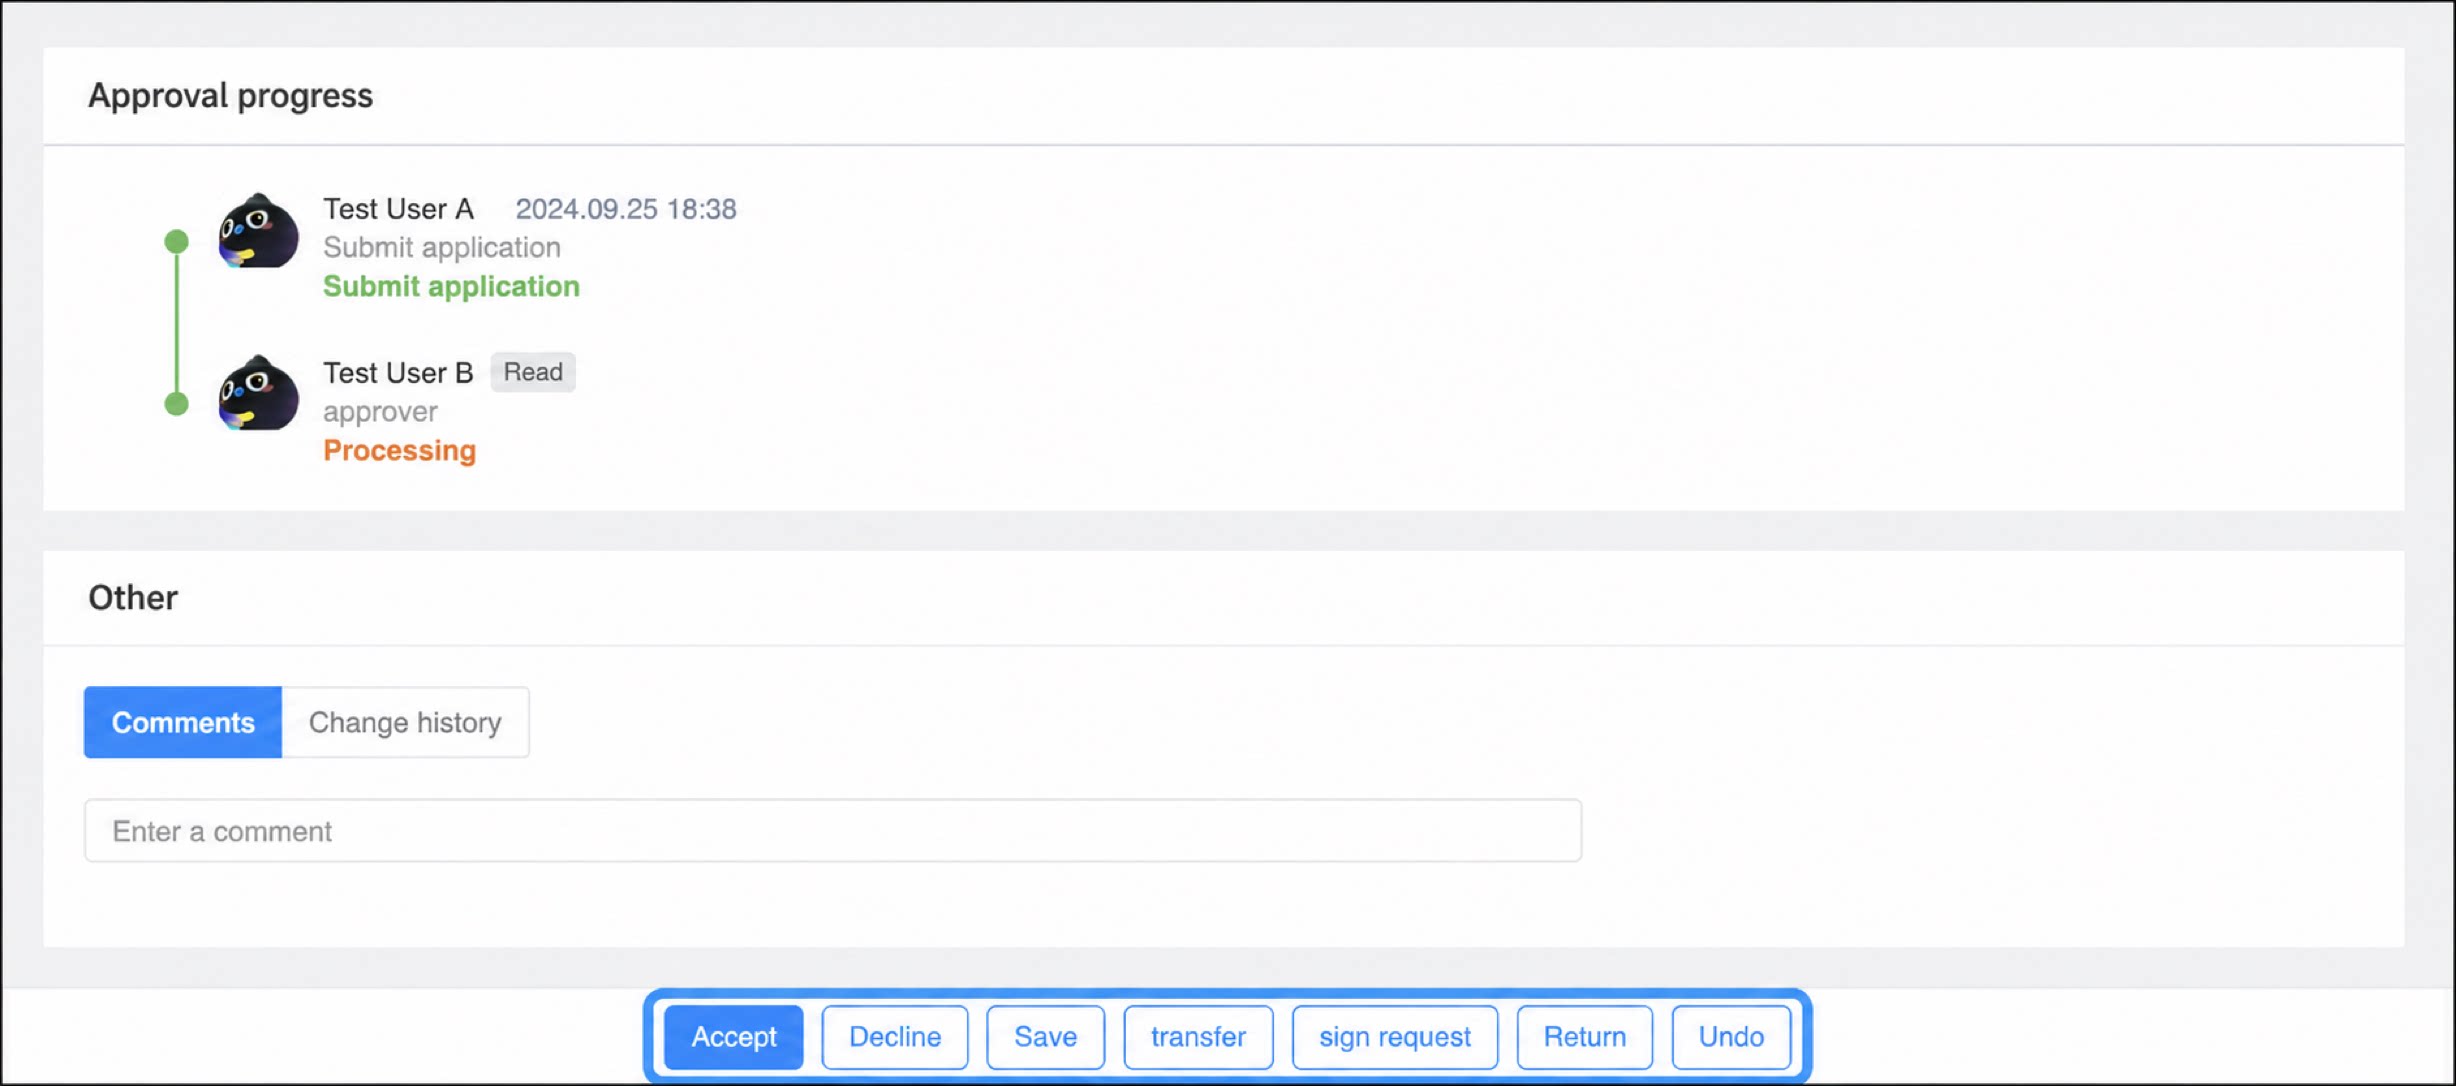
Approval buttons are the actions that the step’s approver can perform when the workflow reaches the current step. The following actions are supported: Accept, Decline, Save, transfer, sign request, return, and Recall. You can configure the display name, default comment, and enablement status for each action. Accept and Decline also support batch approval.- At least one approval button must be enabled.
- When an approver step is created, Accept and Decline are enabled by default.
Accept
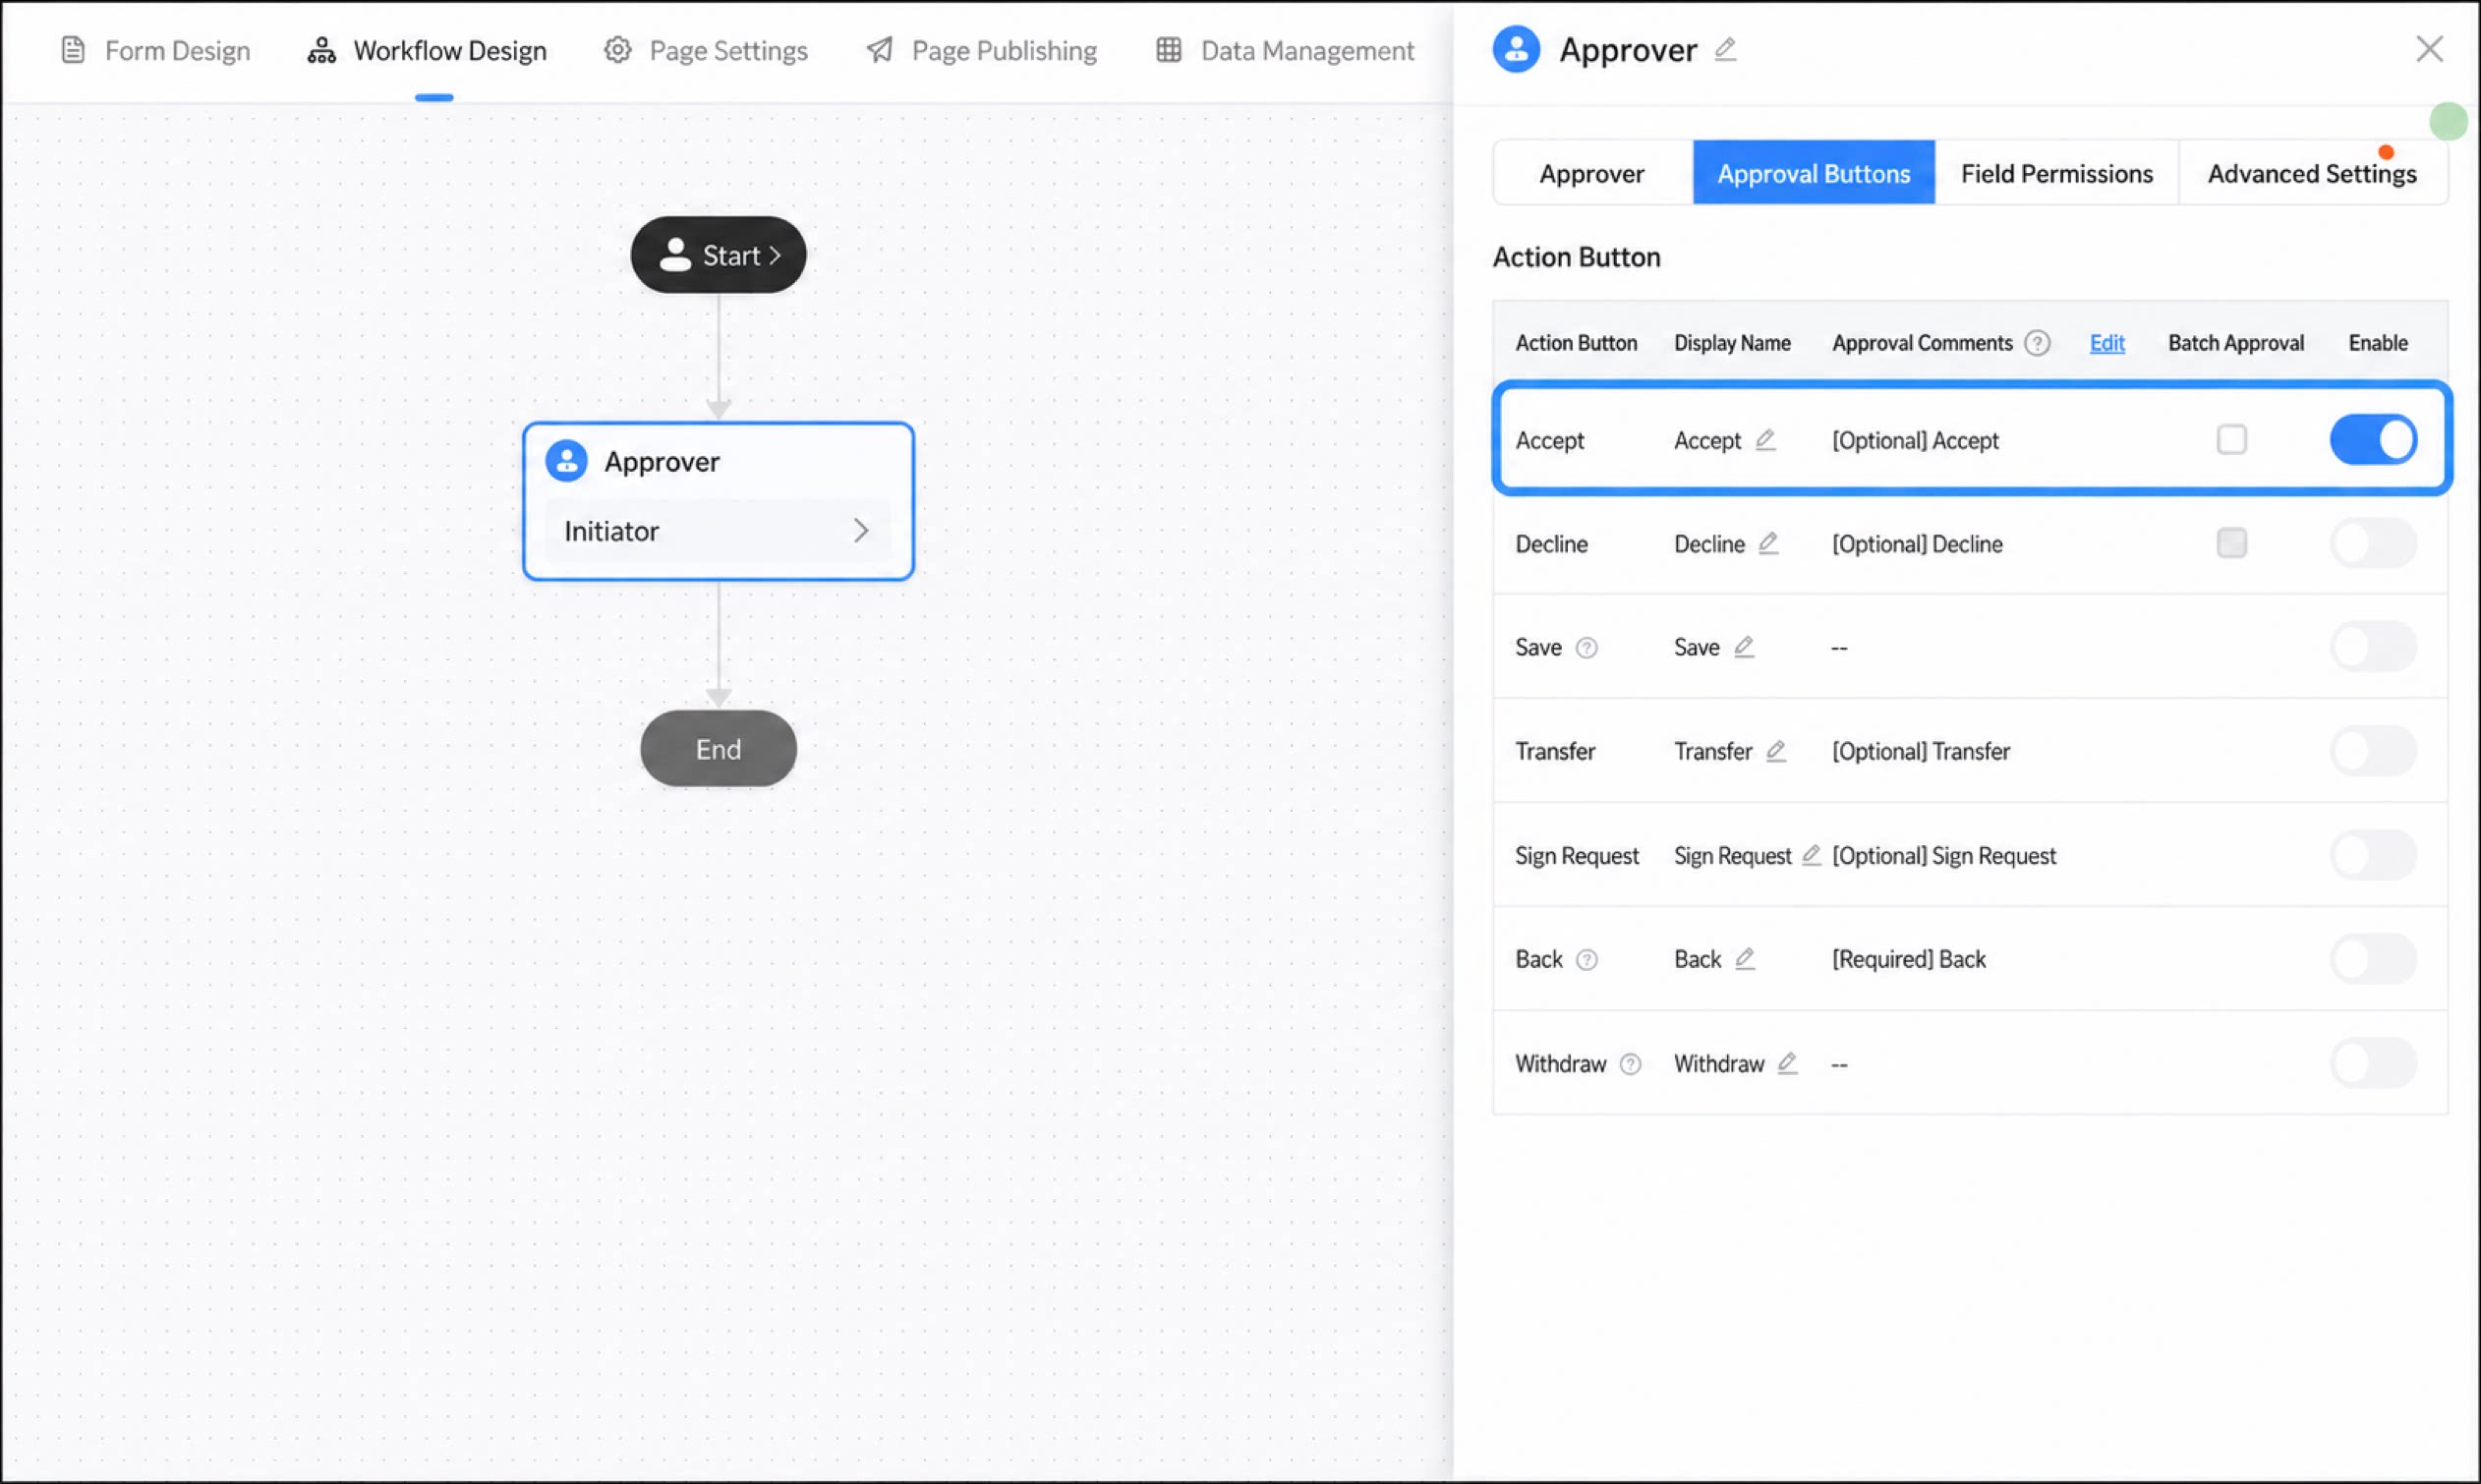
Indicates acceptance of the current initiator’s approval form. Once enabled, the approver sees the Accept button on the approval form.You can configure batch approval, whether to show the comment box, whether the comment is required, and the default comment.
Decline
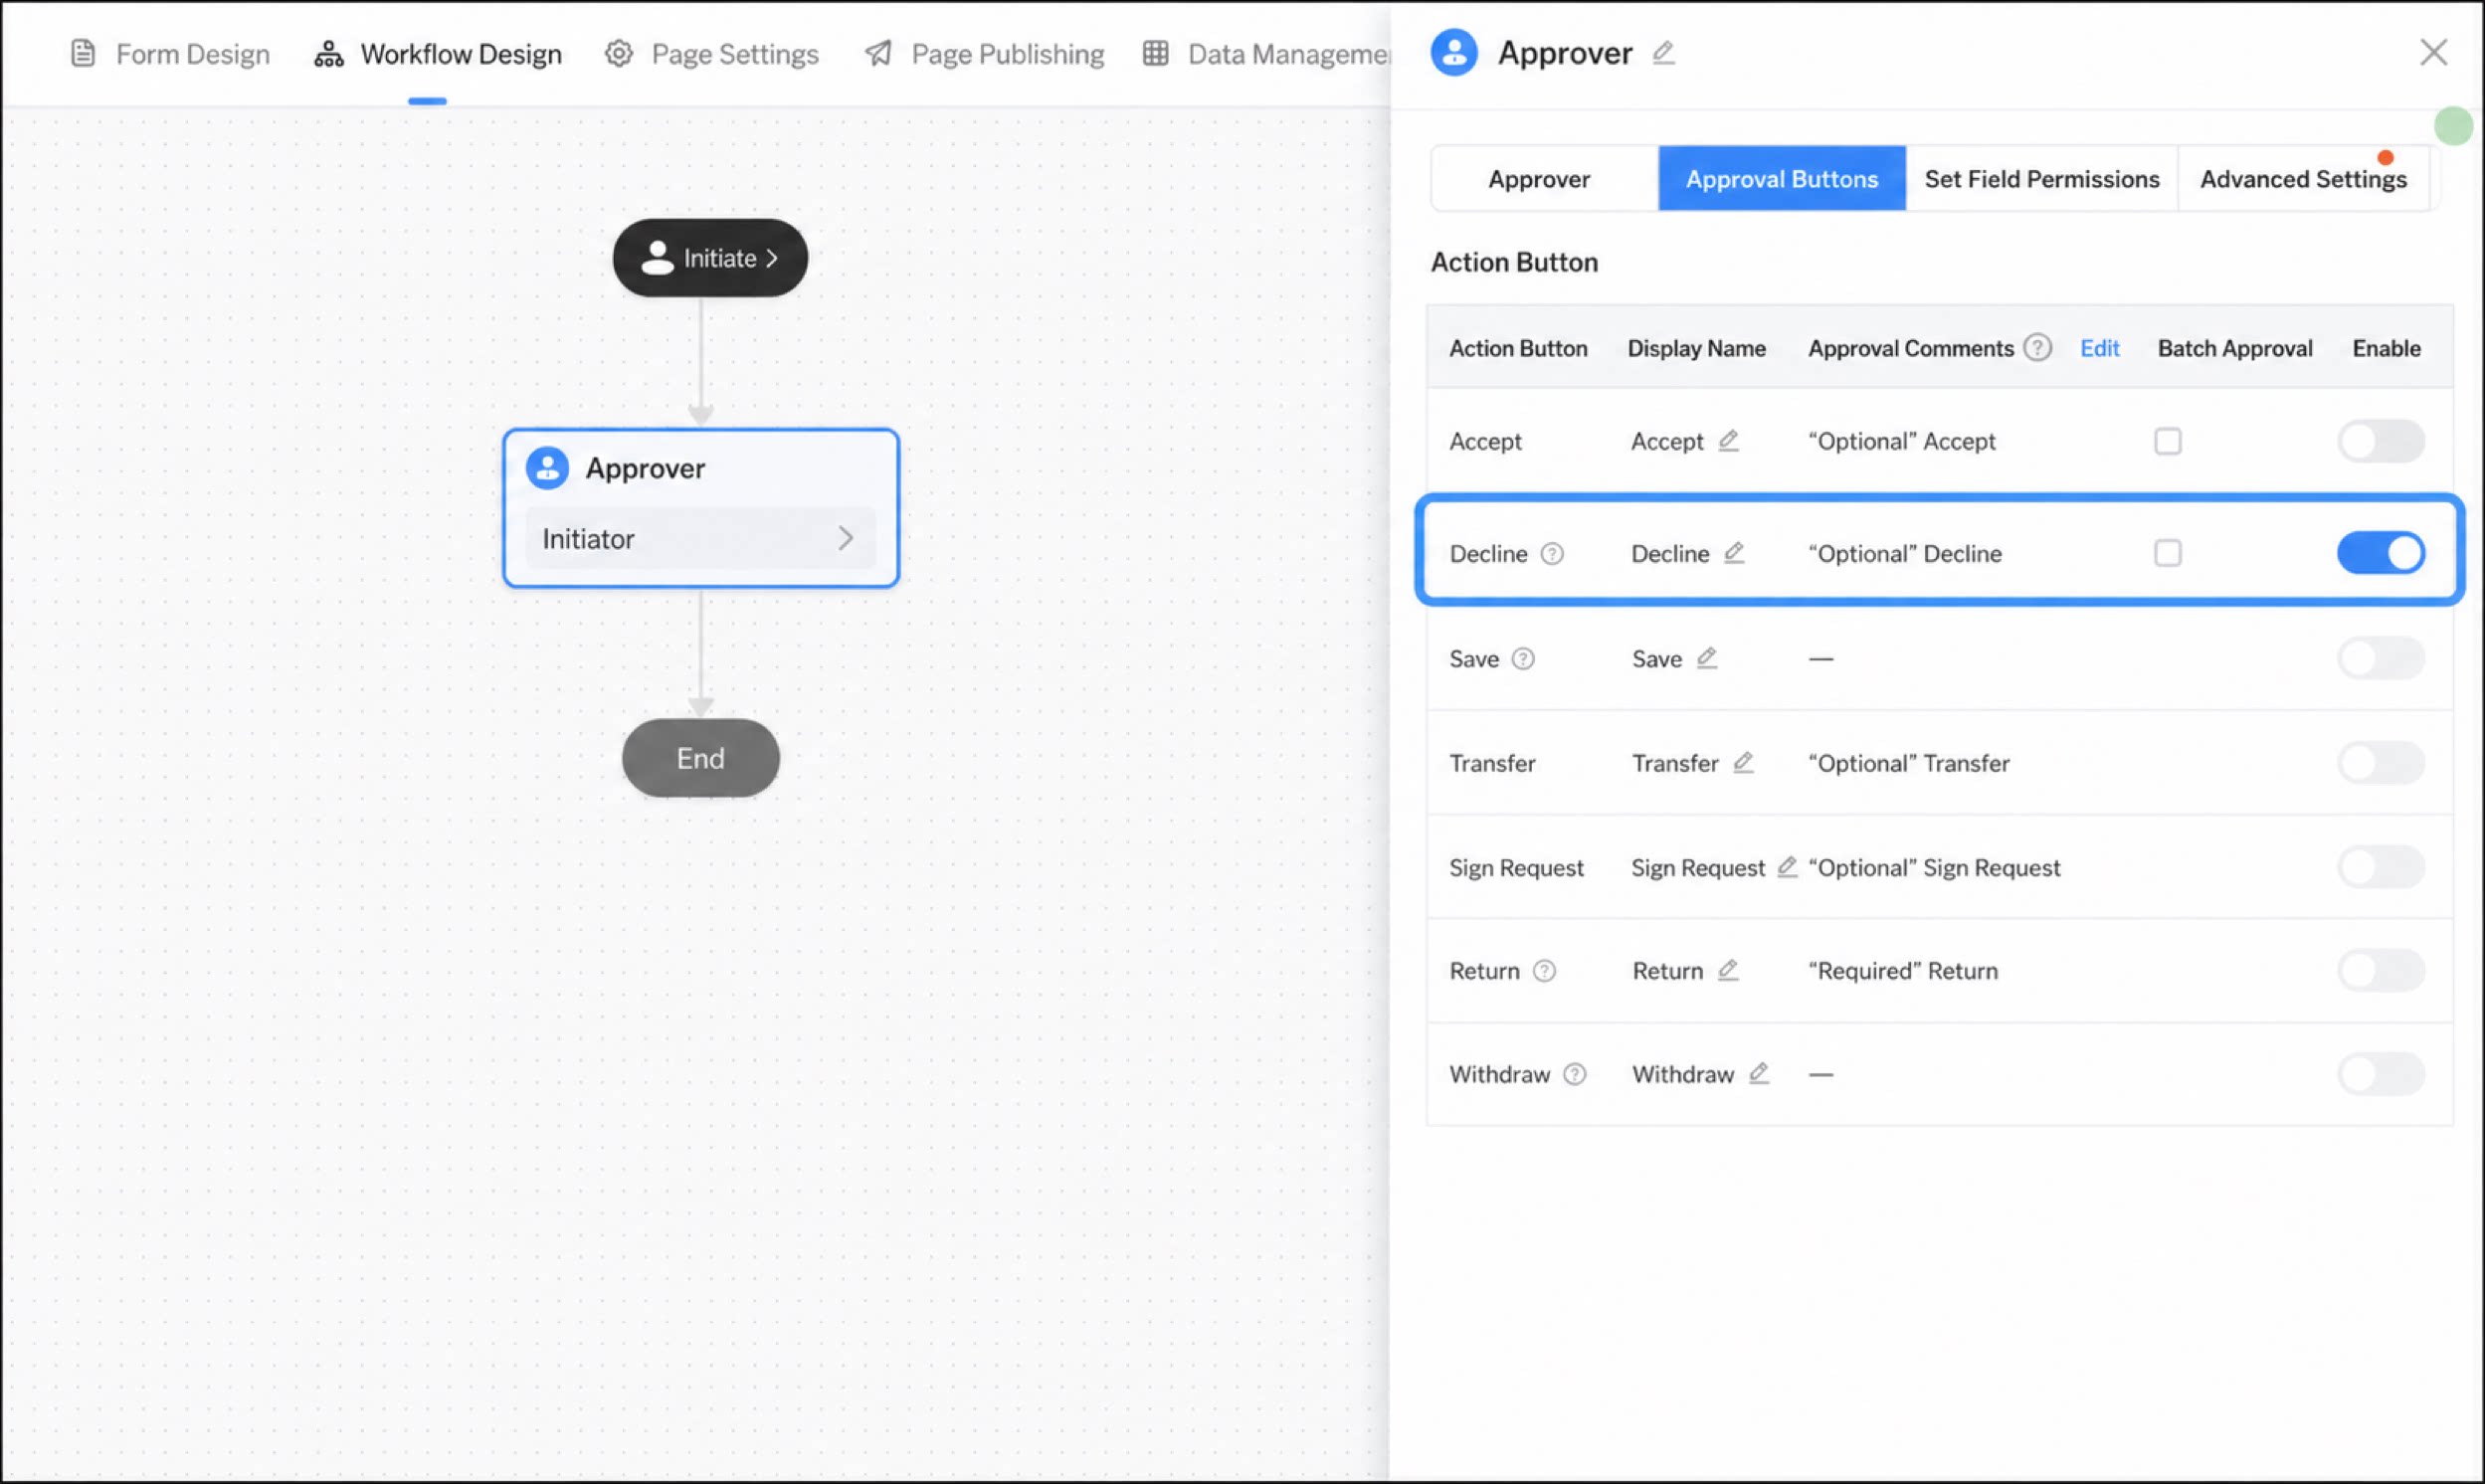
Indicates rejection of the current initiator’s approval form. Once enabled, the approver sees the Decline button on the approval form. Clicking Decline terminates the approval form immediately.You can configure batch approval, whether to show the comment box, whether the comment is required, and the default comment.
Save
The Save action applies when the current approver needs to add information to the approval form or modify content. Once enabled, the approver sees the Save button on the approval form.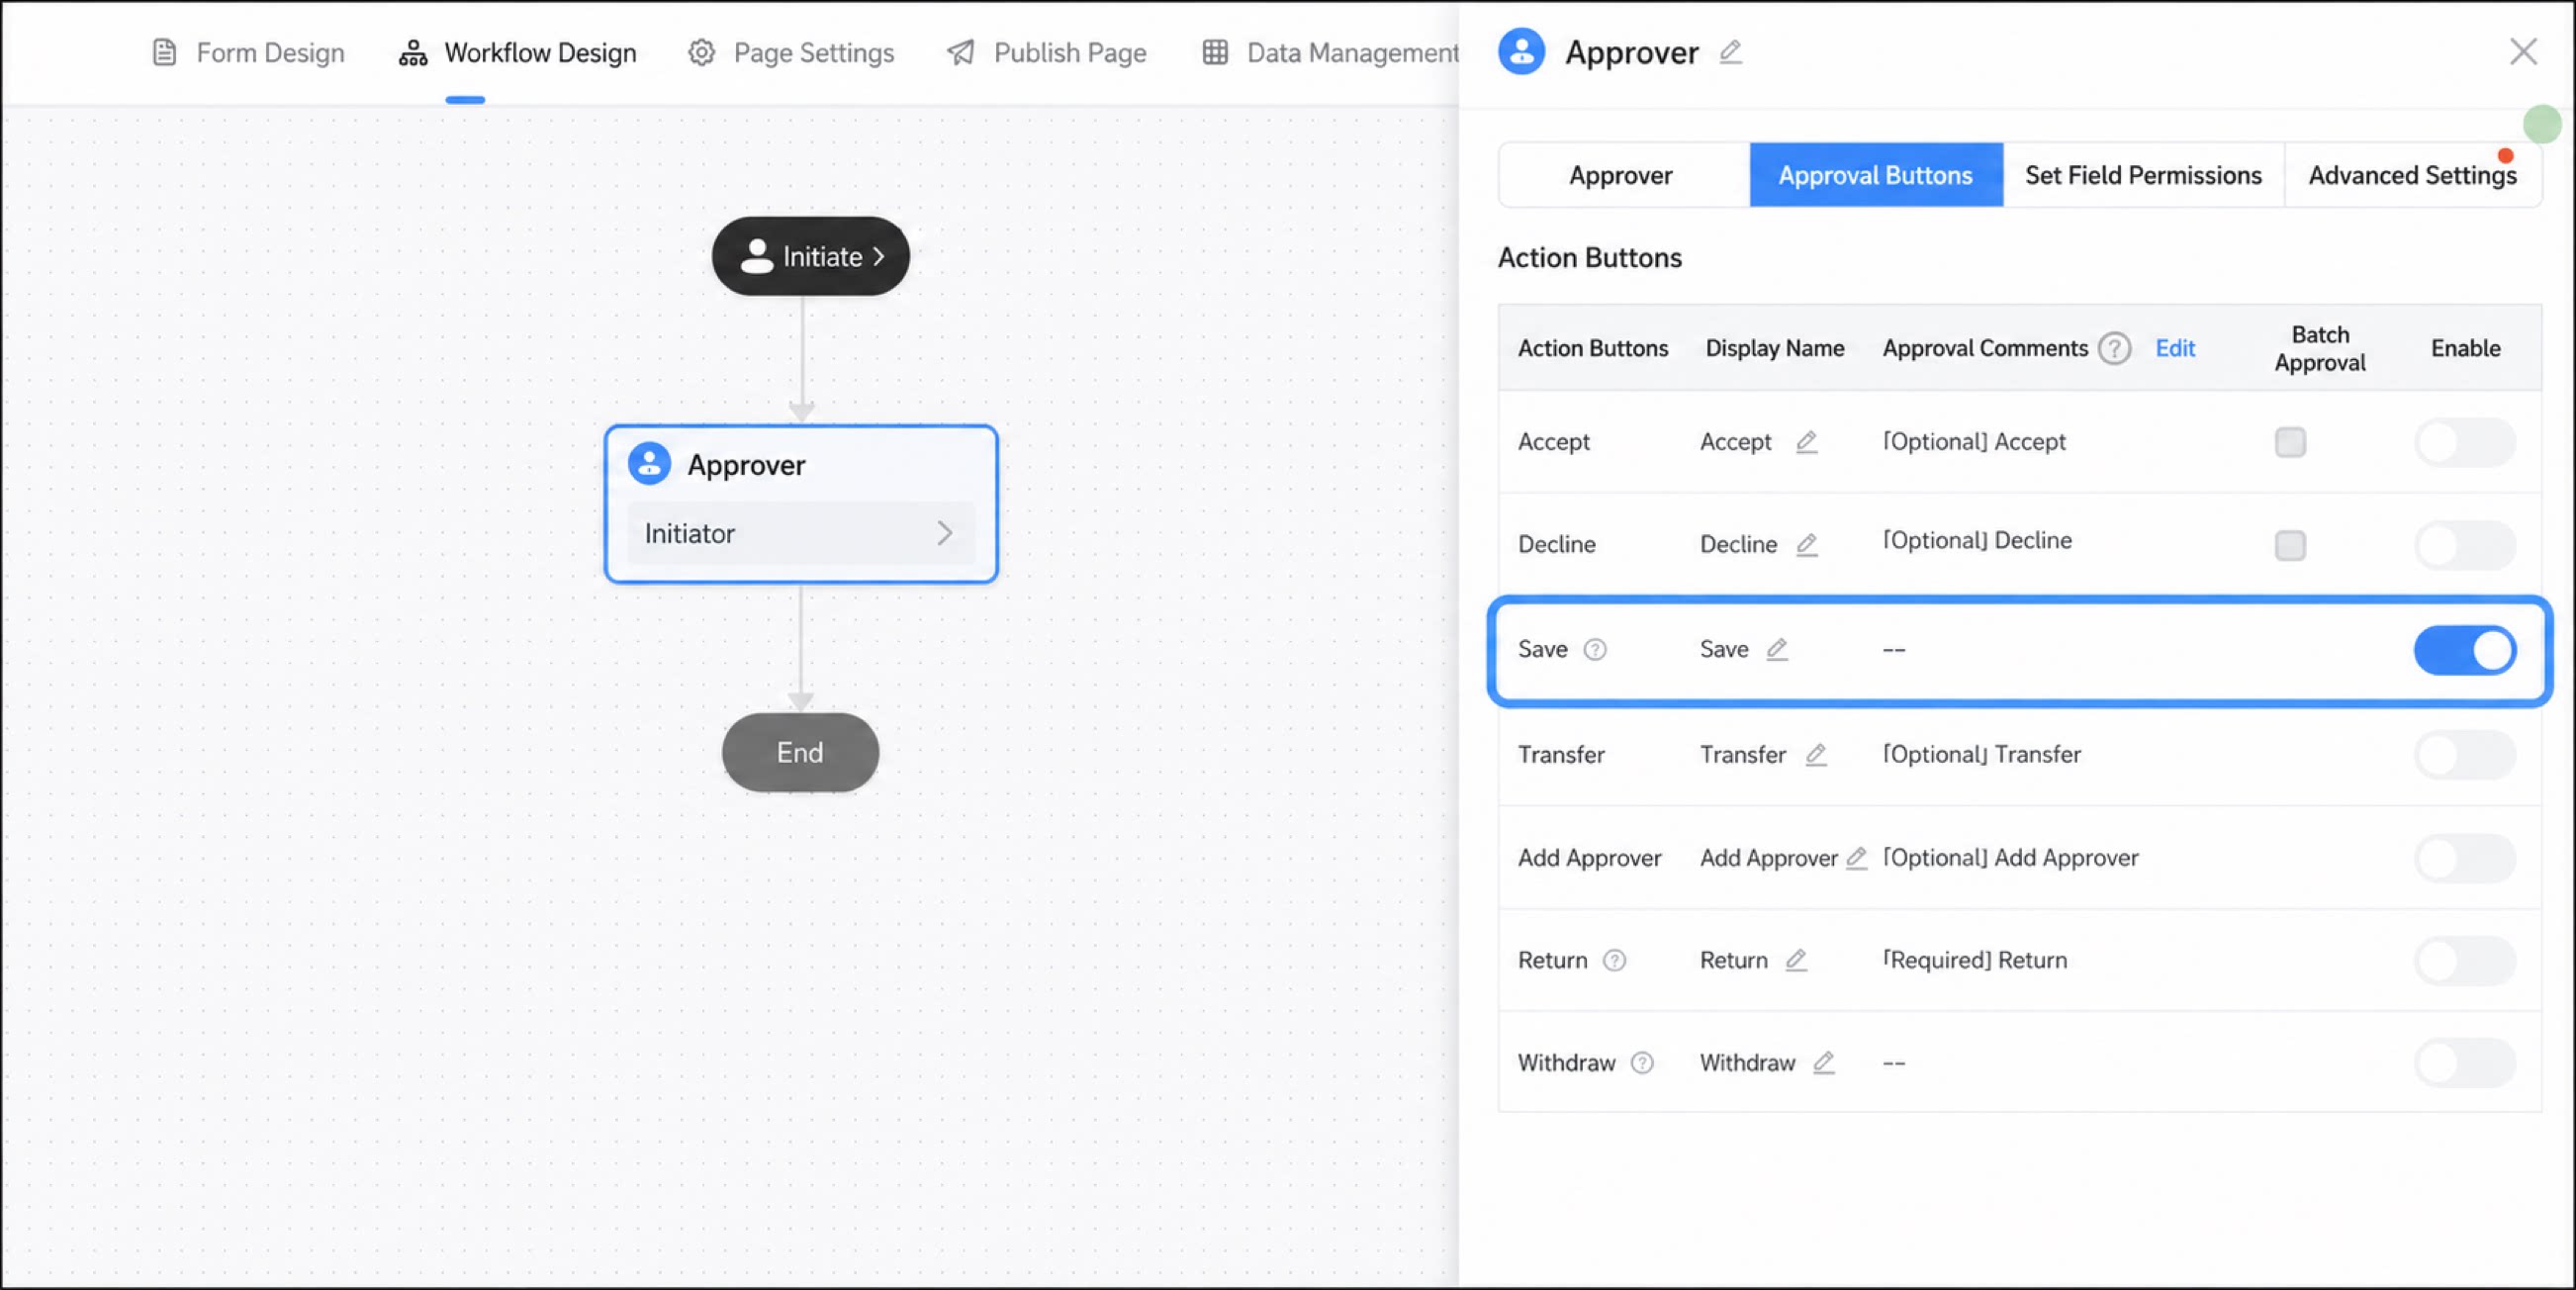
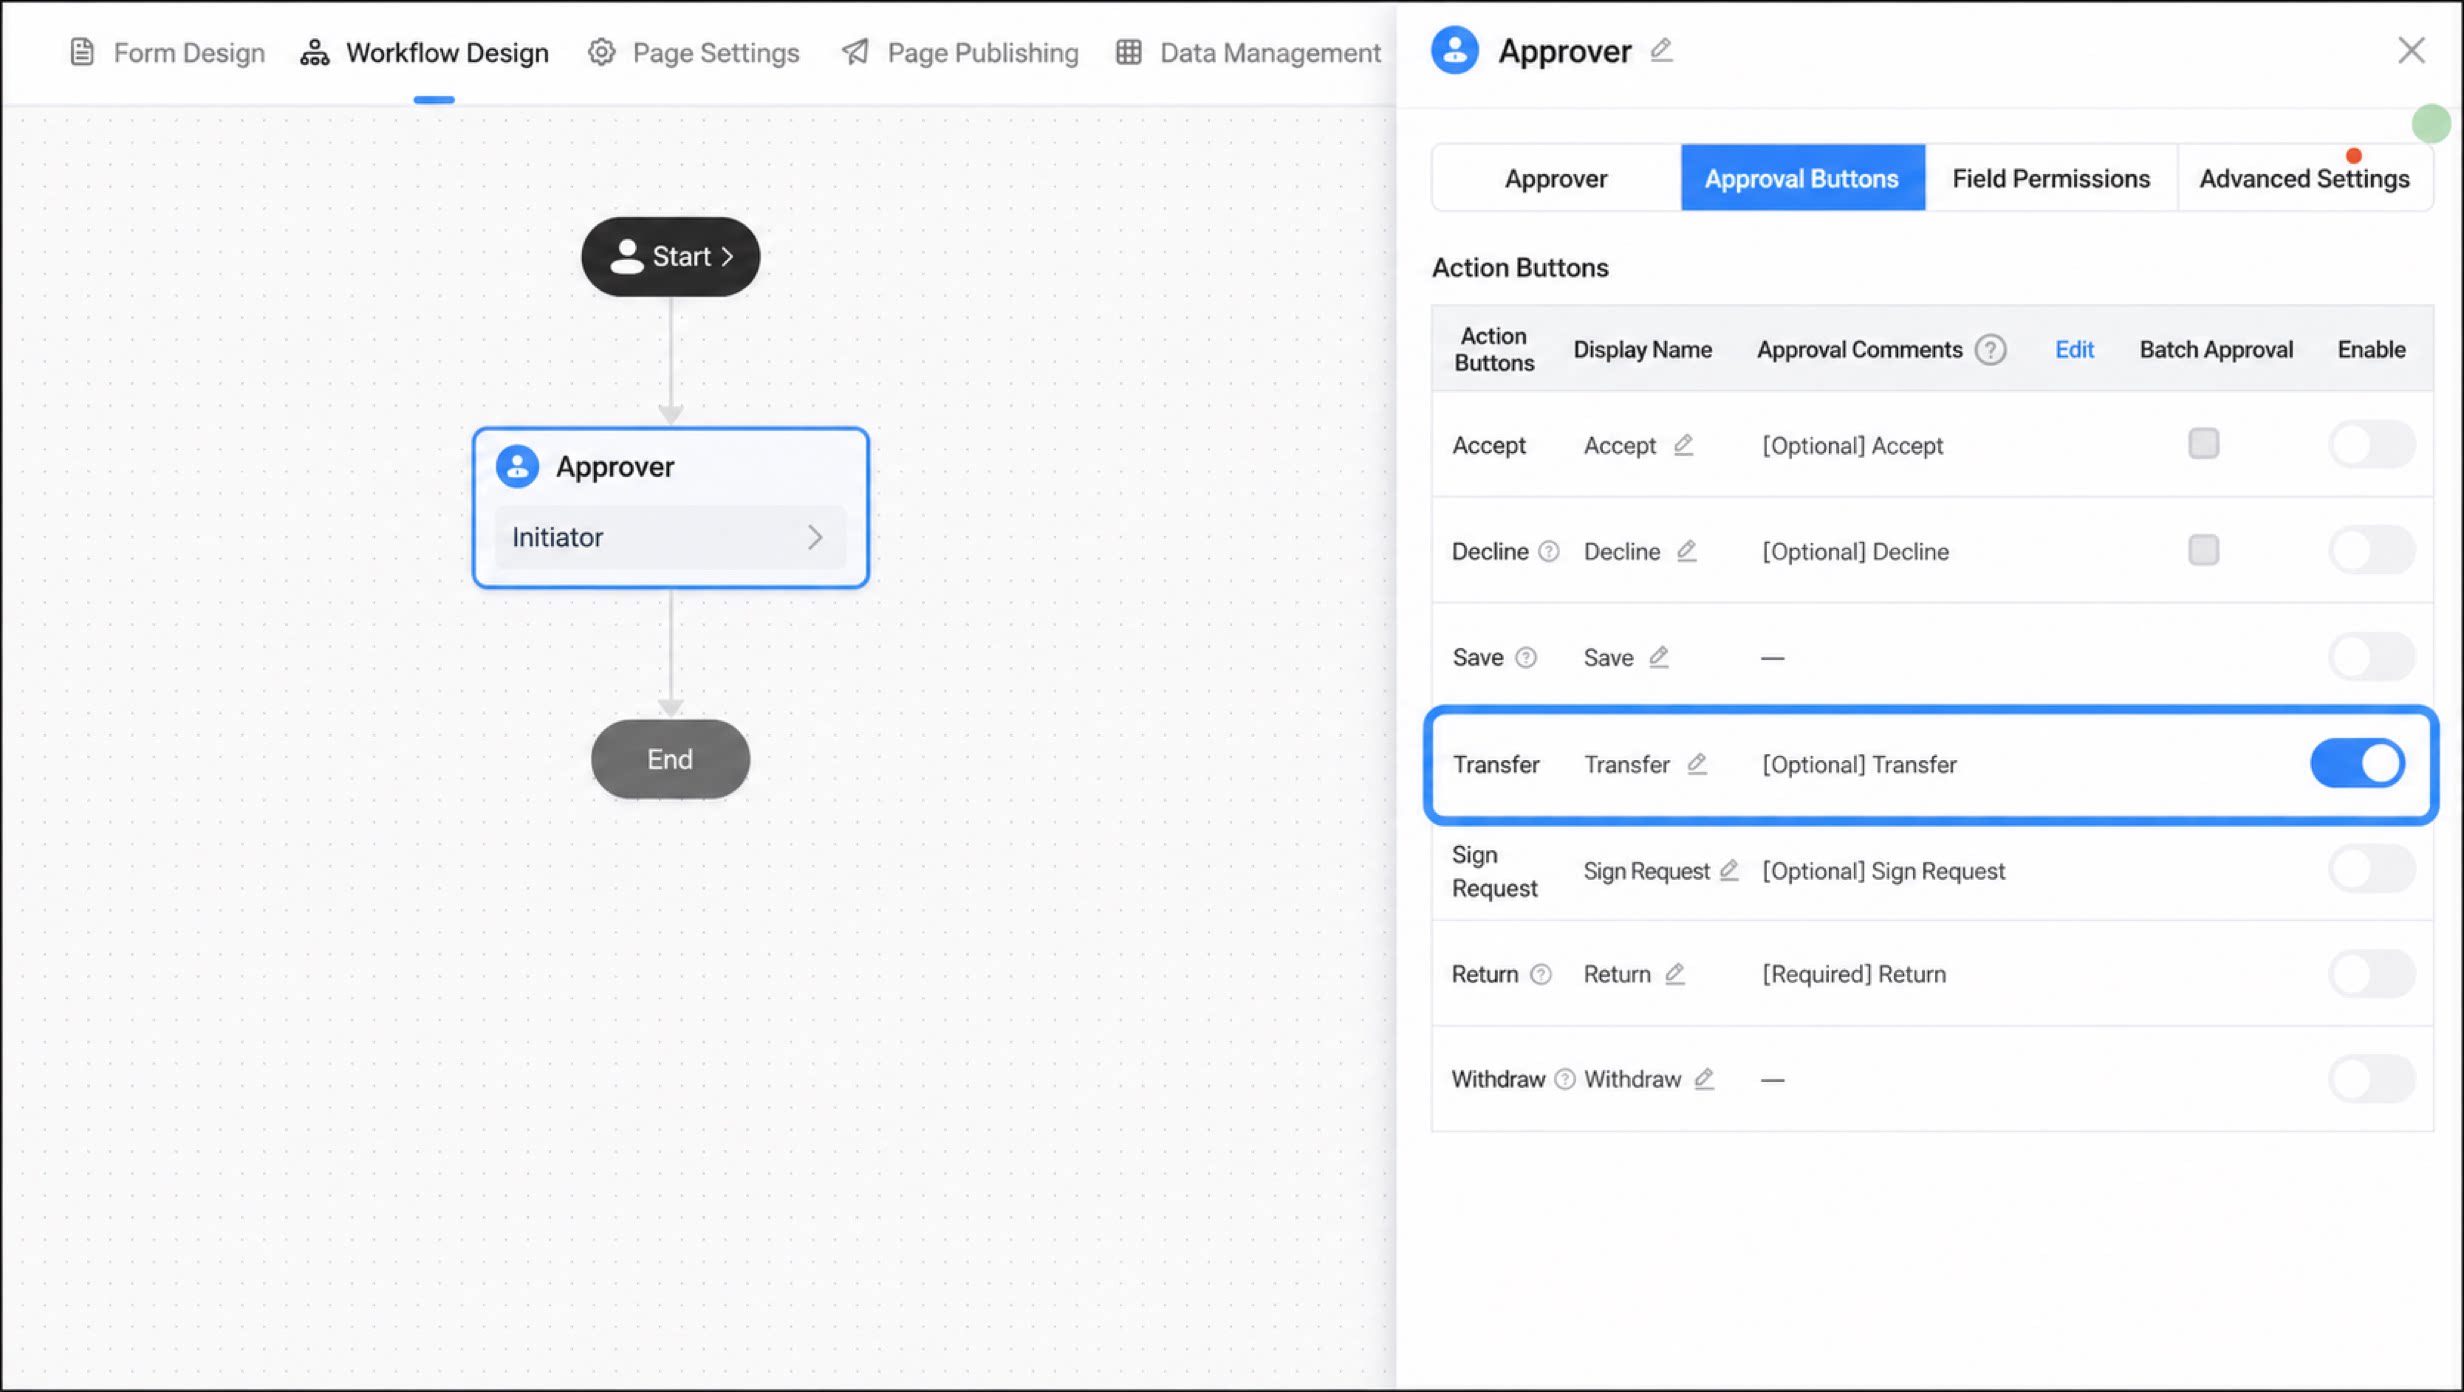
Transfer
The Transfer action applies when the current approver cannot decide on the approval form and needs a higher-level manager or another approver to handle it. Once enabled, the approver sees the Transfer button on the approval form.You can configure batch approval, whether to show the comment box, whether the comment is required, and the default comment.
Sign Request
Sign request adds extra approvers to the approval process. You can configure sign request position, sign request purpose, and sign request action buttons.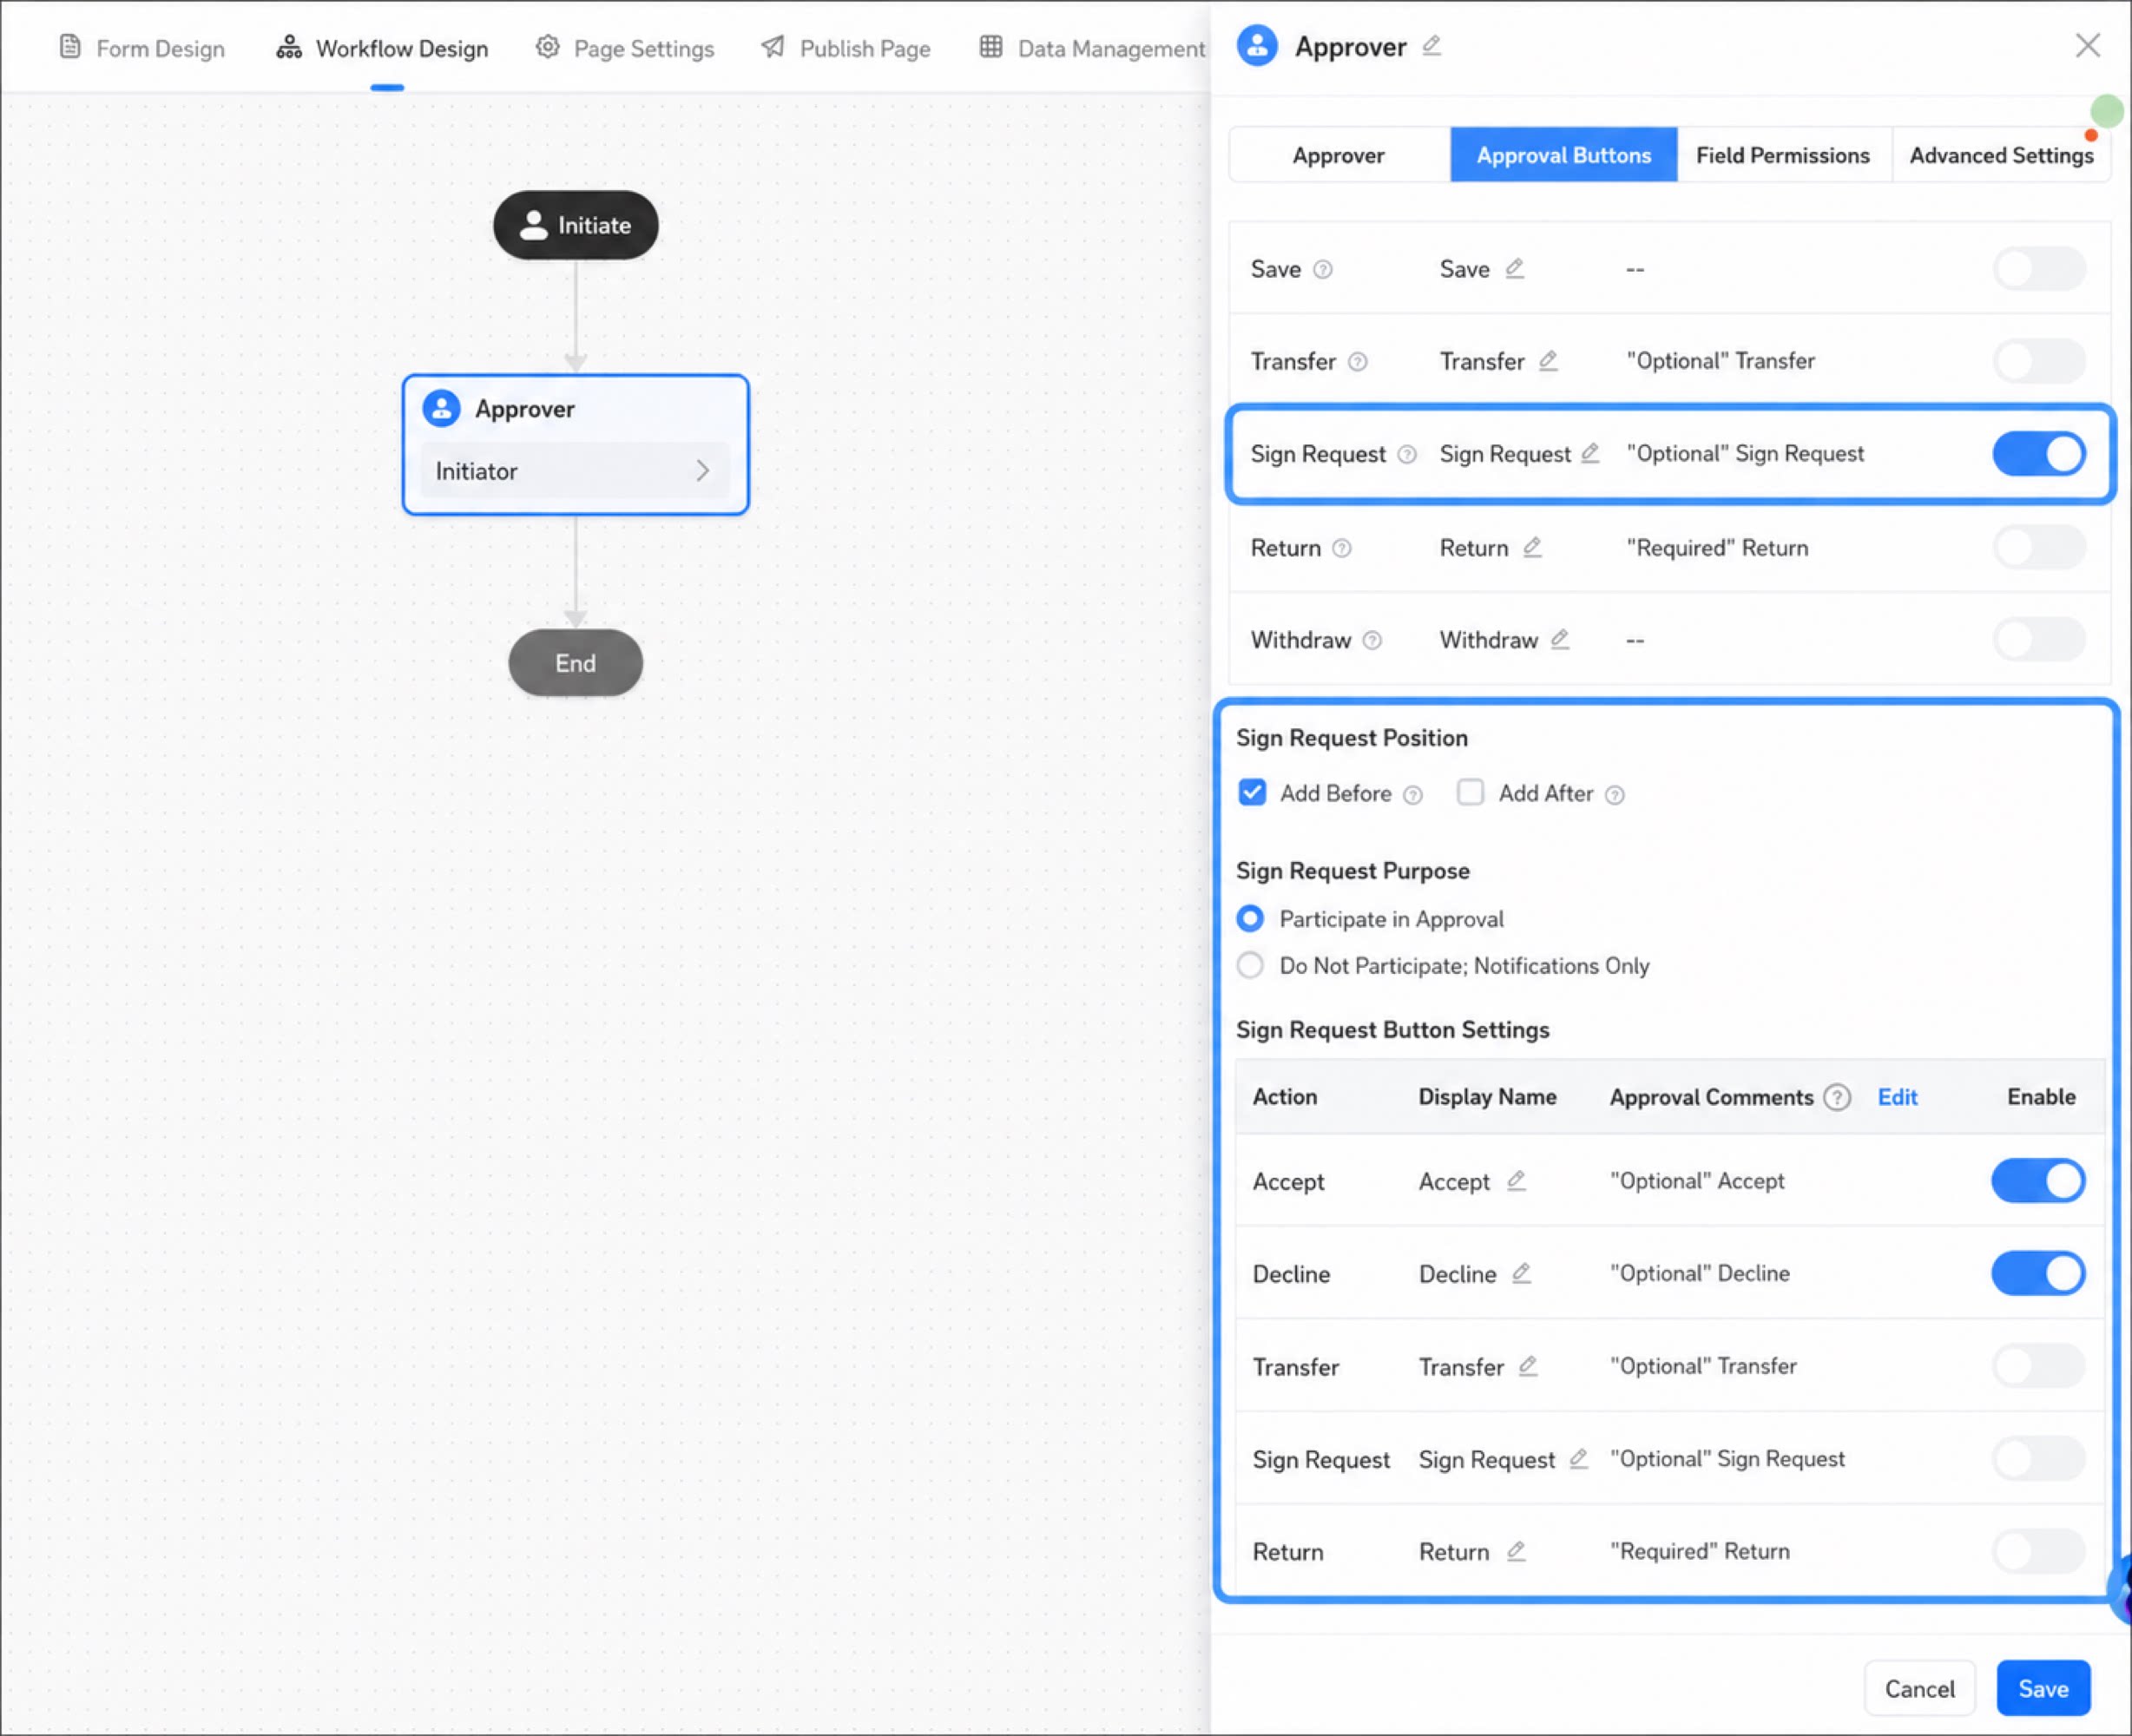
- Before: Adds an approval step before the current approver. The current approver designates the approver of the added step. Multiple sign requests are supported.
- After: Adds an approval step after the current step ends. The current approver designates the approver of the added step. Multiple sign requests are supported.
- Participate in approval: If the purpose is to participate in approval, a new approval step is created for the sign request.
- Notify only, do not participate: If set to notify only, the sign request user only receives a notification, does not participate in workflow processing, and is not shown in the workflow instance view.
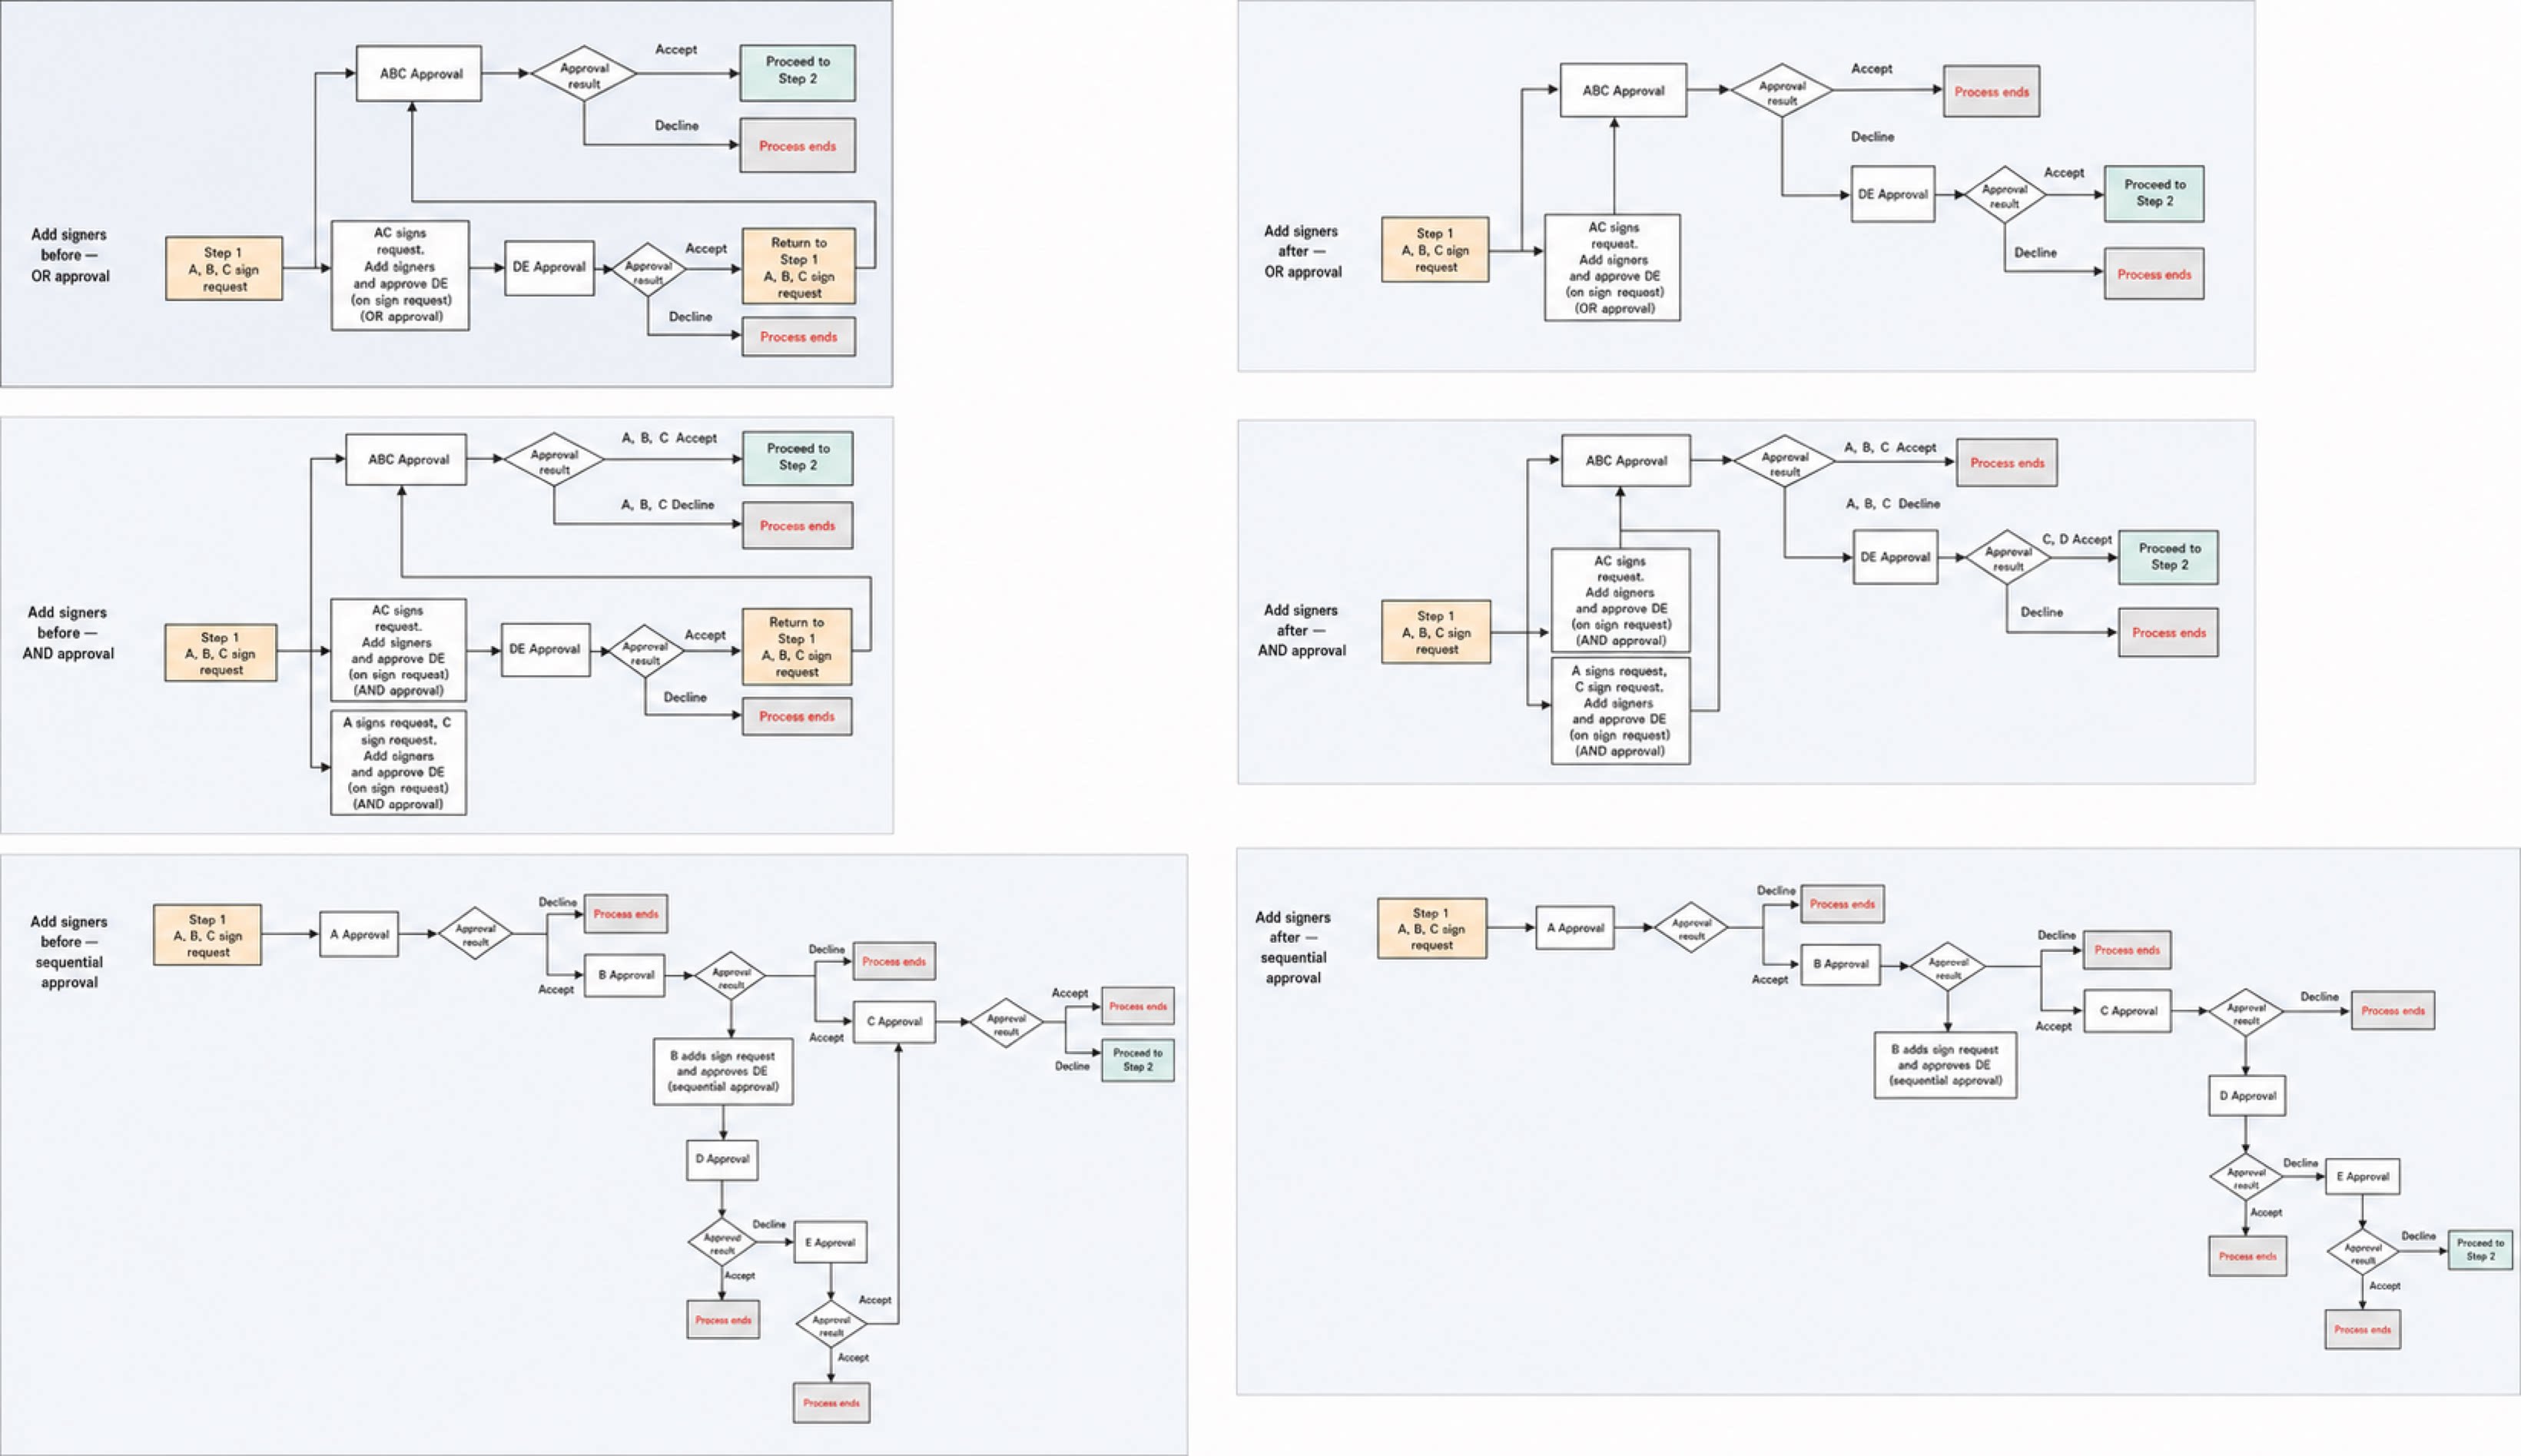
- The current approver cannot be selected as the sign request user. Only specific users can be selected; roles are not allowed.
- The multi-approver mode of the sign request users follows that of the current approver step.
- When a Before sign request step is generated, all pending tasks at the original step are canceled. After the Before sign request step is resolved, pending tasks for the original step are regenerated based on its effect on the original step.
Return
Workflow return means that during the approval process, if the current step’s approver is not satisfied with the submitted approval form or the initiator’s submission is incomplete, the approver returns the approval form to the initiator or to an earlier step in the workflow.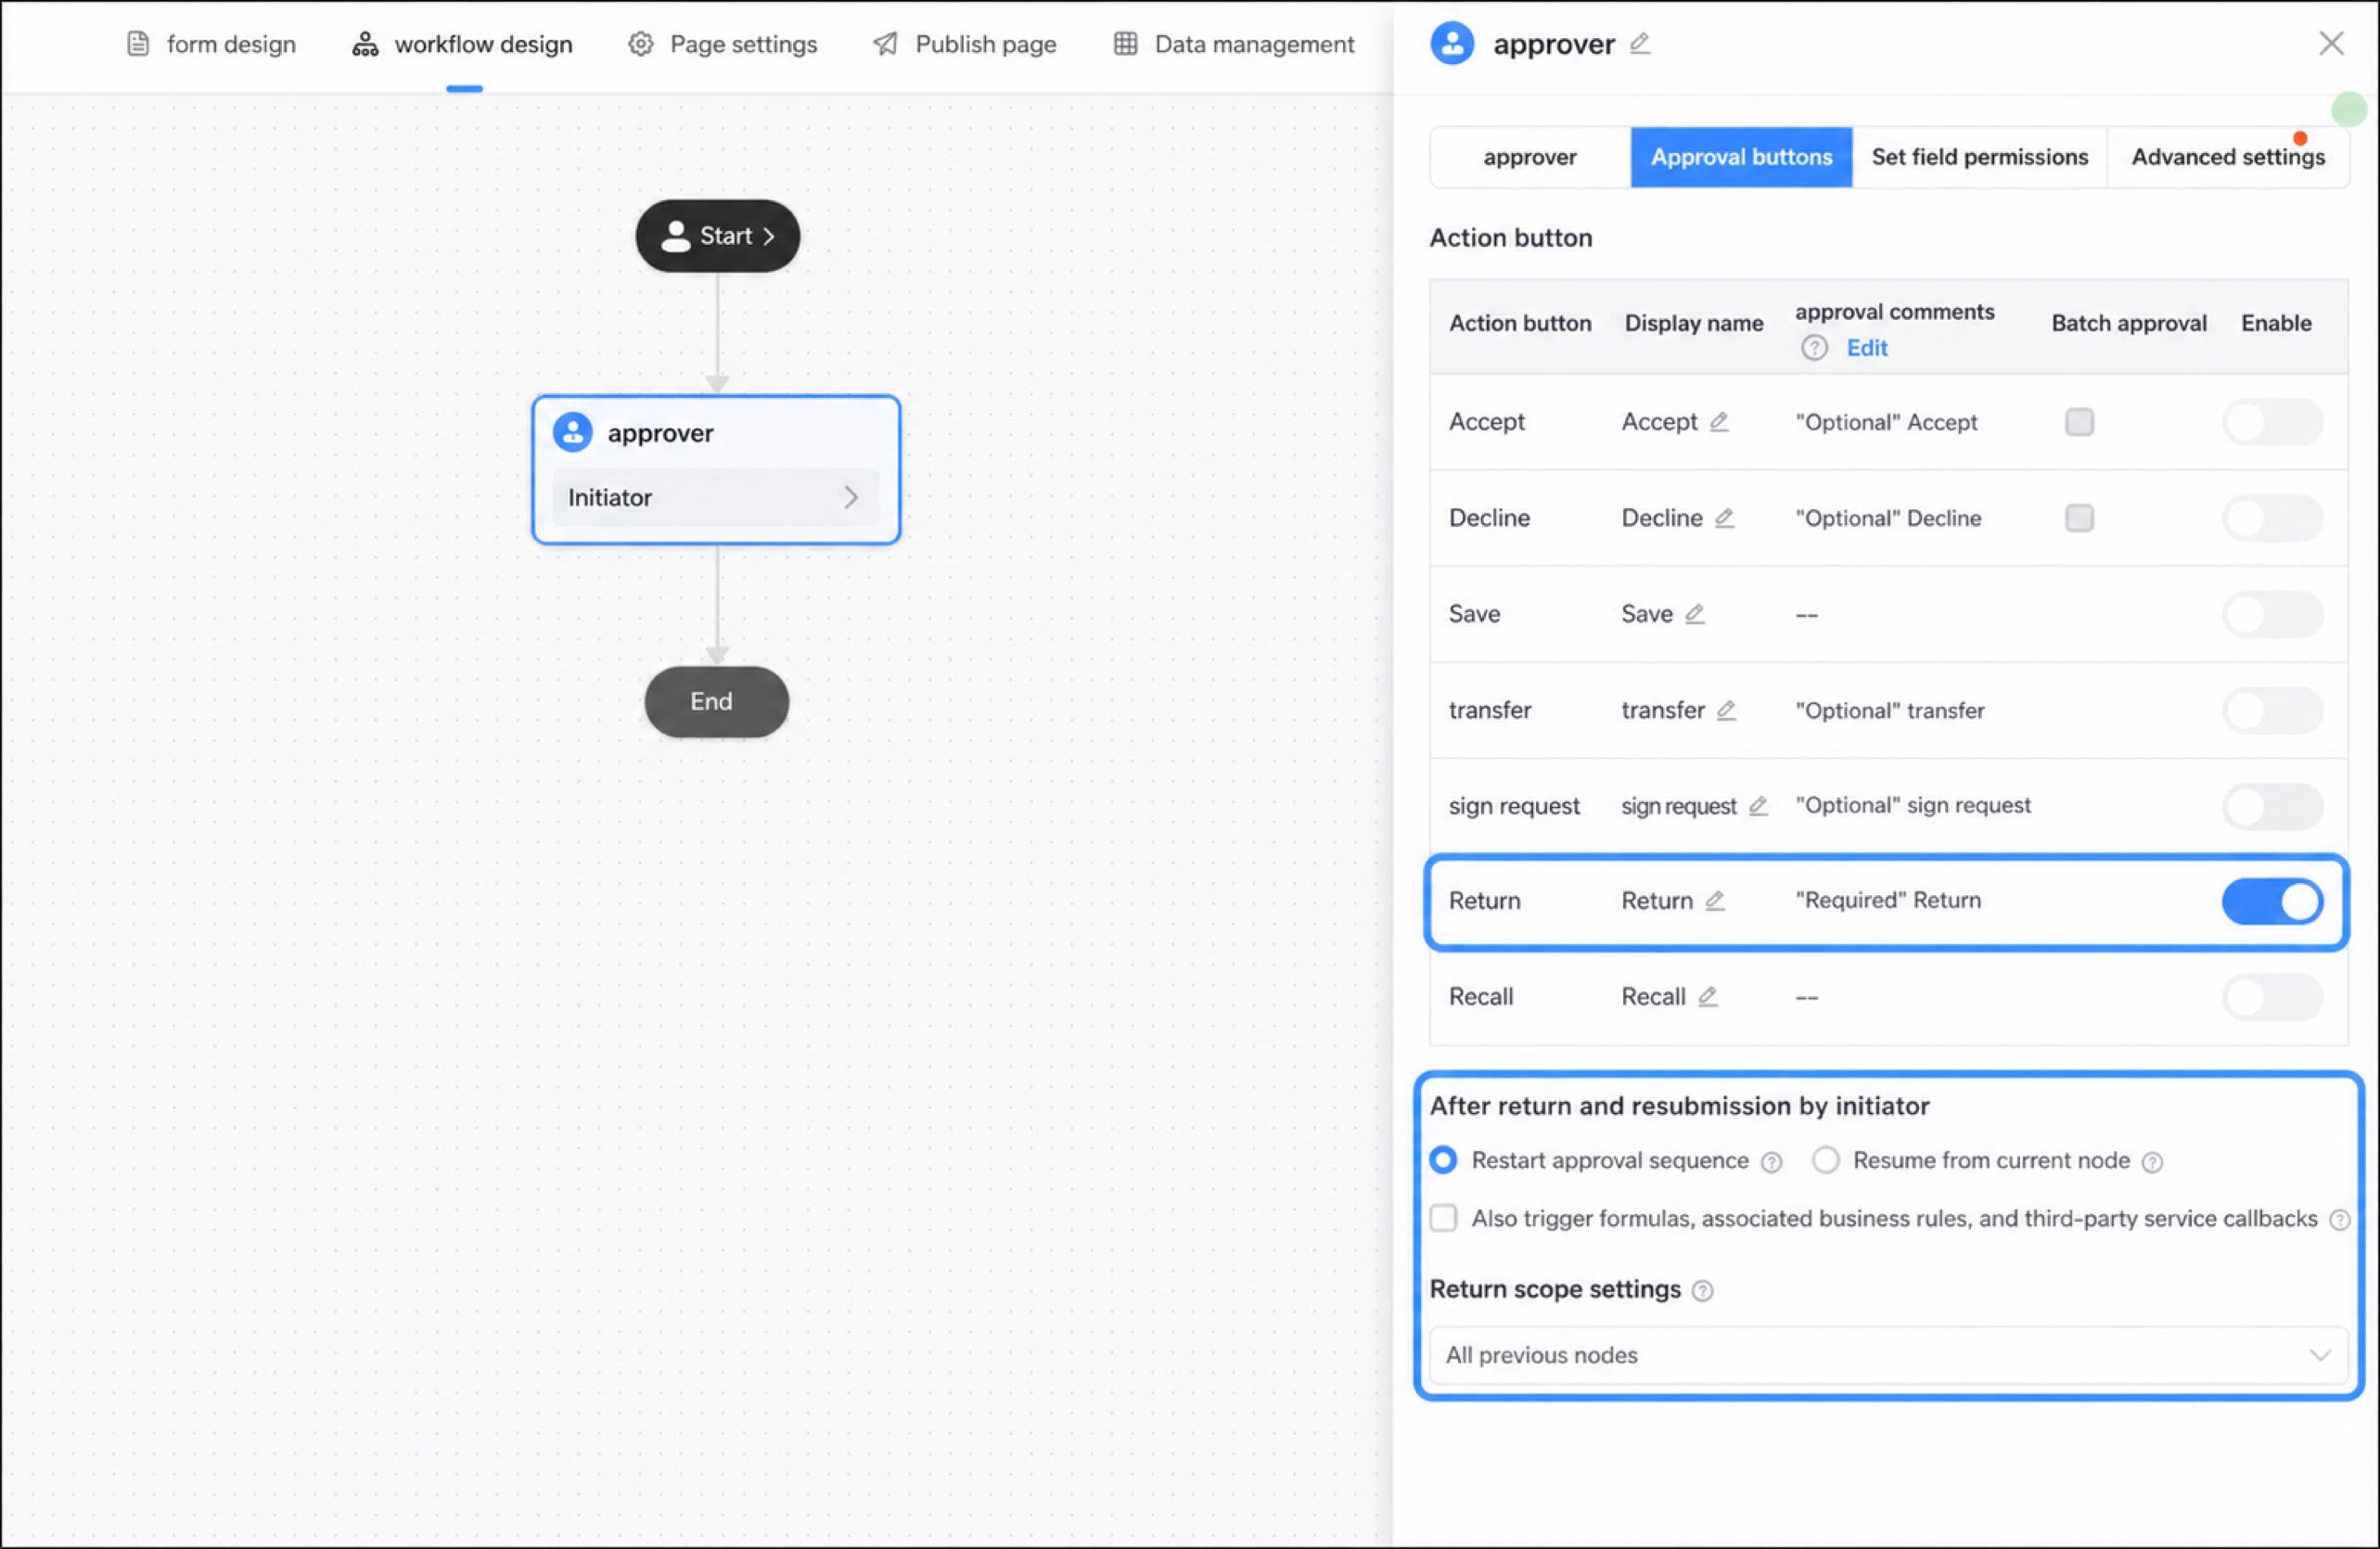
- If the approval buttons include both Return and Sign request, and the sign request configuration also includes a “Return” button, the Return function follows the return logic of the approver step.
- If only Sign request is configured and Return is enabled within the sign request options, the approver cannot perform a Return action, but the sign request user can perform Return following the selected return logic.
- If the workflow has automatic deduplication enabled, and the workflow is returned to a previous approval step and then re-approved, the automatic deduplication logic is downgraded — related approvers along the way must approve again. That is, automatic deduplication does not apply in return scenarios.
- After the workflow is returned to the initiator, the initiator can Recall the approval.
- [Continue from the current step after return to initiator]: After return to the initiator, the original step is paused. The initiator can modify information. The original step’s timeout timer is not interrupted, and the current step shown on the data management page is still the original step.
- [Re-approve after return to initiator]: After return to the initiator, the workflow actually jumps back to the initiator step. The data management page shows the initiator step, and the original step’s timeout timer is reset.
- Re-run in sequence: After return to the initiator, the workflow actually jumps back to the initiator step. The data management page shows the initiator step, and the original step’s timeout timer is reset.
- Approve from the current step: After return to the initiator, the original step is paused. The initiator can modify information. The original step’s timeout timer is not interrupted, and the current step shown on the data management page is still the original step.
Recall
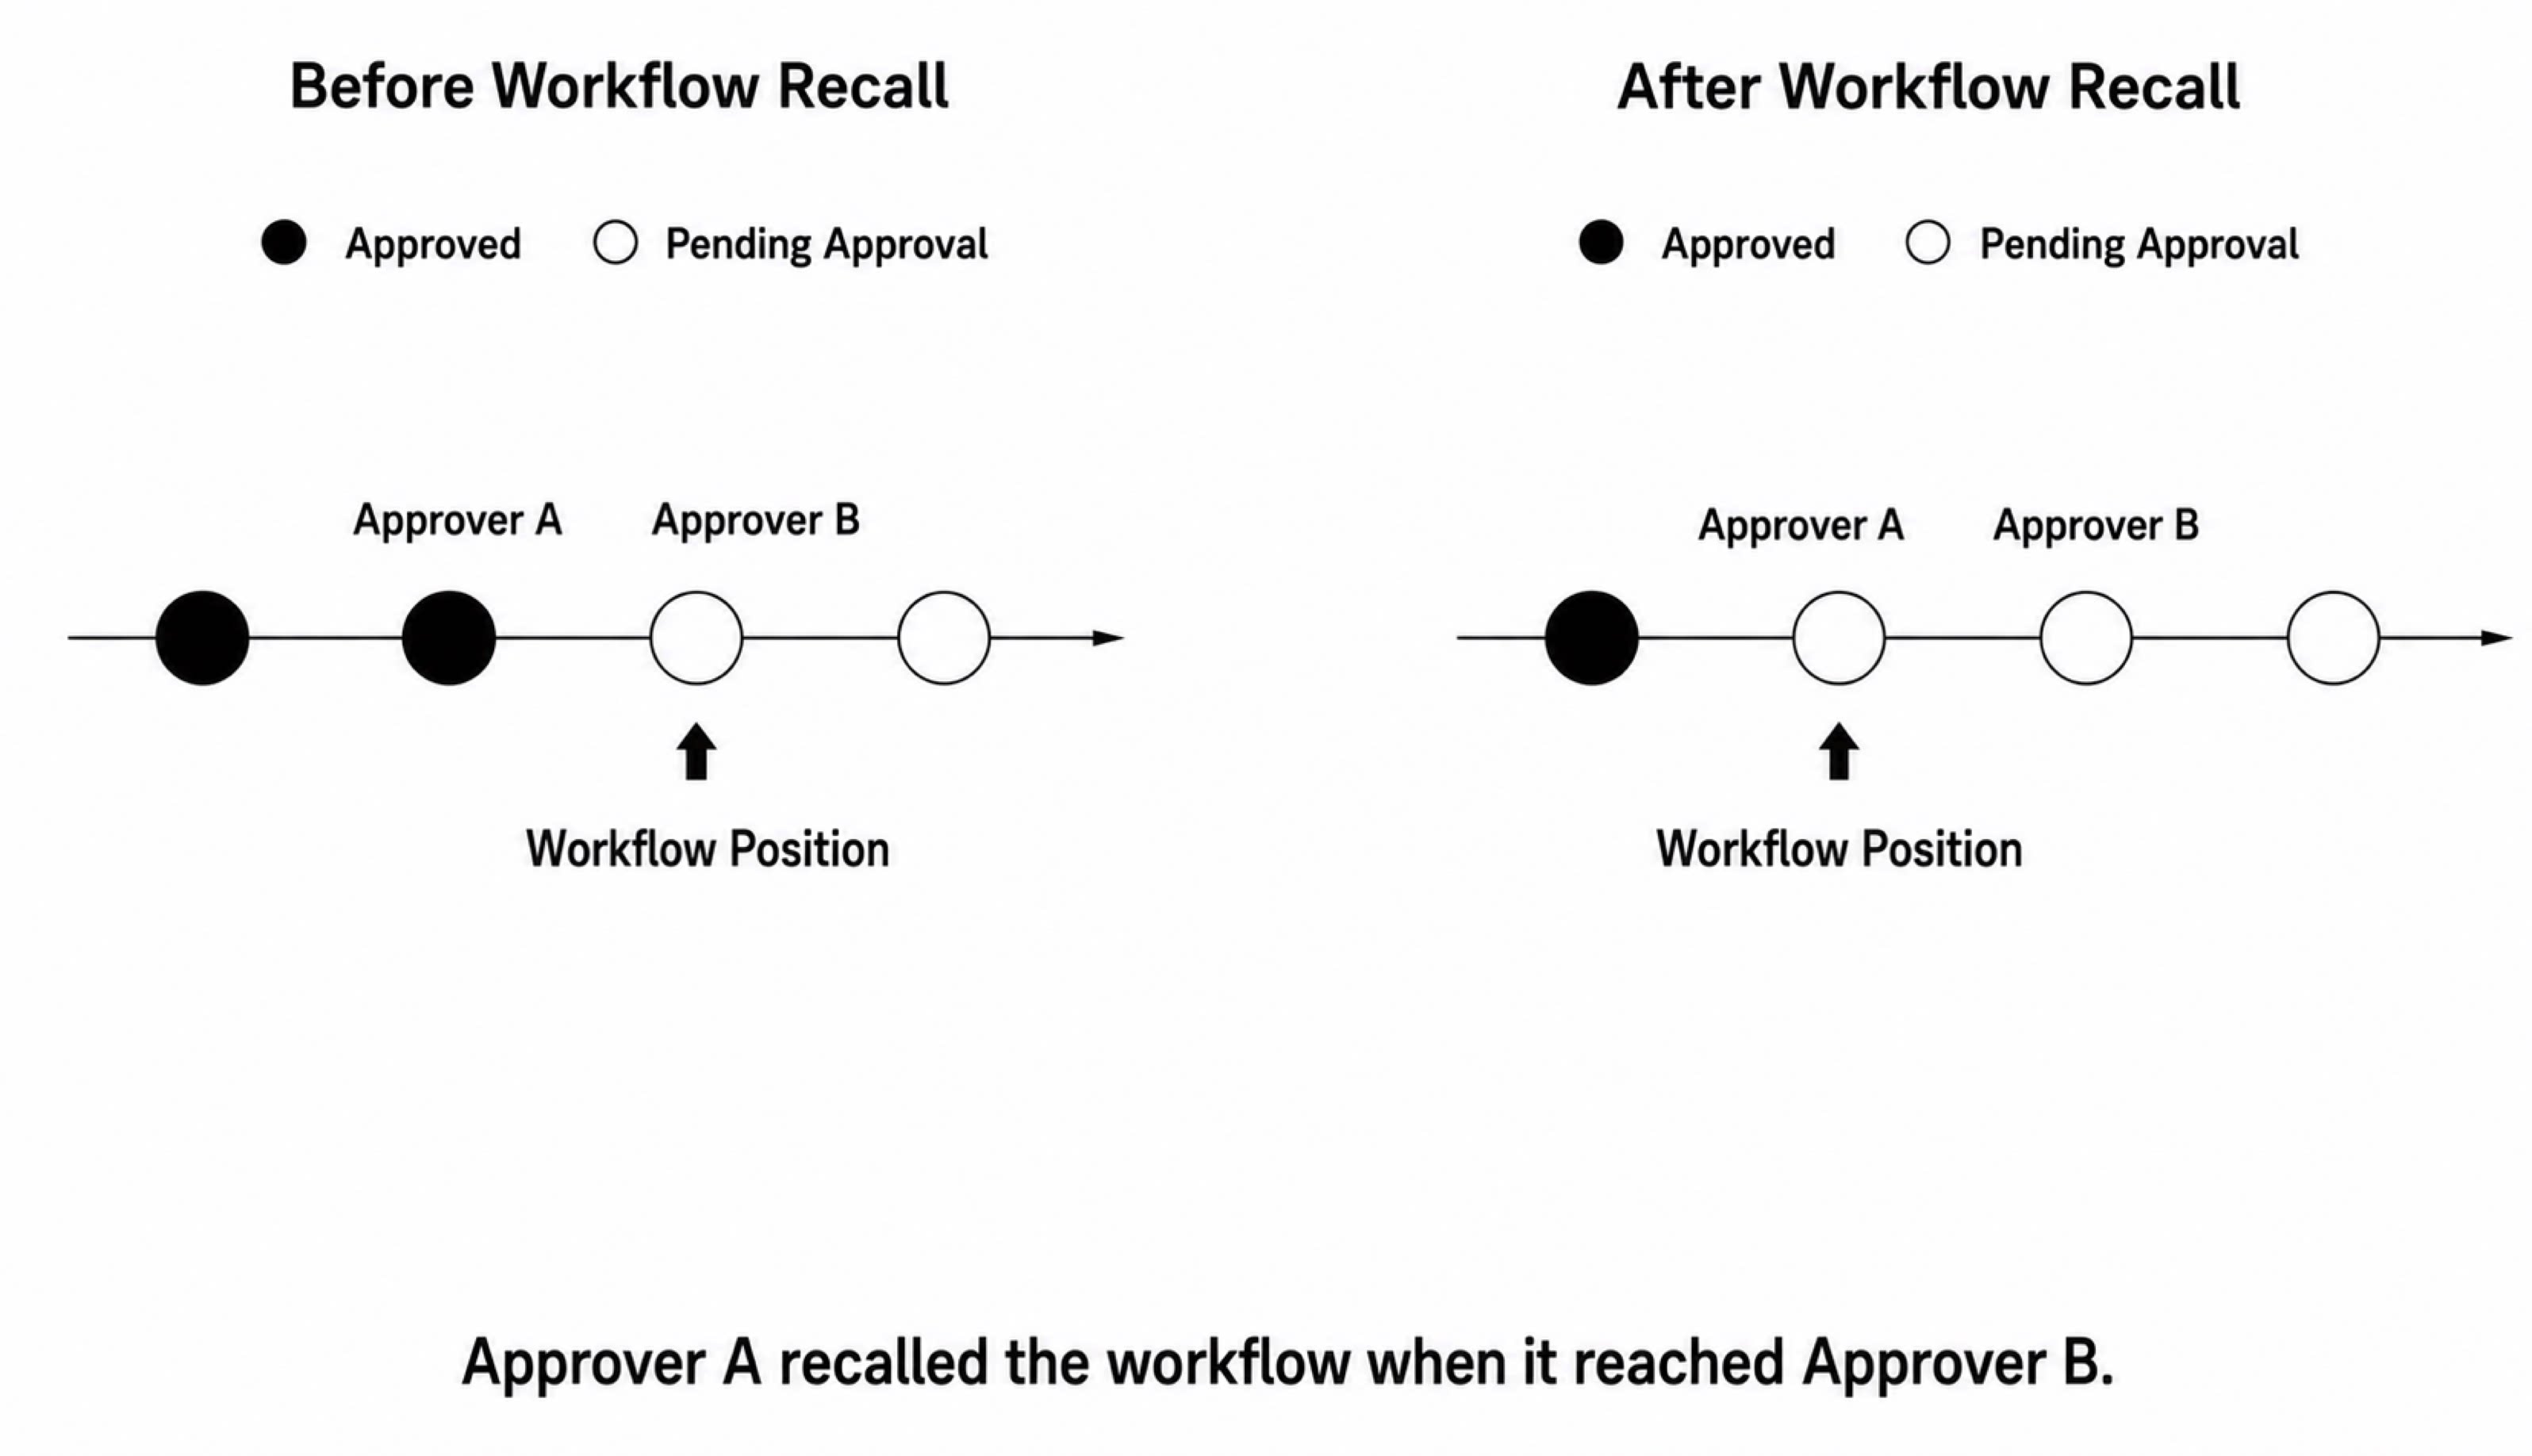
Workflow recall means that when the workflow reaches the next approver or executor step, the user of the current step can perform Recall to re-approve or re-execute.The YiDA Dedicated edition supports silent recall. When silent recall is enabled, recall entries do not appear in the approval history. Enable silent recall in the workflow’s Global settings.
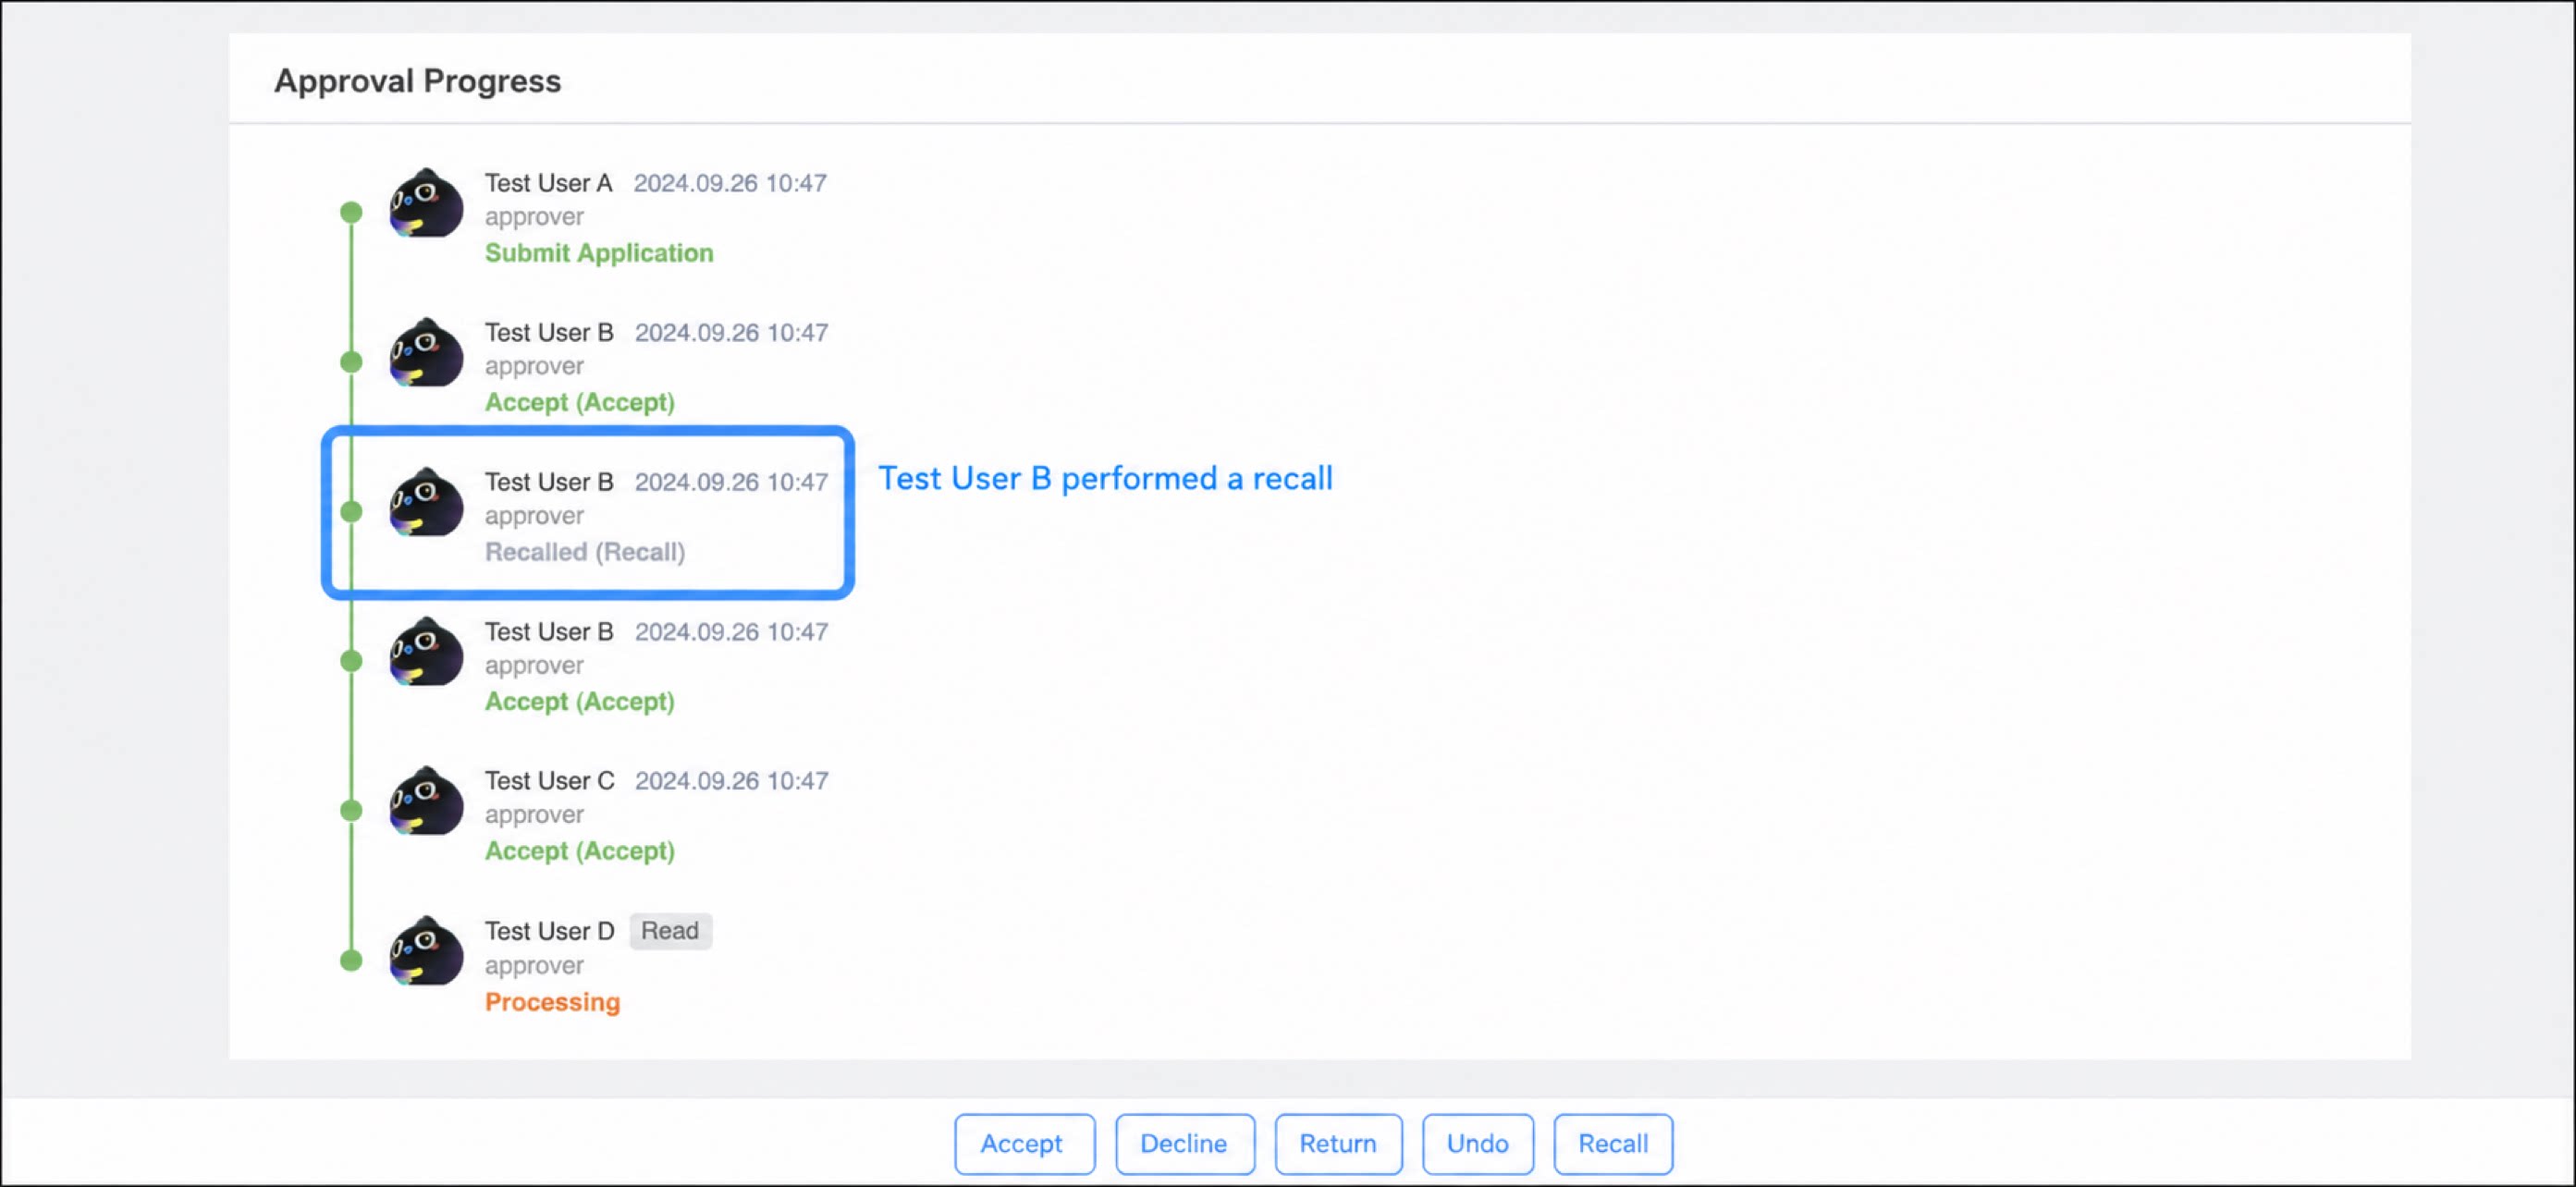
- The first step of the workflow does not support Recall, and the button is hidden. Use Undo instead.
- Recall is only supported between adjacent steps. Once a single Recall is performed, consecutive Recalls are not supported.
- If the workflow step has step submission rules, integration & automation triggers, or similar features configured, Recall is not supported.
- When there is an Automation step between adjacent workflow steps.
- When the step is configured as Parallel (all).
- For Parallel (any) with multiple approvers, a Recall by one person reactivates the step.
- Tasks generated by transfer or sign request support Recall.
Configure Field Permissions
Step-level field permissions control which form fields an approval step’s approver can view. You can configure editable, read-only, or hidden status by component name. For more information, see Workflow permission control.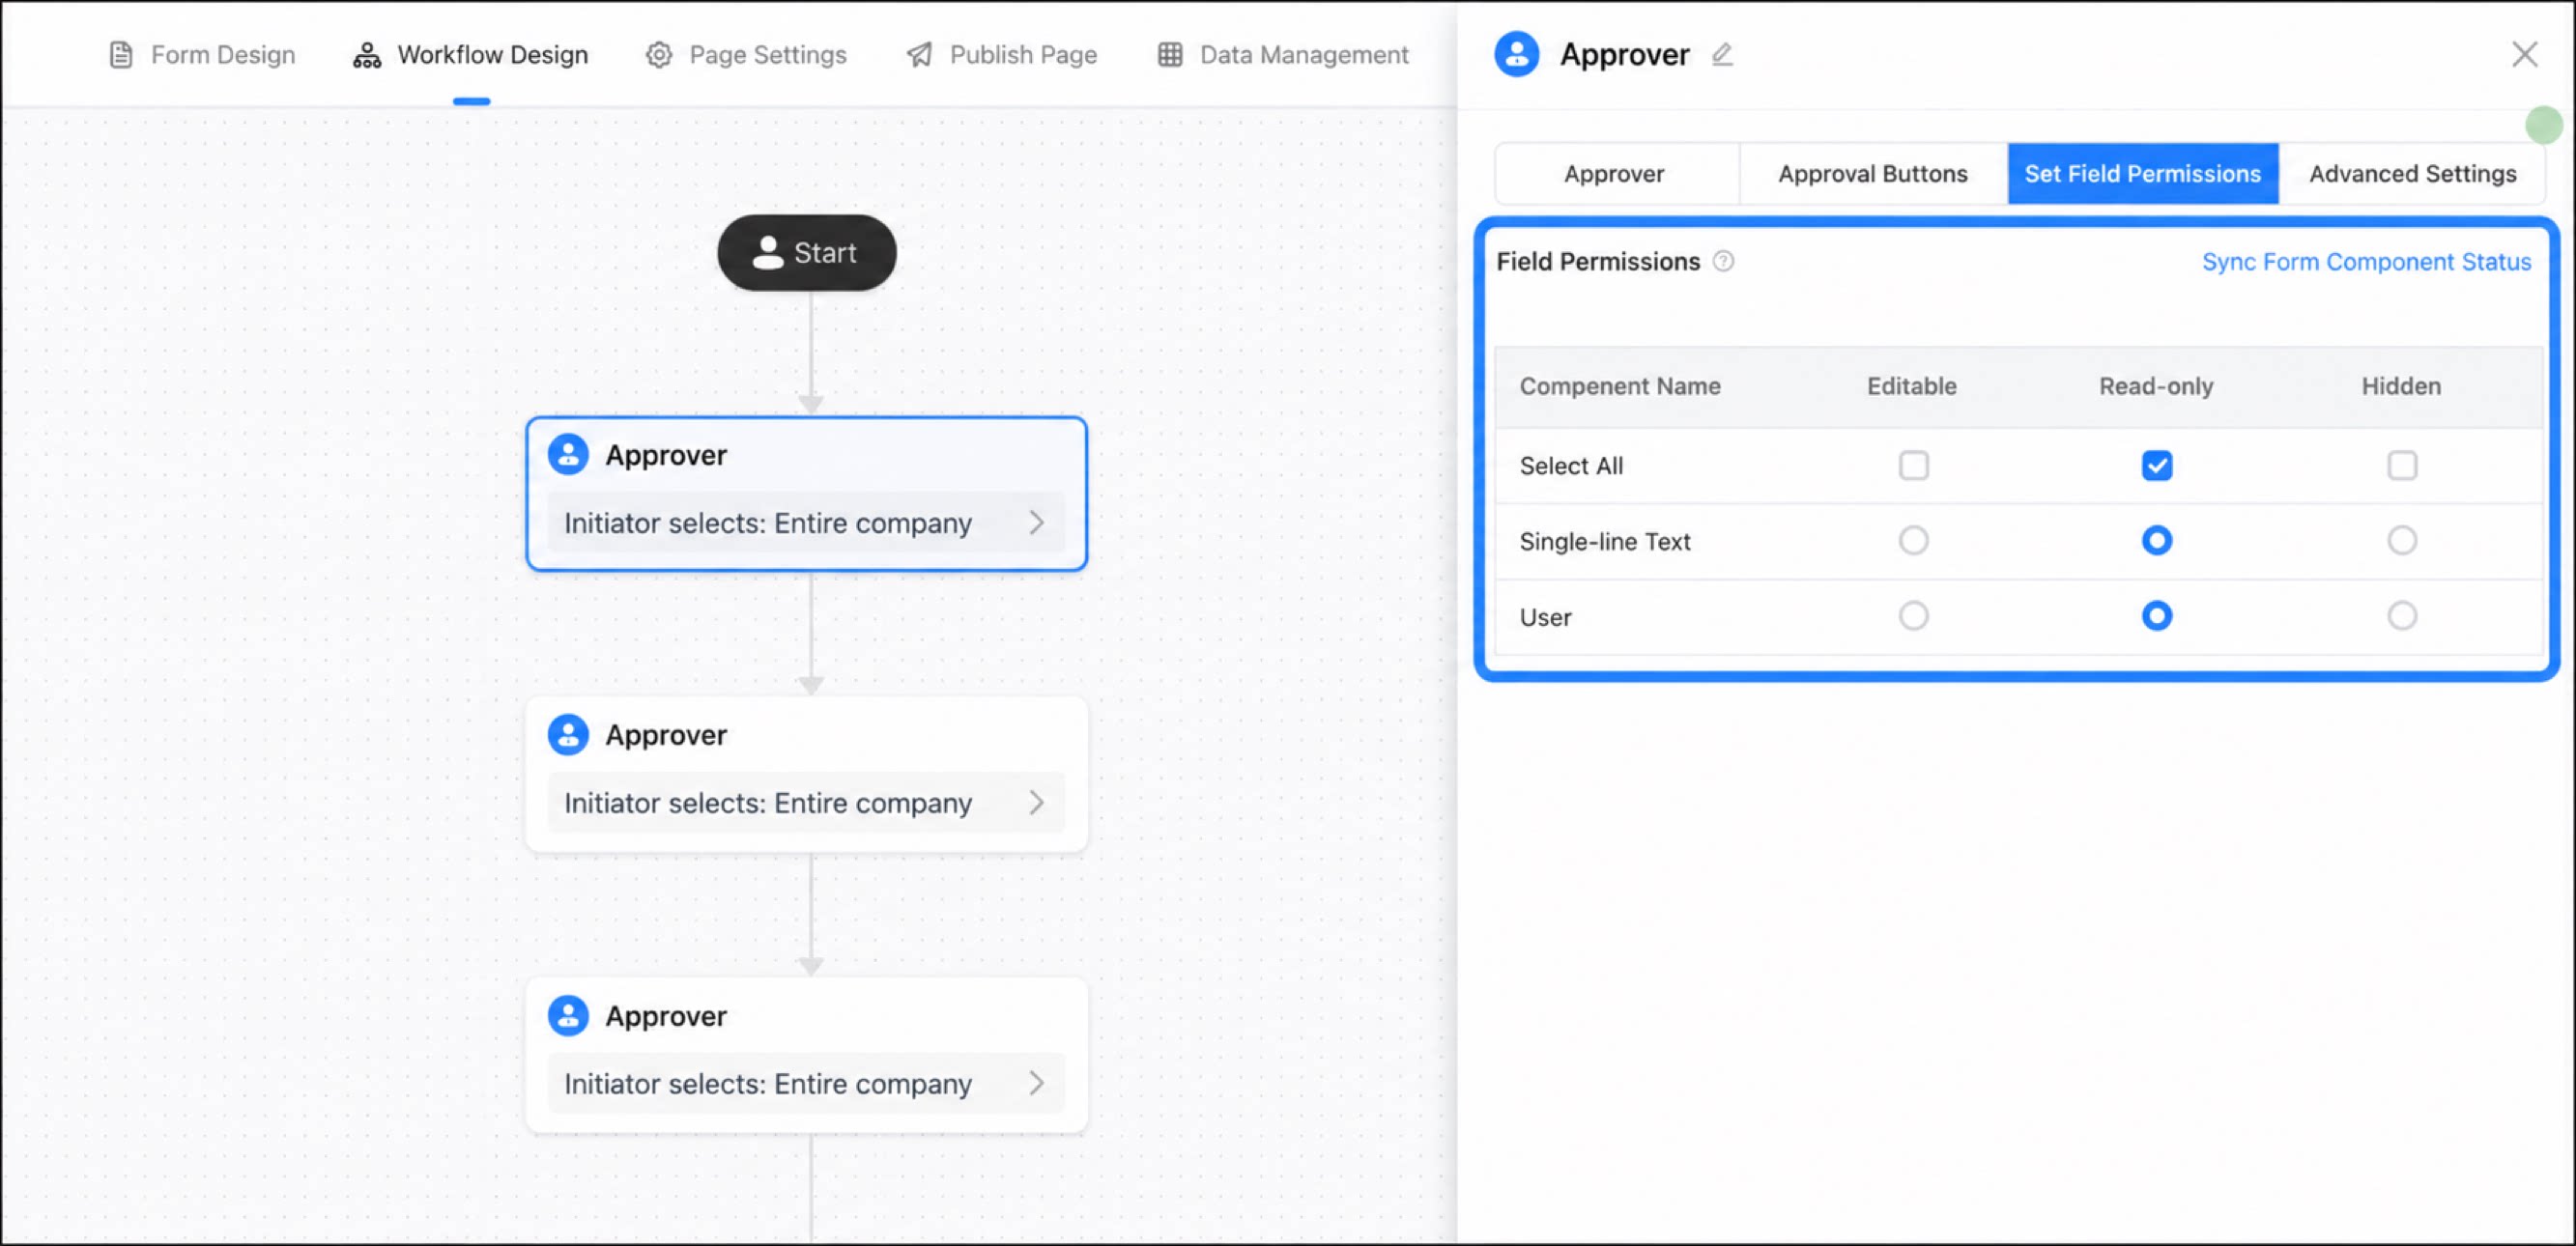
Jump Configuration
In beta
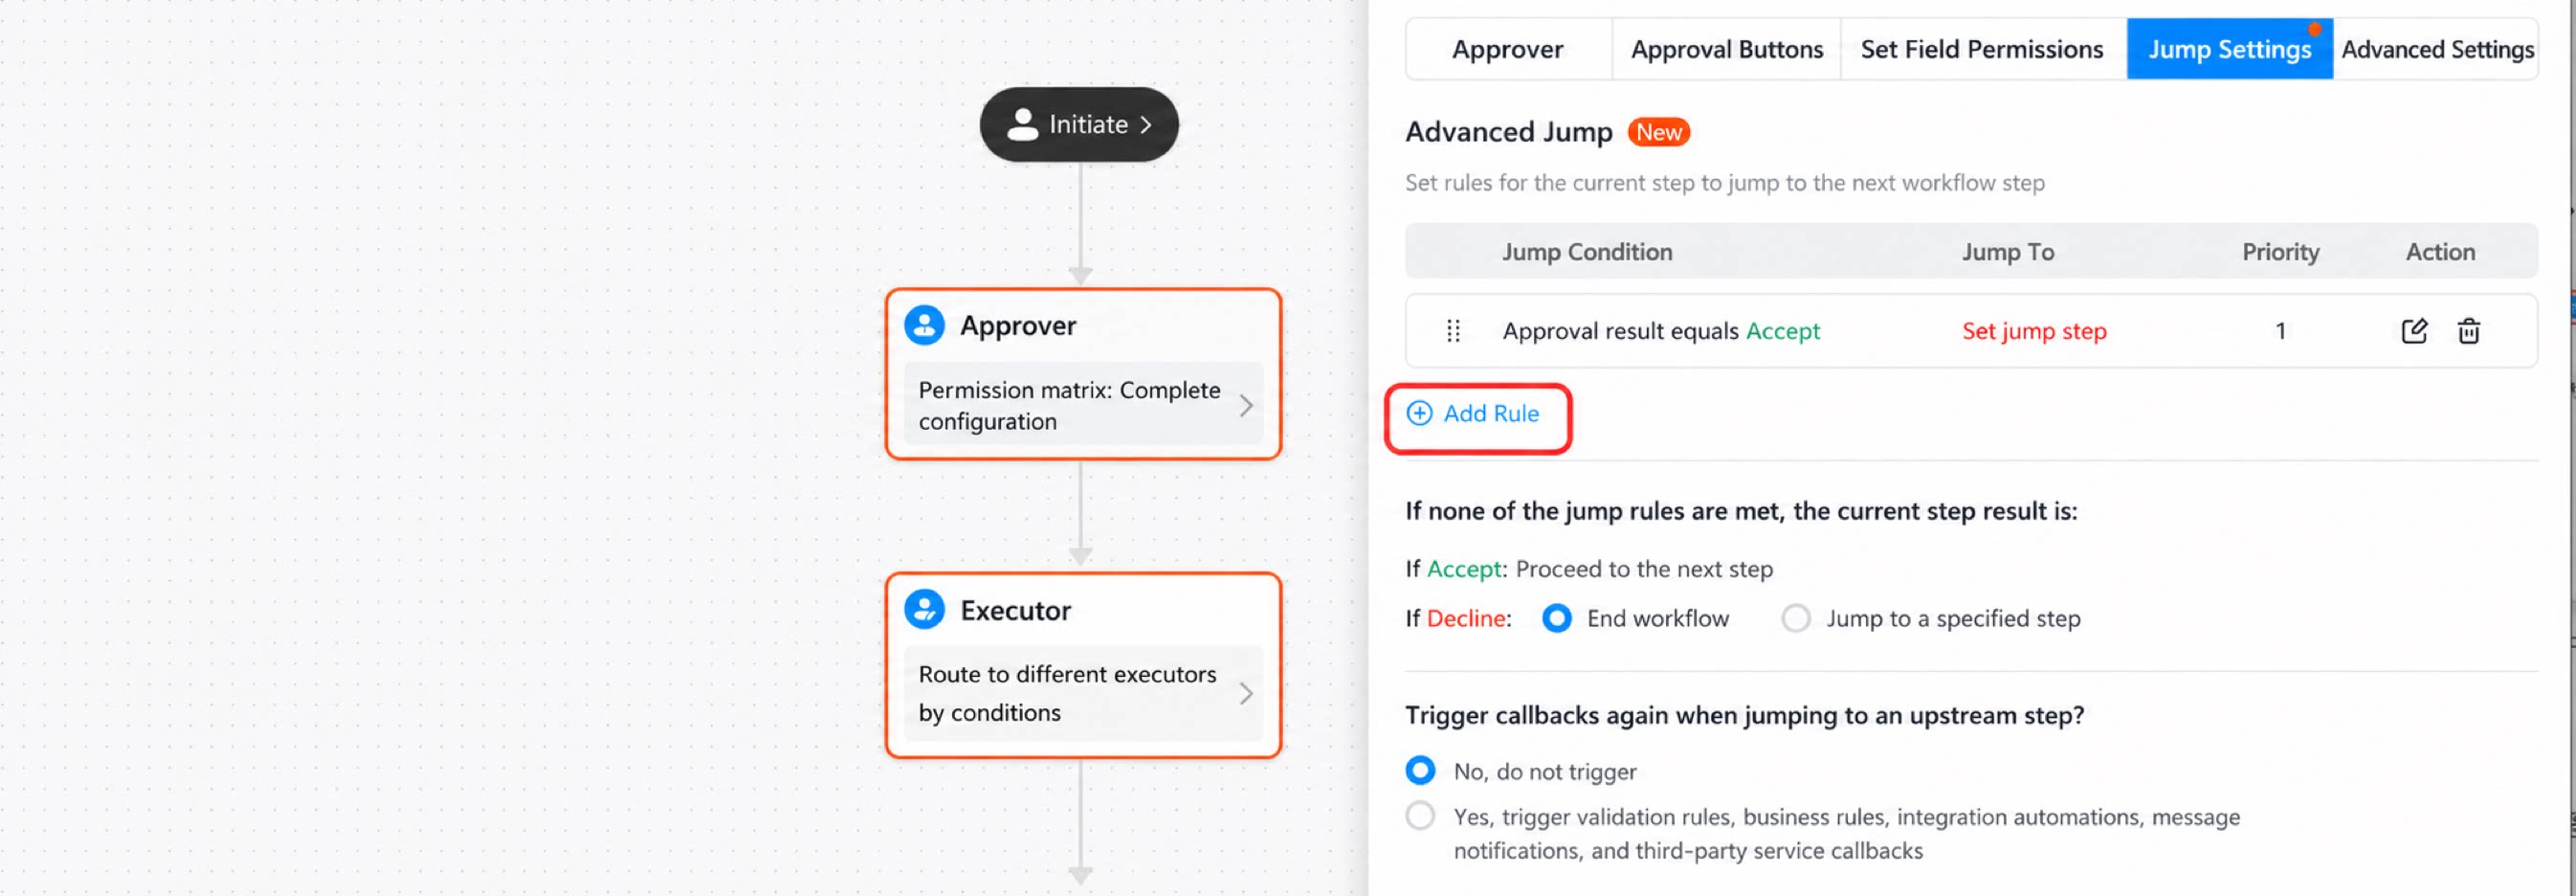
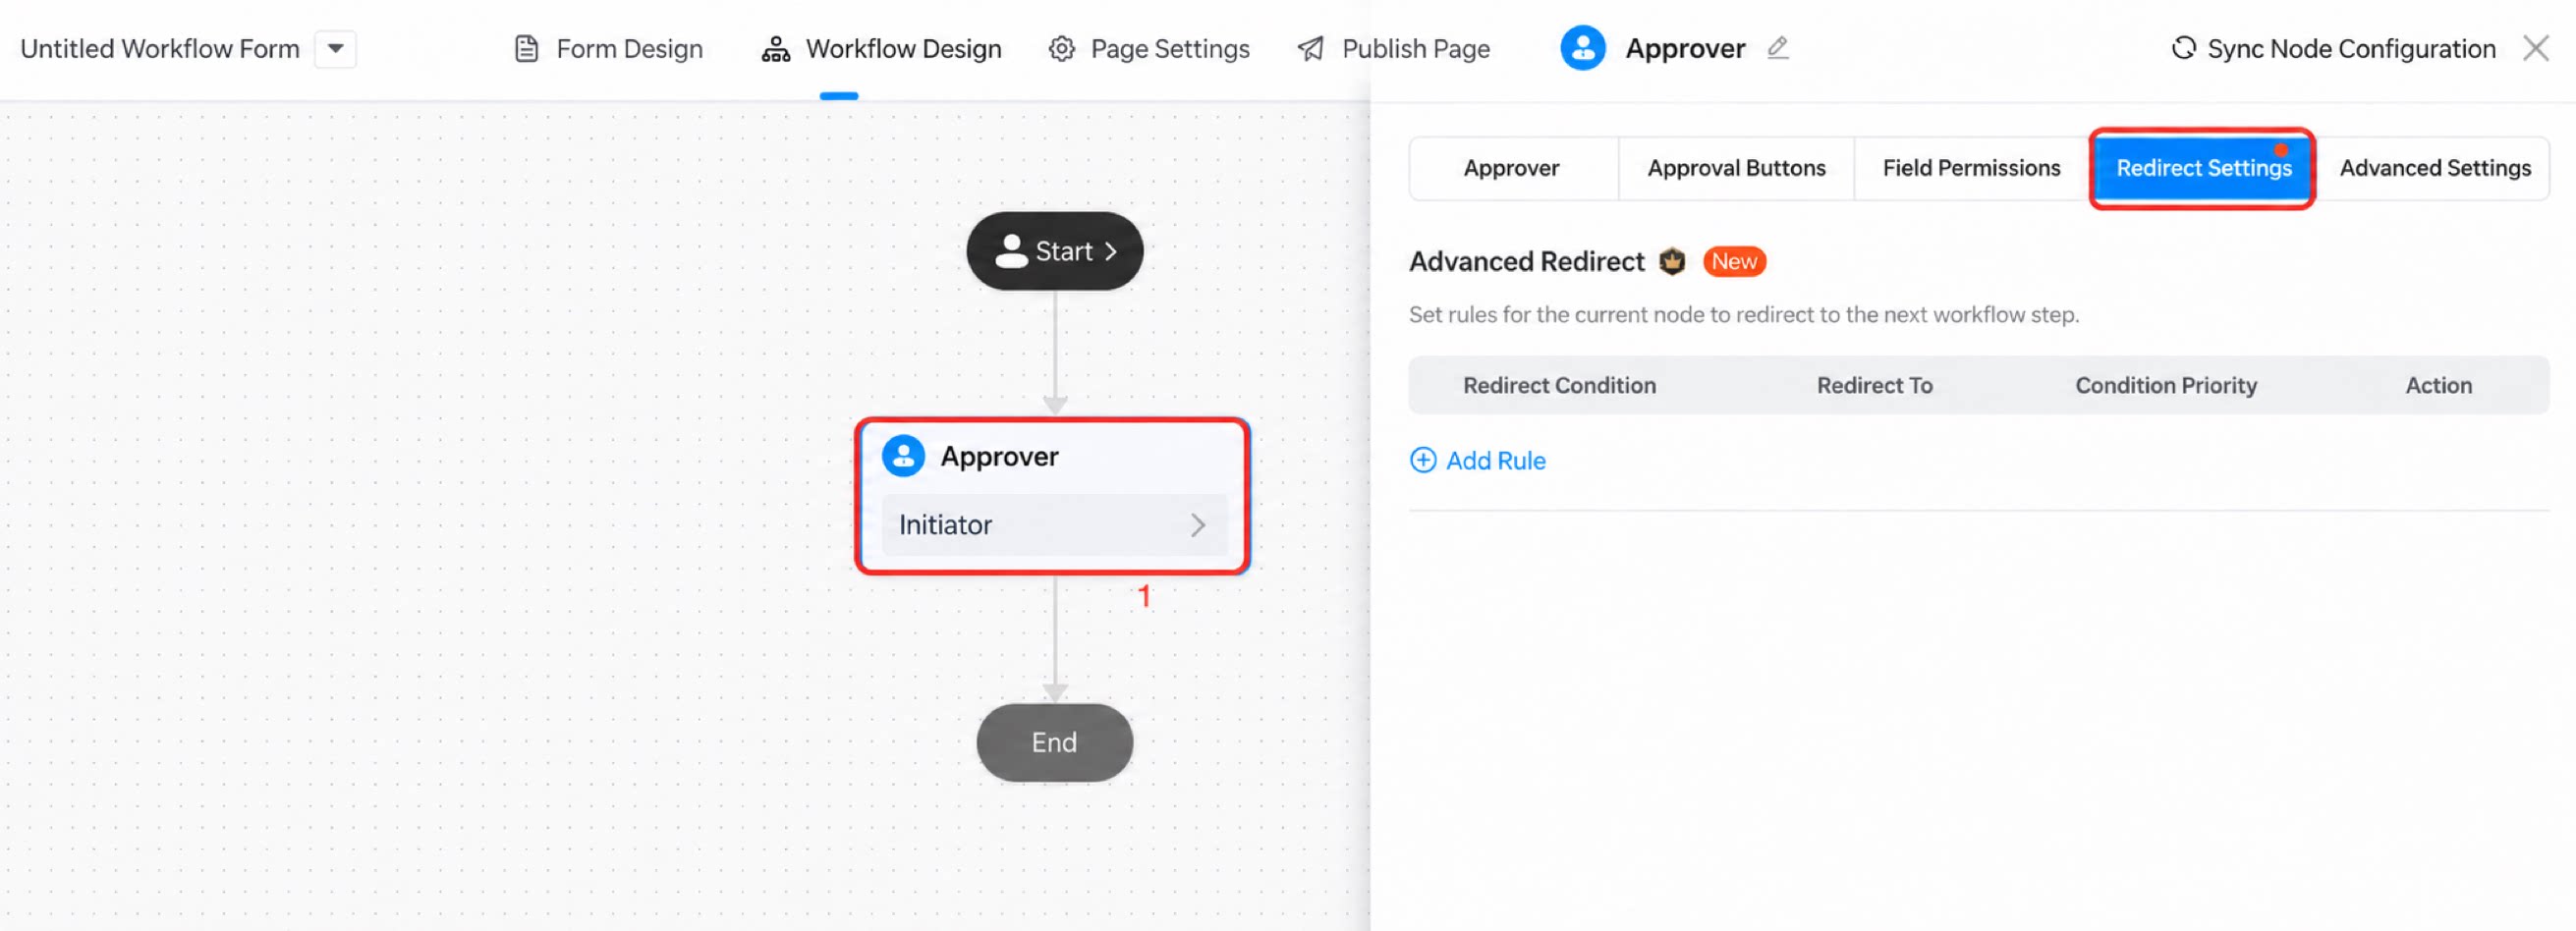
1
Jump settings: In workflow design, open the approver settings and select 'Jump settings'
2
Add rule: Under Advanced jump, click Add rule to add a jump condition row. Click a rule to edit it
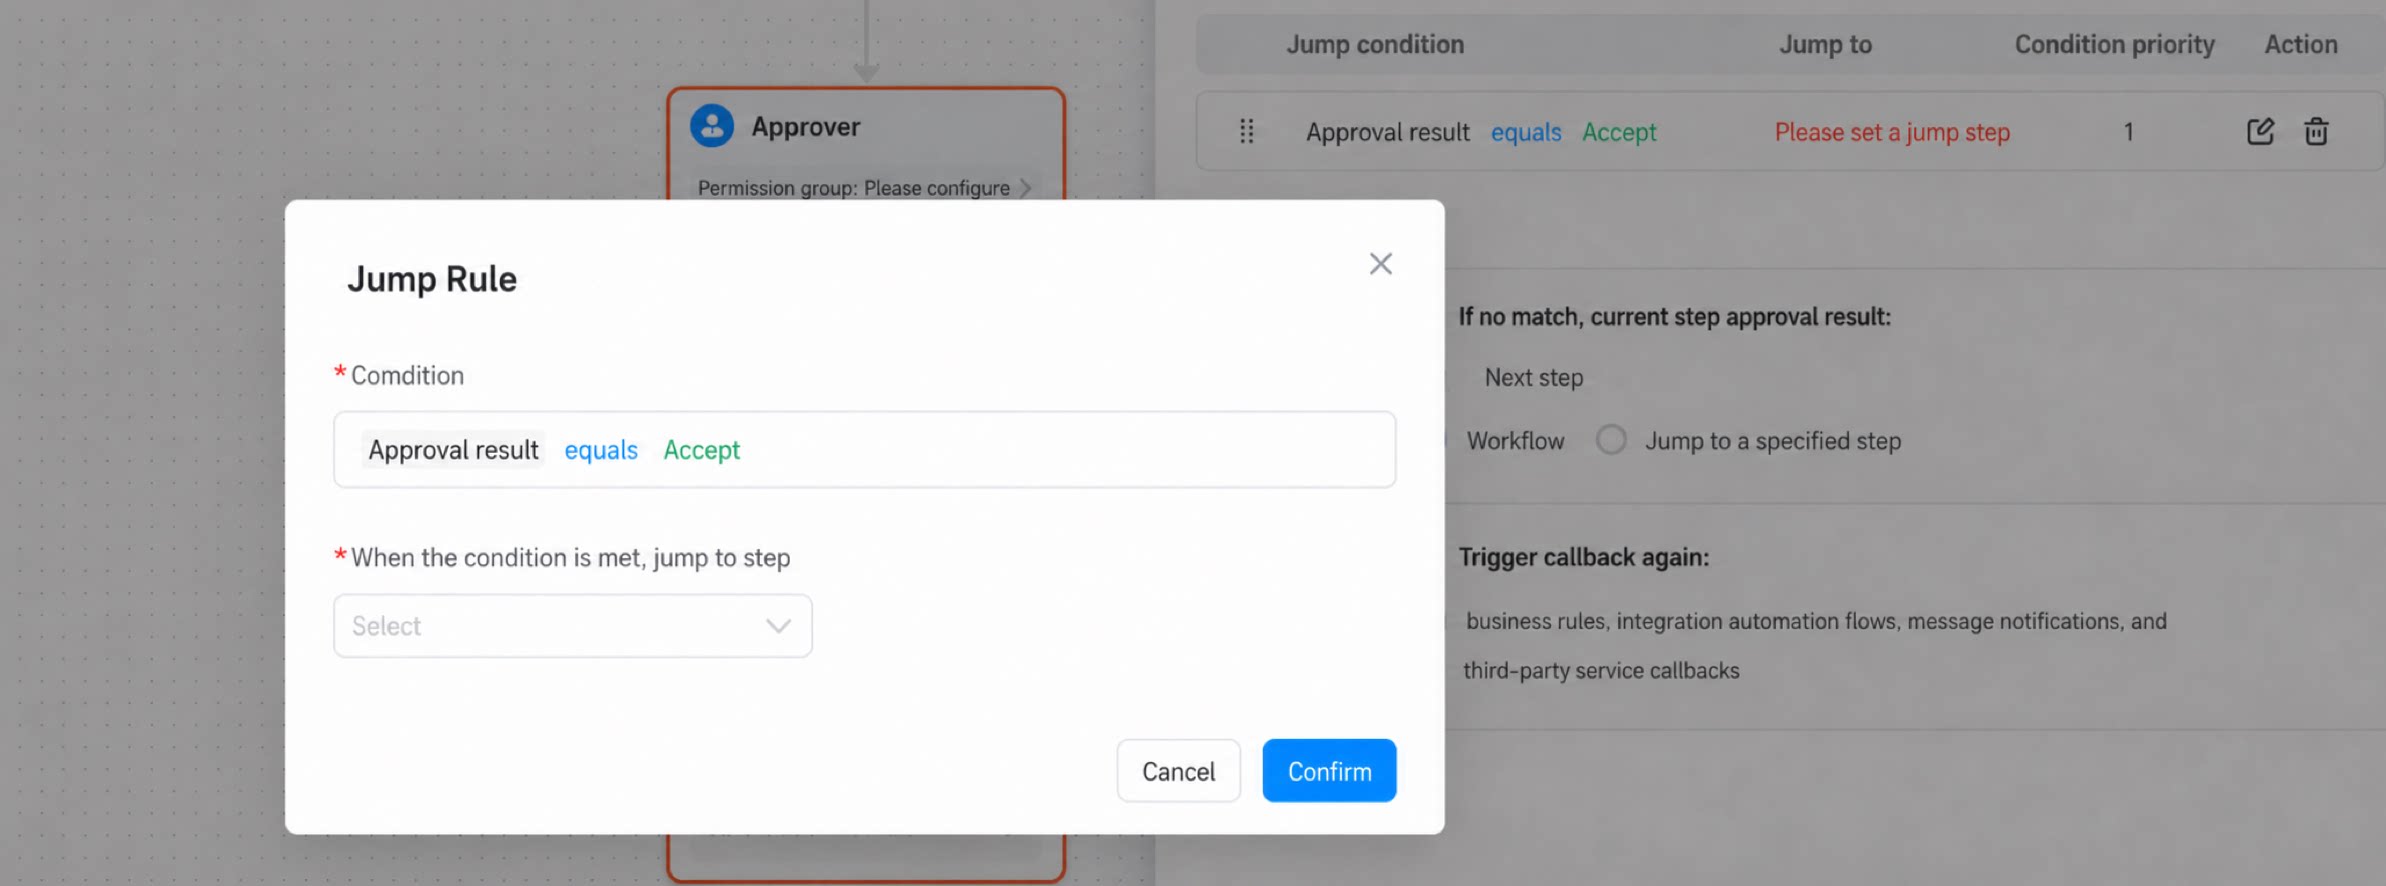
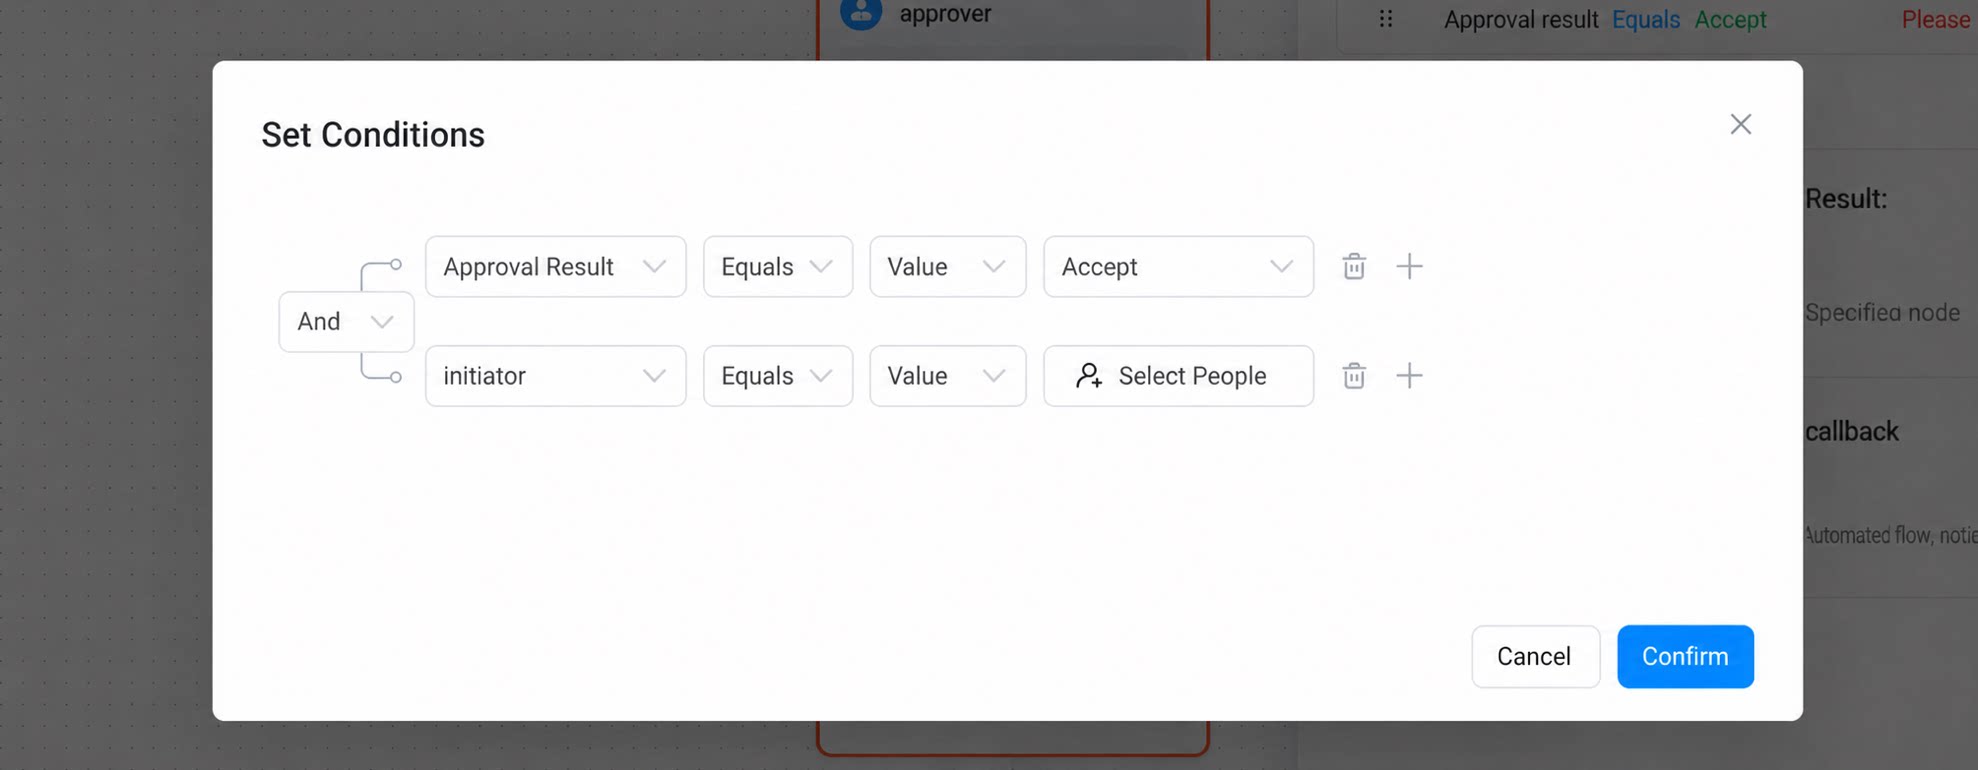
- Other configurations
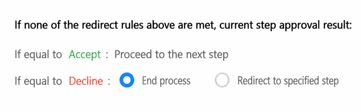
- When no jump condition is met, choose Terminate workflow or route to a specified step.
- When jumping to an upstream step to rerun the workflow, you can configure whether to trigger formulas, associated business rules, and third-party service callbacks again.
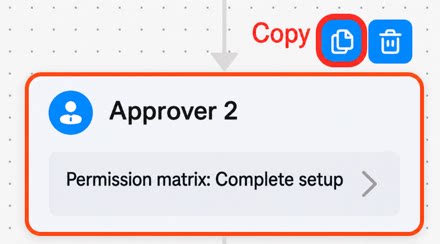
- Save and publish: After all conditions are configured, save the settings and publish the new approval process.
Premium Settings
The premium settings of a workflow step let you configure automatic approval rules for the current step, the handling logic when the current step has no approver, and timeout handling rules.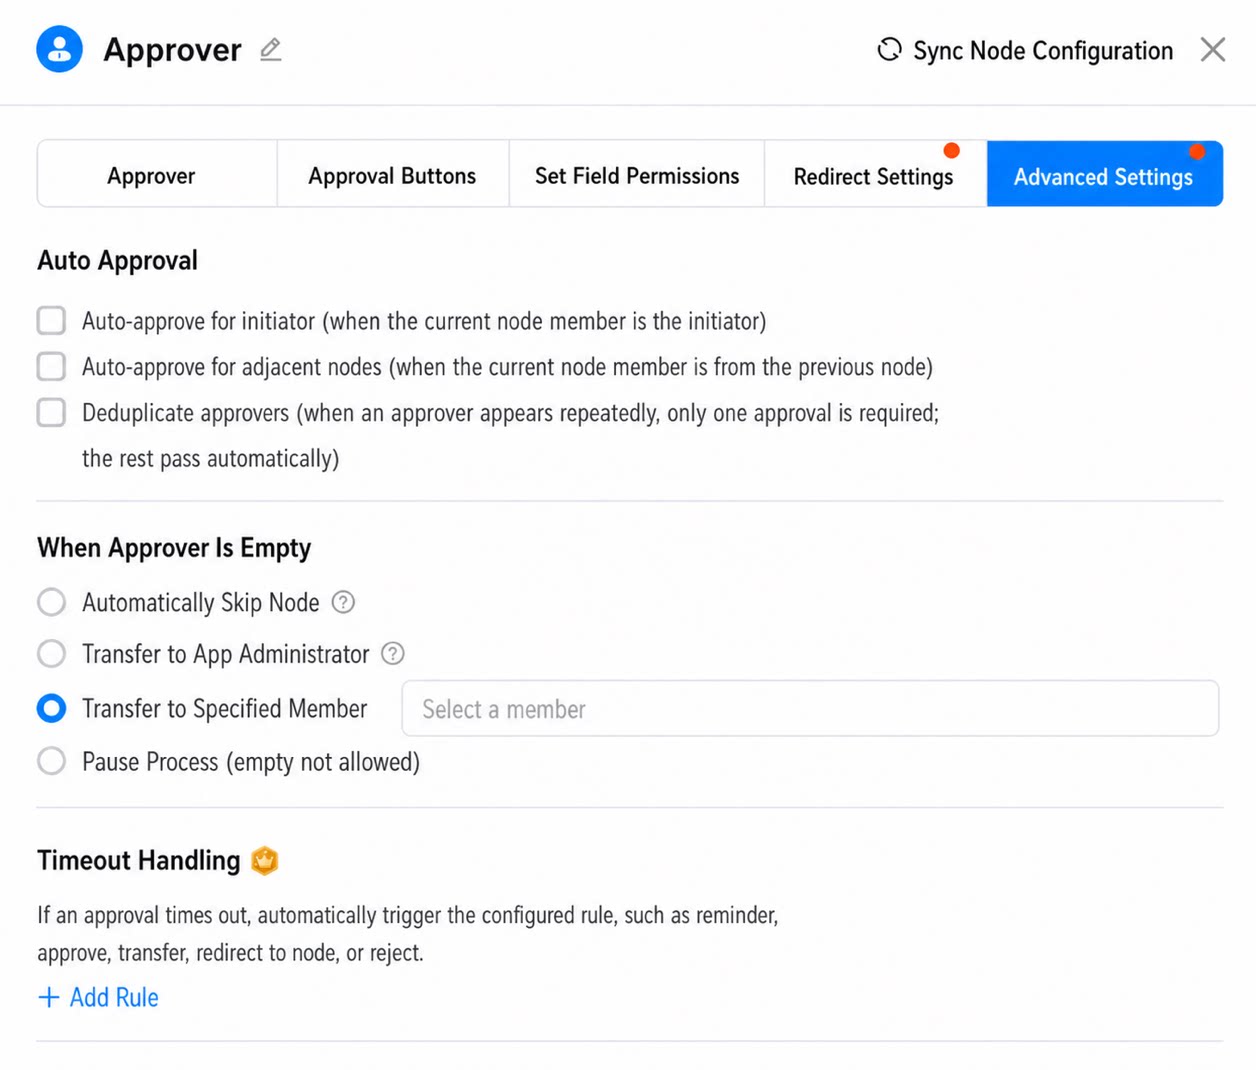
Automatic Approval
Automatic approval rules simplify the approval process and address workflow inefficiency caused by duplicate approvals.For details, see Automatic approval rules.
No Approver Found
Handling options when the approver is empty:- Automatically skip the step:
- Transfer to the app Super Admin: If there are multiple app Super Admins, transfer randomly to one of them.
- Transfer to specified users: Add one or more users. When multiple users are specified, the approval mode follows the “Multi-approver mode” of the current step.
- Pause the workflow: Empty is not allowed. The workflow state is shown as “workflow error” and requires the app Admin or platform Admin to intervene.
Empty means no one is found — for example, a role has no members, or a user’s manager is not set. Users who have left the company are not counted as empty.
Timeout Handling
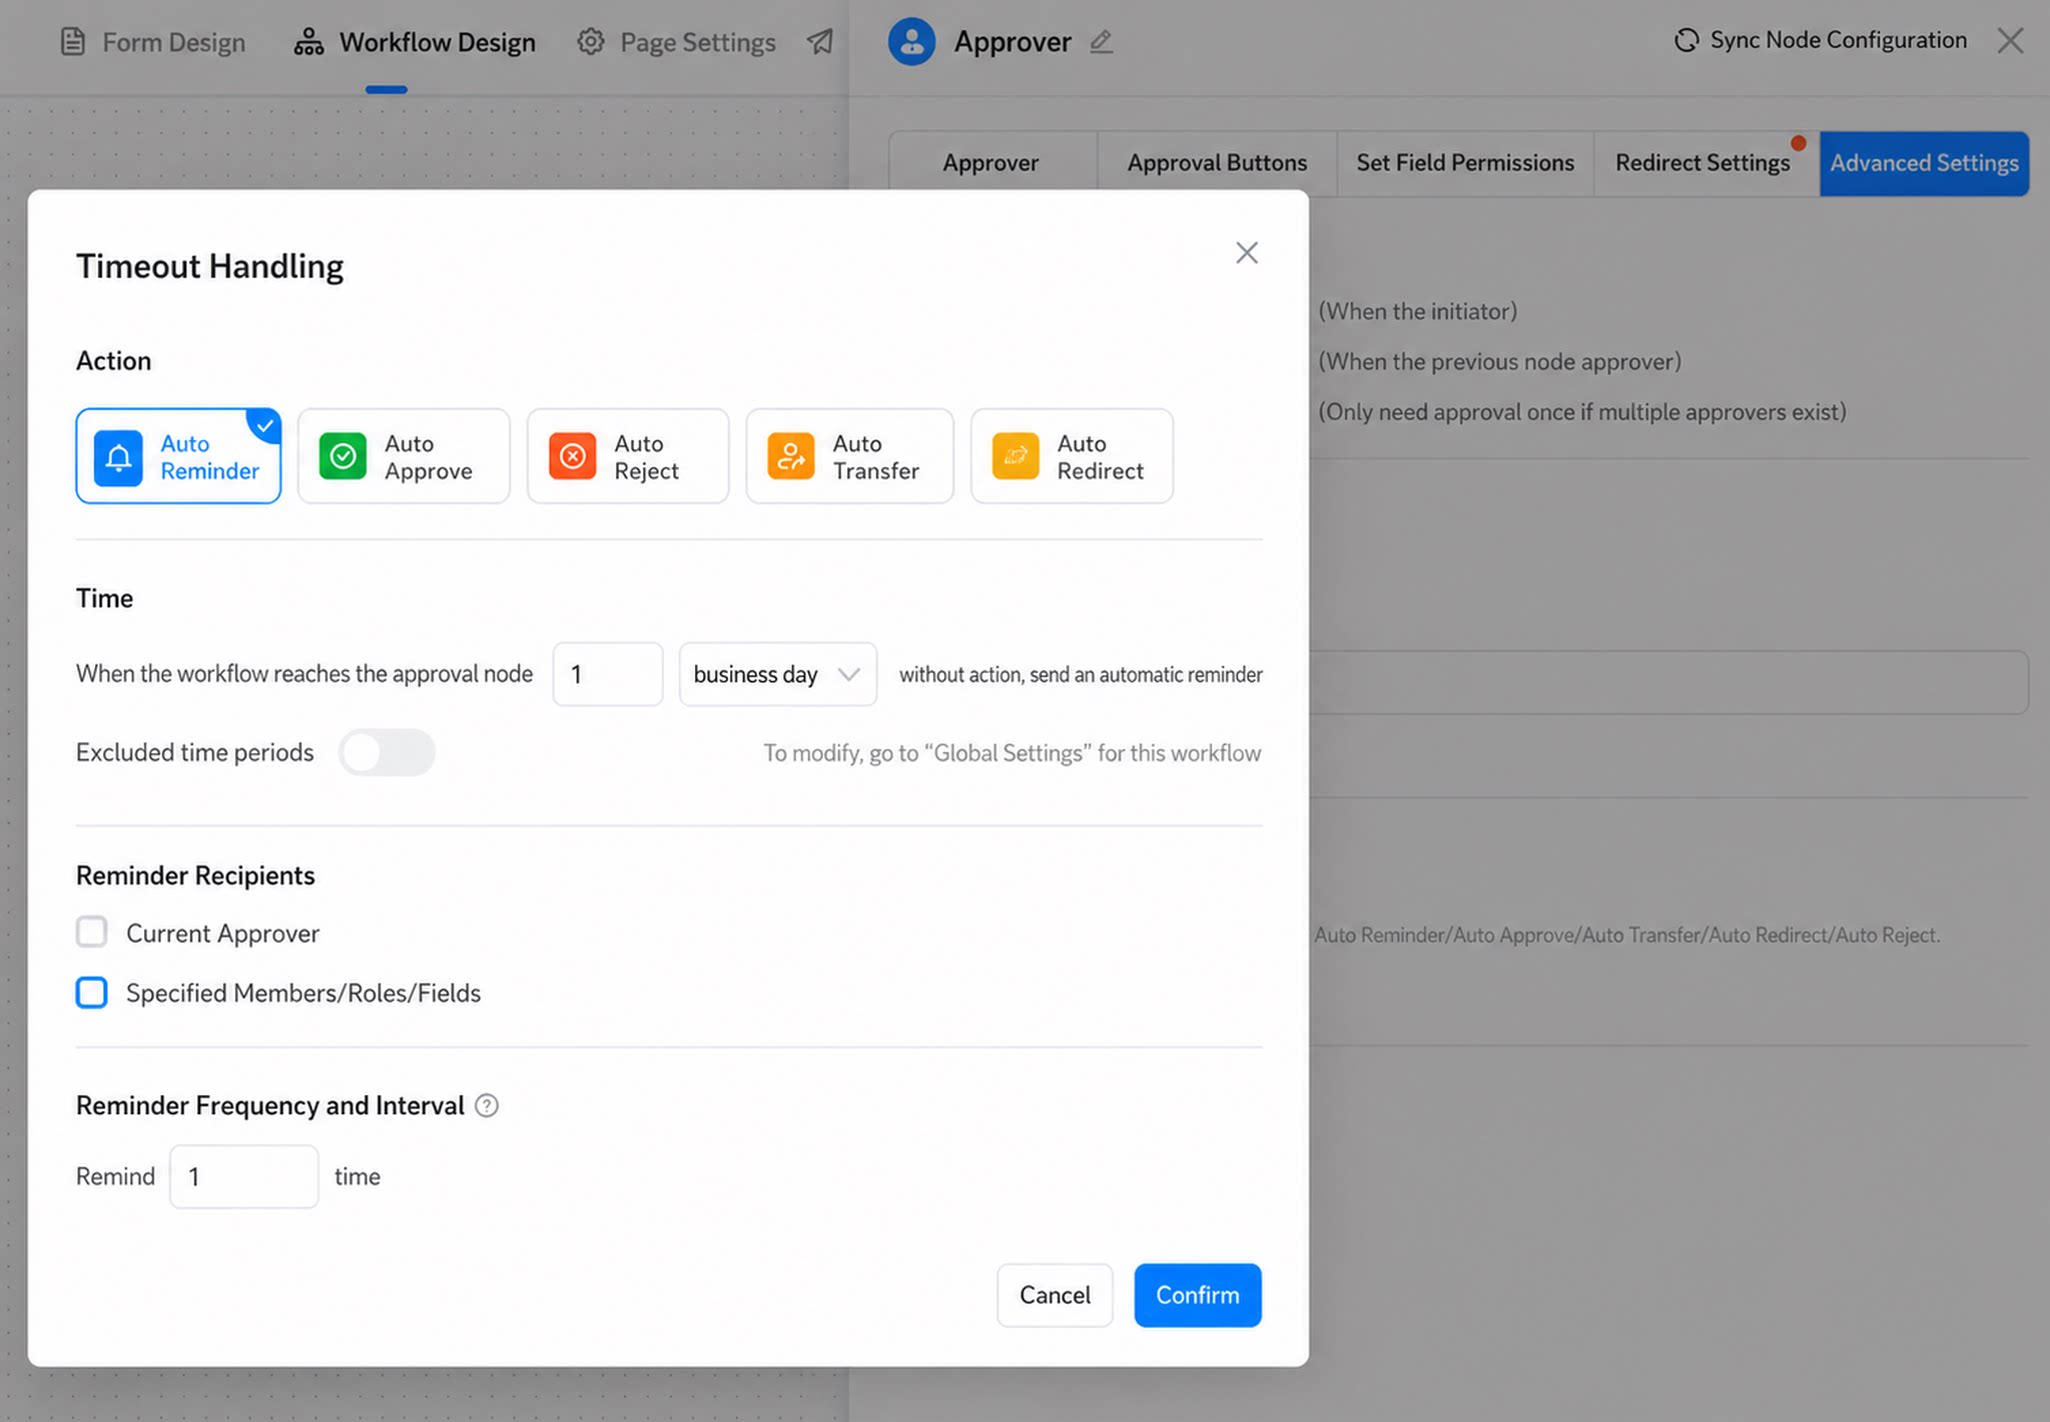
Timeout handling rules are among the premium settings in workflow design. When the workflow reaches an approver or executor step, if the approver or executor does not respond within the set time, the system automatically performs the action selected in the rule.For details, see Timeout handling rules.
Notes
- The workflow initiator and initiating department are locked when the workflow starts. During the workflow, they do not change, regardless of department changes or delegation to another person for resubmission.
- If a user leaves the company during the workflow and an approval step depends on that user’s Organization Structure information (for example, manager approval), the workflow may fail to find an approver, causing an error or halting approval. In this case, contact the Admin to resolve the issue by using a step jump.